Pages

Tuesday, July 22, 2014

Discovering Gelatin and Colors!

What's in my discovery table?  It's gelatin!

My two children are now in their twenties, but as I was looking through some old papers and photos the other day, I came across a recipe for a fun sensory table activity using gelatin and colored water.  They both enjoyed playing with gelatin and other sensory materials at the co-op preschool they attended.

I thought this would be a fun activity to try with your own young children on a warm summer day!  Or some of you might be brave enough to do this with your class during the school year!

Here's how to do it!


1.  Sprinkle gelatin into cold water and dissolve gelatin by heating up the water over the stove.  You will need 3/4 cup of water for each gelatin envelope.

Here is what I did to determine how much total water I needed.  I chose some plastic food containers that I was going to use as molds.  Then I measured out how much water they would hold.  The total volume was 12 cups.  I divided 12 cups by .75 to determine how many gelatin envelopes I needed - 16.  So I used 12 cups of water and 16 envelopes of gelatin.


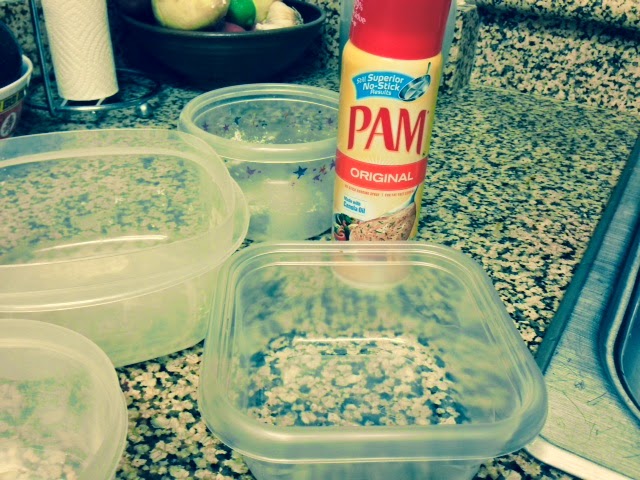
2.  Spray containers with cooking spray and pour the warm gelatin liquid into the containers.  I used a ladle.  Refrigerate until it is set.  Overnight works great.

3.  When it is ready, unmold the gelatin by running a butter knife around the edge of each container.  Place in a sensory table or on a tray. 


4.  Make cups of colored water by squeezing food coloring into plastic cups and adding water.  NOTE:  For more intense colors that show up better inside of the gelatin, don't add as much water.  I used primary colors so that other colors could be mixed in the gelatin.


5.  Take it all outside and have fun using the eyedroppers to squeeze the colored liquid into the gelatin.  


After using the colored water, you can turn it into a true sensory experience by exploring with your hands!!!


Enjoy your summer!


Saturday, July 19, 2014

Setting the Tone in the First 10 Minutes of the First Day of School


The first day of school is full of so many things: anticipation, wide-eyes, school supplies, new faces, maybe a few butterflies. And I'm notorious for trying to get too much done on the first day...
I want to get to know my students.
I want them to get to know each other.
I want them to unpack their school supplies.
I want to show them around the classroom.
I want to teach them procedures, and more procedures, and more procedures.

And not only do I never fit it all in the first day, the tone I set while trying, the "mood" of the room, if you will, is not exactly what I intend it to be.

On a normal, middle-of-the-year day, I want my students to come into my room in the morning knowing it is a calm place, a cooperative place, a place where we work hard, try new things, and have fun.

A couple of years ago, I asked myself a question I thought was a bit unrealistic: Could I get that "middle-of-the-year" tone started within the first ten minutes of the first day of school? Could I find a way to slow down, shove my laundry list of activities and procedures aside temporarily, and show my students right from the get-go what this classroom should look like, sound like, and feel like?

I took on the challenge.

The thing is, it's not something that I get a lot of chances to try. I mean, really, I get ONE first-day-of-school per year. So, after a couple of good cracks at it, here is what I've found to work for setting the tone in the first ten minutes of the first day of school.

Prior to students arriving, I put a freshly sharpened pencil at each student's desk, as well as a "first task" that students will work on when they come in. For me, I try to make this first task something that can be done independently and is extremely low-stress. I don't want to have to explain anything to students about how to do their first task. A "Finish the Picture" like the one below works pretty well for third grade.


(Grab six free "finish the picture" tasks on THIS updated version of my post!)

As each student enters my classroom on the first day, I greet them warmly, and then I ask them to keep their backpack zipped up and to hang it on their cubby hook, then to find their seat and get started.


Giving students a simple but engaging task to do at their seat frees me up to start making personal connections with individual students right away. 

Still within the first ten minutes, my whole class is sitting at their seats, drawing away, with a nice little hum going.  Meanwhile, I'm walking around, kneeling down at different table groups, asking students how they are feeling about third grade, who they already know, what they are going to eat for lunch, and so on.

After a few minutes, I ask the class to share their drawings with their table groups and to talk about how their drawings are alike and different. In the grand scheme of things, I really don't care one bit about these drawings. It's the talking I want. Communicating with each other right off the bat about their ideas.

Pretty soon, I'll start introducing some of our classroom procedures, and eventually I'll let them go unpack their shiny new backpacks. But in the first ten minutes, I've shown my students that we get started working right away, that I care about them and what they have to say, and that sharing our ideas and thinking with each other happens a lot.

http://thethinkerbuilder.blogspot.com/

Come visit me at my blog, The Thinker Builder!

UPDATE: Wow, I never would have guessed this little idea would have picked up so much steam. Thanks! You can pick up SIX "Finish the Picture" pages, totally free, by clicking HERE.

Thursday, July 17, 2014

Quick & Easy Alphabet Activities


 Hello Everyone! This is Crystal McGinnis from Mrs. McGinnis' Little Zizzers. The beginning of school is quickly approaching, and as a kindergarten teacher I know that my main focus those first few months of school will be the alphabet. For the first few months of school, I keep an alphabet center in my classroom. This is a literacy center where students will focus on letter identification, letter matching, letter sounds, and letter formation. I am always looking for extra (QUICK AND EASY) activities to include in my alphabet center. Here are a few that I will begin the school year with.


Alphabet Sea Shell Hunt 


Write the alphabet on sea shells. Bury the shells in sand. (If you do not have a sand table, you can put your sand in a plastic tub.) Students find the shells and place them in order from A to Z.


Alphabet Cup Stacking


Write the alphabet on small plastic bathroom cups with a sharpie marker. Students practice matching the upper and lowercase letters. When they are done, they can participate in cup stacking.


Alphabet White Board Practice


Students pick a letter of the alphabet out of a tub. Students write the upper or lowercase match on a white board. They erase, and then do it again. I always provide a copy of the alphabet in my alphabet center for students to use as a guide.


 (You can see these by clicking the link)


Provide these alphabet strips that have been laminated and attached by a book ring. Students practice their alphabet formation one letter at a time using an expo marker. I provide baby wipes for my students to use as a quick eraser.


Calculator Tape Alphabet Writing


Provide rolled calculator tape and let students rainbow write their alphabet. Students write each letter in a different color. My students love writing on the calculator tape.


Alphabet Practice With Dot Markers
 
 
Students draw a capital letter out of a basket. Students use a dot marker to dot the lowercase match. 


(You can see these by clicking the link)


Send home this necklace with the new letter that was introduced that day. This will let parents and others know what your letter of the week is.


(You can see these by clicking the link)
 
 
Create alphabet headbands. Students cut out pictures that begin with the letter that you are focused on and glue them to the headband. Students then color and wear these home.


(You can see these by clicking the link)
 
 
 Students identify pictures that begin with a certain letter and glue them to the letter. Simple as that!


(You can see these by clicking the link)


Introduce the students to the letter of the week using these alphabet activity books. Students complete multiple activities including highlighting, drawing, rainbow writing, and identifying beginning sounds with pictures etc.


I hope that you can use some of these alphabet activities in your classroom. You can get most of these alphabet activities and more in my TPT store by clicking here.


Wednesday, July 16, 2014

Fluency

Hello! It's Allison Stuckey from Stuckey in Second! I hope everyone is enjoying their summer! I've been trying to relax as much as possible and I've been doing a ton of reading (for pleasure!)


I thought I'd share one of my posts from last summer with you about fluency. I don't know about you, but I have to get my mind back into the beginning of the year and how to start all over on fluency practice.


Fluency....isn't that what we are all working on? Fluency not only helps with test scores (grrrr), but it actually helps students comprehend what they are reading. I always spend a good portion of the beginning of the year working on fluency with every student in my 2nd grade classroom.  Some students move out of needing so much fluency work, but others need it the whole year.

I discovered Fry's Fluency Phrases probably 5 years ago. At first I was excited to just copy them onto different colors of card stock, cut them out into strips, and put them on rings for students to practice. I can actually remember cutting them and assembling them in the car on a road trip we took to Nashville. I actually still use those rings of phrases. They hang up on hooks in my classroom (if I were in my room yet, I'd add a picture, maybe later!)

I have the 100 phrases of each level separated into 5 or 6 rings, so I will pass those out to my small group (whichever level they are on with the phrases.) We usually warm up our small group with those. They will read through one set, then throw them in the middle of the table and when someone else is done, they take theirs, etc. Even though the kids still like doing those phrases on the rings, I felt like I need some more creative ways to practice the same phrases. Of course, the kids don't seem to notice they are practicing the SAME thing, they think it's a new and fun game!

I gave away my Super Reader Fluency Phrases last week for $1 when I was celebrating 1,000 Facebook fans! I've heard a lot of feedback and it seems that people are finding them fun and useful. My Super Reader Fluency Phrase packet is actually a set of 6 games. (One game per level of phrases) My intentions when making the games are to have students start at Level One, and move through the levels as they master each one. In my own classroom, I start teaching students how to play the games (very easy, a variety of Oops!) in my small groups, then when they are good at it, the games can be moved into centers/workstations where they can play with a small group to gain fluency. I have to admit, what I like the most about this set of phrases is the clipart. I just find these "super hero" alligators to be hilarious! :)


Now, since my students love these so much, I decided to make another set for a few reasons. First reason, they like to have a variety throughout the year and not get bored of course! Second, because I don't want this laminated set to get completely ruined after an entire class is using them for an entire year (and the kids last year have already worn them in pretty well!) So, I've created another set, same exact phrases and everything, just different clipart! They have a Back to School theme! So, I know that I have the option of using the "Super Reader" set or the "Back to School" set at any point in the school year! :) The kids think they are "new" games, but I know that they are all just fun ways to practice fluency without them thinking that they are really being pressured to read phrases over and over again. They truly love it. Here is the Back to School Fluency Phrase set that I completed yesterday. Click on any of the pictures to check them out in my store!!


Sunday, July 13, 2014

Community Building Puzzle

It's almost that time of year again!  Can you believe it?  We're nearing the back-to-school frenzy.  I know some of you just ended your year and some of you have already started back again.  Those of you in the southern hemisphere, of course, didn't get a summer break over the past few weeks.  Crazy how quickly time flies!

I'm Jessica from What I Have Learned, and I'm here to share with you a fun back-to-school activity you can do with your students at any time of the year.  I've used it in grades 1-5 and it's a fun community building activity.


It's a puzzle!  What kid doesn't love a puzzle, especially one they create!  I started out doing puzzles that were shaped like a rectangle, but saw some shaped like kids in a teacher-friend's classroom.  I knew we had to change up our boring rectangle puzzles!


I outline all my shapes in black marker, although that step is optional.  I tell students that they have to write their name large on it (names are blocked out on the image above) and color it however they want to.  Then, I divide students up into the boy / girl teams to assemble the puzzle.  Students work together to put all the pieces in place.
Several years ago, I made it into a product.  Each year, I just print a new set of puzzle pieces on card stock, outline each piece in black (again, optional) and have students color them during the first week of school.  I do cut out the puzzle pieces, just to make sure everything fits!  I also label the back of each piece with with "B" or "G" to signify if it's the boy or girl puzzle.  The labels are on the front side of each print out before cutting.  I don't have my girls do the girl puzzle or the boys do the boy puzzle.  They're all mixed up.

Actually putting together each puzzle is a little bit of a challenge for some kiddos.  My second graders do fairly well.  Last year one group got it and one group didn't.

Sometimes I leave the puzzle unassembled and have it as an early finishers activity.  Other times, I put it up for display.  Each year is a little different!

So, how are your puzzle building skills?

Saturday, July 12, 2014

Calling All Campers!

     
     Oh, a-camping we will go, a-camping we will go!  A great way to end or begin the school year or for some Summer School fun is to use a Camping theme.  The weather is usually warm (in some places it’s always warm!) and the children are anxious to learn about the outdoors.  We enjoy using a camping theme in our Kindergarten summer school program.  

     We start each morning with a rousing, “Gooooood morning, campers!” followed by a bugle call of revelry!  (Click here to link to a Youtube video with a wide variety of bugle calls.)  Next we make a circle and salute the flag which starts our day.  Then we sing a few camping songs like “She’ll be Coming ‘Round the Mountain”, “The Bear Went Over the Mountain” and “Do Your Ears Hang Low?”.  (We’ve also created several Camping-themed songs so we use those too!) 

      On the first day the children get a name tag that will be used again and again to graph questions on the pocket chart each day.  A morning activity includes asking a question such as, “Have you ever gone fishing?”   A short discussion takes place about the topic.  Then each student answers the question by placing their name tag under the words "Yes" or "No" in a pocket chart.  We talk about the results first and then color a graphing recording sheet to show the class responses.  
Graphing JK Curriculum Connection
Click here to download the Free graphing packet   
        Food fest!  Everyone loves making s’mores when camping!  Since we really can’t have a campfire in the classroom, the next best thing is to use a microwave.  Each child builds their s’more by placing the bottom graham cracker square on a paper plate, topping it with half a bar of Hershey’s chocolate, and 1 marshmallow.  Place it in the microwave for 18 seconds, then take it out and smash the top graham cracker.  Squish!  Be prepared for sticky fingers, sticky tables, and SMILING faces covered in chocolate and marshmallow. 
   
     Now that we've made and enjoyed our s'mores, it's easy to tie that into our camping Math center activities.  This 10-frame math center gives them plenty of practice in adding 2 numbers together.  They just never want to stop pulling those S'more 10- frames out to build problems and find their sums! 
Math Center Camping JK Curriculum Connection
Click here to download the FREE S'more Math Packet
     Another favorite camping activity is “gazing at the stars".  We turn off all the lights and the campers lie down of the floor facing the ceiling under some sight words stars.  (Before doing this activity you have to attach Sight Word stars to the ceiling!) Using a flashlight, they take turns shining the light on the stars and reading the words.  (If you have access to a lot of flashlights, more students can hold them but they should take turns shining them on the words!)  They may write them using clipboards with the recording sheets attached.  Another variation is to have students take turns reading a word and using it in a complete sentence.  At another time, the teacher can shine the light on a word and all students can say the starry sight word together. 
Camping Starry Night Sight Word Activity  JK Curriculum Connection.com
Click here to download the FREE file

      When all their daily work is completed, the campers play board games and puzzles or read books, etc.  We set up a tent in the corner and 5-6 children take in their selected activity.   Since we have a pretty large number of students attending, we rotate the children using the tent so they each get a turn about every 3-4 days.  

Tent Camping in Kindergarten JK Curriculum Connection

     We always plan a field trip to the local library and since it is within walking distance of our school, we tell the kids we’re taking a hike….another camping reference!   In fact, any time we leave the classroom in a line, we “take a hike”.... and sing a song, of course.  Here is an example of a simple hiking song:


March and Sing
(Author unknown, Tune: “The Mulberry Bush”)                                         

Along the trail we march and sing,
March and sing, march and sing.
Along the trail we march and sing,
Along the trail today.


We hope you try a Camping Theme sometime in your classroom.  

It's LOTS of fun!
Click HERE to link to our TPT "store".


Thursday, July 10, 2014

Wish you thought of it earlier?? Let's plan ahead!

My vacation just started less than 2 weeks ago, but I am already thinking about the new year! Don’t get me wrong, I’m looking forward to my months of relaxation, but I LOVE setting up my classroom and organizing myself for the new school year (ask me again in October, though :D).
Every year, I think of things halfway through the year that I wish I had thought of at the beginning of the year. I figured, what better time than NOW to share ideas of things we want to implement this upcoming year?


So, if you share my enthusiasm for setting up and organizing,  here are a few ideas that may help. Please share your own ideas; I love learning new ways to make my life easier or my classroom more fun :).
  • CLASSROOM THEME: Pick a theme and brainstorm a list of associated words/ideas. Then, think about your classroom- reading and writing areas, word wall, poetry board, etc. See if you come up with ideas of how to incorporate the theme into these areas. For example, for a space theme, you may name your tables after planets, and your reading corner could be called ‘The Reading Orbit,’ your word wall may be labeled ‘Word Galaxy’ and your trash can could be the black hole :). I made a few themed lists and decided to go with a farm theme because I had so many cute ideas for it! Here is a look at one of my reading nooks- the garden of reading. 
    I wish I had more pics, but this year I will be amping everything up with stuff from my farm décor pack! If you also want a farm theme, click the picture to take a look- it’s on sale! The EDITABLE  newsletter template is a freebie.
  • ANCHOR CHARTS- I love doing anchor charts with my kids, but they are time-consuming to ‘cute-sify’ every year! So I laminate charts with just a border, heading and anything else that doesn't need kid input, then I fill in the meat of the charts with the students using dry-erase markers- cute and kids still have ownership because of their participation!
  • STUDENT PORTFOLIO/MEMORY BOOK FILES- I also keep a file folder for each student, with manila folders inside to separate items, such as writing samples, assessments, etc. This year, I also used this to store unit of study projects that they completed over the course of a few weeks, such as our farm study. Having it kept neatly in one place made it easy to send home undamaged at the end of our study. I also had my students work on a year-long memory book and placed their sheets in a folder till the end of the year, when I stapled them together to make their scrapbooks. Here is the scrapbook and a freebie !

  • TWO FILING SYSTEMS- My monthly files hold holiday and seasonal items, but I keep all my skills stuff organized by just that- skills. I used to organize by unit in program, or month we covered the skill, but we change programs so often, I was constantly rearranging my files.  

  • GARAGE SALE! Keep a bin for things you don’t need/want anymore. As the year goes on, instead of getting rid of them, place them here. At the end of the year, have kids earn bucks named after you (my kids earn Tejeda bucks) for excellent work and on the last week of school, host a garage sale in which you place all your junk. . . ahem, merchandise . . .on the tables for kids to ‘shop’ for! Very motivating when kids have checked out early for vacation!

  • PLANNING AHEAD- I always have an ‘extra time’ basket and a  ‘sub tub’ ready for whenever we may have 5-10 extra minutes, or even a whole extra period, if an event is canceled, delayed, etc. It helps to have plans for a sub in case you have to be out unexpectedly. I keep books and response sheets in there from my monthly read-alouds packs, since many can be used year-round and cover essential skills, as well as Scholastic News magazines with directions for pulling them up on the interactive board. Plus, I always keep things like a bus list, first aid kit, class emergency contact and allergy list, schedule, etc).
  • Make yourself a beginning of year to-do checklist that you can save for next year!

  • Use a notebook or Excel spreadsheet to track your expenses for tax purposes.
  • BIRTHDAY CORNER-This idea I got from a colleague, who got it from her 5th grade teacher! To make every birthday special, I wrap the cover and bottom of a big storage box (we reuse the same box for each birthday) that kids get to open on their birthday. I fill it with 3-4 little treats (bouncy ball, bubbles, pencil, etc) as well as A LOT of tissue paper (we actually make a joke out of it, since the box is so big and is mostly filled with paper :D).  I also decorate the back of my door with a big happy birthday sign and take the kids' pictures holding the box while wearing a birthday crown in front of it. 
  • CENTERS- Creating centers can be very time-consuming, so I love centers that are ‘reusable.’ For example, I keep a stack of reading response sheets that can be used with different books and kids just write in the title of their book at the listening center. Check out this awesome freebie from Krista Wallden. . . 
and I use my baseball spelling center, which can be reused weekly because kids just write in the new words. I also like sticker story center, because students can always use different stickers to make up new stories. You'll find a link to a free one in the writing centers freebie below, from my previous post, in case you didn't get it before: 


OK, so hope some of these helped you start thinking of things you want to implement this year! If you have any other ideas of things to start the year with, please share! Enjoy the rest of your vacation!