Pages

Showing posts with label Classroom Decor. Show all posts
Sunday, July 31, 2016

What does your classroom say about you


What does your classroom decor say about you?

Anyone that is reading this blogpost is most likely either a teacher or a parent. And most teachers are also parents. Everyone can relate to taking your student to their classroom for the first time. One of the first things you notice as a parent may not be the teacher, or the other students but the classroom itself.
What kind of teacher did my son/daughter get this year? Classroom decorations go a long way to communicating what kind of a teacher you are to both parents and youngsters.
So when you are putting together your classroom what do you want it to say about you? Are you strict? Fun? Energetic? Boring? Are you "with it?" (Do you know what is popular with the kids in the age range that you are teaching?
Decorating your classroom with popular cultural icons can go a long way to making that important first connection with your students. And having inspirational posters and posters on behavior is one of the key components to any good classroom management plan.
So all that said, are you ready?
My sister Hilary Lewis has been teaching 2nd grade for over 20 years and this year ended up moving to a new 3rd grade classroom with only 2 years left before retirement! We joined forces over the summer and came up with some classroom decorations in the style of Minecraft called Blockcraft Kids and Pets that will make your life easier and hopefully help make those all important connections.
With the TPT site wide sale and 28% Off everything in our stores, now is the time to find some amazing new decorations and organizational stuff for your classroom! Take a look at some of the decor we created:

Name tags that are individualized can make kids feel special!


Labels that go with the theme brightens up your spaces and helps with organization, not just for you but for anyone that is volunteering or helping in your classroom:


And for classroom management it helps to post character traits that are important to classroom culture, for all kids and parents to see:


And inspiring those kids to learn is one of the biggest parts of our job as teachers. Here are some inspirational posters from my store too!


Good luck with setting up your own amazing classroom this year! Make it the best year ever! So that your students look like this:


And not like this:

I found some great tips from Edudemic on how to help young children feel safe and more at ease in the classroom:
  • Have group activities where children are encouraged to decorate the classroom together.
  • Install a large bulletin board and encourage student to bring photos of their family and pets to pin on the board. Children should also be encouraged to bring and share items of cultural significance to display.
  • Hold an orientation early in the school year where parents are invited to the classroom. This will serve as an icebreaker and help the classroom environment feel less strange."
Have the best year ever!

Sabrina


Friday, November 20, 2015

Surviving in a classroom without wall space

Hi, it's Aimee from Pencils, Books, and Dirty Looks.  Today I'm going to tell you a little bit about my classroom.  It's a very large classroom, and I love all the floor space that it has to offer.  Students are able to spread out around the room and work without being on top of each other.  However, there is a downside.  My classroom has very little wall space.  I have a wall of cabinets and counters, a wall of windows, a wall of book shelves, and a wall with a dry-erase board and Smart Board.  Luckily, I still live by the old preschool adage, "You get what you get, and you don't throw a fit."  Here's how I deal with my lack of wall space...

1.  I hang anchor charts on anything magnetic.  The back of my room houses the entire leveled library for the 3rd/4th grade high ability program where I teach.  Lucky for me the book shelves are metal.  I use clip magnets to hang charts to them.  The charts are easily removed when I need to grab a set of books.
2.  I have a decent sized dry-erase board in my room that is magnetic as well.  Since I have a Smart Board, I don't need it for direct instruction.  I placed my focus wall on the dry-erase board.  I type up each week's focus and hang them with clip magnets.


3.  I use every flat surface in my room even if it happens to be a door.  My WOW wall hangs on a closet door in my classroom.  Students each have a clothespin with their number on it.  They hang quality work that they want to share with others on the door.
4.  Behind my easel is the only wall space that is available in my classroom.  Seriously it is maybe 5 feet wide and is sandwiched between my Smart Board and classroom library.  I use the space to hang more anchor charts.  Some are hung with 3M hooks while others are hung on a ribbon strung between two hooks.  I rotate my charts depending on the skill/strategy that we are working on during the week.  Since this space is front and center in my classroom, it is visible from our group space as well as student desks.  (Click HERE if you are interested in seeing all the anchor chart tool kits that I have to offer in my TpT store)


5/6.  I have an very long row of very small cabinets in my classroom.  The cabinets are above the sink and computer area.  I utilize this space for our Indiana History Timeline.  This works perfectly since the cabinet doors aren't large enough to display much else.


The south wall of my classroom is nothing but windows (Don't get too jealous!  My view is of the Village Pantry gas station that is right across the street).  I make the most of this space by displaying multiple things on the windows.
7.  This window displays our math fact masters.  Instead of making a chart to display student progress, I printed and laminated a photo of each student.  When a student masters an operation, their picture goes up on the window.  This is a real motivator!!
8.  This is one of my data windows.  I have a bar graph made out of painters tape for our math topic tests.  This too is a motivator for students.  They can't wait to see if the class average is higher than the previous test!  Above the bar graph is a decorated book spine for our read alouds this school year.  We are hoping to make our way across all of the window shades.
9.  This window displays students' birthdays.  I was lucky enough to find this for free on a blog that I follow, but unfortunately I accidentally deleted the file and can't find the source.  If anyone knows, please leave a comment, so I can give credit to the creator!!
10.  Every teachers needs a spot in their classroom to display all the cute notes and artwork from students.  I hang student creations on the pull down shade behind my desk.  Some are taped to the shade, while others are clipped to the shade and pull chain that opens and closes the shade.

There you have it!  This is how I survive in a classroom with very little wall space.  If you have any ideas that I haven't mentioned or more suggestions for making the most of little to no wall space, please leave a comment below!


Thursday, August 6, 2015

Classroom Facelift

Hello!! Happy August! I am Melanie from Momma with a Teaching Mission . I am a first grade teacher and am going into my 3rd year. I inherited my classroom and MANY items in my classroom. And I will be FOREVER grateful to the lady who retired who I replaced. She left me books, baskets, games, centers, and so much more. But after two years of kind of still living in 'her' classroom, I decided to make some changes. Maybe you are in the same boat as me, so keep reading!!

So many things I left the same for the past two years. Which nothing is wrong with, however, I felt like it was time to put my spin on the classroom! So I decided to write a little post about dressing up or giving your windows a face lift with some do-it-yourself made curtains.

So when I got hired 2 years ago, the bulletin boards were empty. So that was one area I went ahead and purchased the chevron fabric to cover the bulletin boards. HOWEVER, I know nothing about buying fabric, so when I purchased the fabric for the bulletin boards, I had lots left over! These leftovers have been sitting folded in one of my cabinet drawers to almost 2 years!


So the other day, during my lunch (I'm teaching summer school), I thought, 'hey, let's dress up these windows!' So I got all my fabric out and laid it on the desks! And my it was ALOT!!
This is a before picture of the window. As you can see, I put little stuffed animals on the shower curtain rod. But it's just awful!!
So I cut the curtain strips about 3 inches wide, and they were about 2 feet long. I had 4 different kinds of fabric (which I had originally bought at Hobby Lobby). I had Black and white chevron, white and pink chevron, blue and white chevron, and then another pattern with the black/white/blue/pink with flowers. My room colors are blue, pink, white, and black.
So this is the after! I am nowhere near a seamstress and I definitely won't quit my day job! But I think it looks cute and it adds a pop of color to the windows! I just tied the fabric strips to the shower curtain rod and I was done in about 45 or so minutes!!

Make sure to check out my blog, as I will be doing a classroom revel at the beginning of September!! Momma with a Teaching Mission Wishing everyone a fantastic new school year!

Melanie


Sunday, February 15, 2015

Burlap Bulletin Board

Hi there! I'm Neetu from Cinnamon's Synonyms and I'm thrilled to be blogging here on Who's Who today!

I have a quick little bulletin board tip to share with you ...I actually came up with this idea by pure accident!

Here's the real deal: I am not very talented when it comes to making bulletin boards look pretty. No, really... I'm not. I usually find myself fiddling with my boards ... constantly... because I NEVER like the way things look.  After several failed attempts I usually give up and accept my attempt for what it is (because honestly, who has time to fuss with this stuff when there are a gazillion things to do in the day).

This year, I haven't fiddled with my board once!! Annnd, get this... I continue to receive compliment after compliment on the way my board looks! Yay! Success!!!

In the fall, when school started, I knew I wanted to have a neutral background for my boards. Something that would make my students' work just pop!  In our district there's a huge push for Reggio inspired kindergarten classrooms and although I don't teach kindergarten I thought it'd be neat to incorporate some natural elements into my decor just as the Reggio philosophy encourages.

My initial plan was to just cover the board in this burlap material I had laying around in my basement. I figured it'd be perfect because if the material is resilient enough for the outdoors, then it'd be an ideal way to create a fade-proof bulletin board for my classroom.

I had one problem though...

It barely stretched out far enough to reach the top and bottom of my boards.  Take a look:


I had two rolls of burlap, so I used one to cover the center part of the board.

Then, I cut the other roll in half (lengthwise) and used it to cover the empty parts at the top and bottom. I knew it would look sloppy if I just stapled it flat -  it would look like three ugly rows of burlap. This is when the idea to do this poofy thing came about:


Burlap is extremely easy to work with... the little poofs just happen naturally. Yep, burlap is your reliable friend and will do all the pretty poofing for you. NO SKILL REQUIRED... but people will think you're super talented with mega decorating abilities.  I love Burlap! It took the stress right out of beautifying my board.

It's February now, and I haven't had a single urge to change it out! 6 months is the longest relationship I've had with a bulletin board. I think this is true love!


Neetu teaches in a school with a high population of English Language Learners. With the awareness that students learn best through visuals (whether they speak English as a second language or not), she strives to create engaging language based resources filled with illustrations that kids just dig! There is a strong language component in everything she creates (including her math and science activities). This is inspired by her need to help her students build the vocabulary required to succeed in every subject, not just language arts.  Visit her store by clicking HERE.


Thursday, October 9, 2014

Table-Group Signs with Style and Charm

I'm going to go out on a bit of a limb here and say my classroom is stylish. 

To me, at least.

I've got a rustic, antique kind of vibe going on... lots of table lamps, barn-wood bulletin board paper, old kitchen hutch re-purposed into a bookcase, curtains. Yes, I have curtains. They add to my color scheme, which I try to maintain throughout my room: blues, purples, and orange. So, 'ya know: stylish. My style, anyway.

Our table-group signs, those things hanging from the ceiling above each group of students, serve multiple purposes, one being that they are a perfect way to unify the colors I've chosen with which to decorate the room.

Those signs' functional purpose, just like with anything you would hang above your table-groups, is to give an identity to each group of students. I can simply call the "orange group" and ahhhhh, everyone knows who I'm talking to.

My favorite purpose for the way I do our group signs is to build teamwork and cooperation skills within each group, because the members of each group are planning and decorating their own signs.

What follows are step by step instructions for our stylish table-group signs.

The supplies I use are large sheets of construction paper (12"x18") carefully chosen to fit my color scheme, fishing line or string, and ceiling hooks.


I give each table group a different piece of construction paper to design. Each group can design their paper however they choose. I don't give many restrictions, except to allow only crayons and colored pencils. I've found that markers can be so bold that they can distract from the true color of the sign. I like to have students all incorporate their names onto the signs too. Even when we switch seats, the signs will stay in place, and these original groups will always remain the "founding members."


After each group has decorated their sign, I collect them and laminate them. Then I roll each one and tape it into a tube, with the design on the outside.


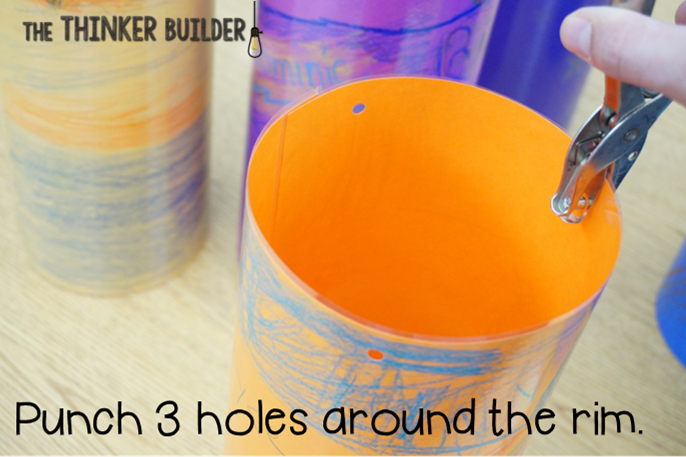
Then I punch three evenly-spaced holes around the top rim of each tube.


Next, I tie pieces of fishing line, two feet in length, to each hole. Fire code for our district requires an 18 inch gap from the ceiling to whatever is hanging from the ceiling.


I pull the three pieces of fishing line together and tie the ends into a knot.


Then I hang the knotted end onto a ceiling hook that is positioned over each table group.


There you have it. The signs remind me of pendant lights, without the light, of course.


The custom student-design of each sign and the bold pops of color make these table-group signs my favorite type of "hangy thing" in my classroom.

And they also add a little style. I think.

http://thethinkerbuilder.blogspot.com/


Come visit me at my blog, The Thinker Builder!


Monday, September 8, 2014

When Form meets Function: Classroom Decor


Decorating a classroom isn't just about decoration it is an opportunity to create an environment for students where form meets function and helps define the culture of your classroom.

When I think back to the teachers who were the most influential to me, it is always the teachers who had the most passion for their subject. I still remember Mr. Lindquist reading Shakespeare, face glowing, gesturing with his arms and voice ringing through the room. He was kind of a geek, really, but we all loved him. He made us want to learn Shakespeare, it couldn't be that bad if he was so excited about it, right? I remember posters of Shakespeare and inspirational quotes posted throughout his classroom.

What better way to communicate to your students your thoughts, your beliefs, your expectations, your passion than with posters and pictures of things that are important to you?As an Art teacher, it's easy to decorate my classroom with student artwork, but classroom decor should reach past just decoration and actually create a space where students can feel at home and ready to create. As an English Teacher books will be a key component to their classroom. There is a Math teacher in our school who has large dry erase boards hanging from every wall in his room. It is the perfect example of form meets function.

Classroom decor works best when it also facilitates learning, regardless of what subject or grade you teach. Here are some photos of my classroom. I will post some of Math, Science and ELA later today, I also encourage you to share photos of your classroom.

I teach Art and set up carts for each of the classes I teach. Because I have a different class every period this is essential to keeping myself organized and it helps the students know where to go to get the materials they need to do their work.


Because I teach so many subjects and assignments are large I have green bins that I label with each period for students to turn in their work. This helps me stay organized and students cannot say they turned something in when they didn't. I also have supplies that we use in all classes on this cart.


This is new for my classroom. I set up an area where students can go to grab an object to draw or paint. I included shells, buttons, bones and wooden blocks. I'm going to add sticks and stones and other stuff as the semester progresses. There are also magazines for collage work.


Over the computer area I found posters on Michael's and some cheap frames and hung them on the wall. I like painting that aren't too tight so students realize they don't have to paint as if its a photograph.


To get you started I just designed some posters with the secondary teacher in mind. The posters below are free and will work in your classroom regardless of the subject you teach:

Click on the photos below to download them!


I hope your new school year is off to a great start! Have fun decorating your classrooms! If you have photos or ideas please share them below!

Thanks,
Sabrina