Pages

Showing posts with label Crafts. Show all posts
Wednesday, May 13, 2015

Memorial Day Activities

Hi everyone! Kelsea here from Teacher Gems. Today I will be sharing some ideas for how to celebrate Memorial Day but before we get to that I want to give you a little history on the holiday.

Memorial Day is a US federal holiday that is observed each year on the last Monday in May. This year it will be observed on Monday, May 25. Memorial Day started after the American Civil War to honor soldiers that died during the Civil War. It was originally called Decoration Day because people would decorate soldiers gravestones with flowers. On Memorial Day we remember those who died in active service to our country.

Memorial Day was officially proclaimed on May 5, 1868 by General John Logan (national commander of the Grand Army of the Republic) and was first observed on May 30, 1868. After WWI the holiday changed from honoring just those who died while fighting in the Civil War to all Americans who died while fighting in any war.

It is vital that we teach our students about this important holiday so that they will gain a respect and appreciation for those who have paid the ultimate price for our freedoms! There are many ways to teach students about this holiday.

Activities to Celebrate Memorial Day

  • Decorate a fallen soldier’s gravestone with flowers
  • Attend or participate in a Memorial Day parade
  • Invite a veteran to speak to your class
  • Invite a family member of a fallen soldier to speak to your class
  • Visit a veterans’ home and ask them to share their stories
  • Read a book to your class about a fallen soldier 
  • Read a book to your class about the history of Memorial Day
  • Have students research the history of Memorial Day or study the life of a fallen soldier
  • Have students interview a veteran or family member of a fallen soldier
  • Have students write thank you cards to veterans or family members of fallen soldiers
  • Watch a video related to Memorial Day
A few years ago I put together some “Oreo Memorial” Day activities as a fun way for students to learn about the holiday. Most students love Oreo cookies and the play on words helps them remember the holiday!


One activity with the "Oreo Memorial" theme is the Oreo pops flower bouquet. This is a fun one to make to bring to a veterans' home as a way to say thank you.


Another fun activity to learn about Memorial Day is to create a giant American flag. We made this one on a large piece of poster board. We created the 50 stars out of Oreos of course! Below are a few more sample pages from my "Oreo Memorial" Day Activities. Click on the image below to check out the full product.


Hope you all have a wonderful Memorial Day!


Thursday, February 12, 2015

Valentine's Day Woven Paper Hearts Activity


Valentine's Day Woven Paper Hearts

Do you need a last minute no prep Valentine’s Day activity? The Woven Paper Hearts are easy to make and can be used as part of a display or as little baskets for storing Valentines. The effect is really beautiful when made with contrasting colored paper or patterned scrapbooking paper.

To make cutting out the template easier for young children, you can print out the outline on to coloured construction paper from the First Palette.


Steps for making the Woven Hearts

1. Cut out the template and fold the paper in half.


2. Cut along the lines.


3. Starting with the upper strip, begin weaving through the strips. Weave the first strip of one of the pieces of paper inside the first strip of the second piece of paper. Weave it over the second strip of the first piece of paper, inside the third strip, and over the fourth strip.


4. Begin with the second strip and alternate the weaving. Weave the second strip of the first piece of paper over the first strip of the second piece of paper. Weave it inside the second strip, over the third strip, and inside the fourth strip.


5. Continue weaving the remaining strips.


6. If you wish to add a handle, tape the ends of a strip of ribbon to the inside of the basket.


Now, you can use the hearts to decorate your classroom or as baskets for storing sweets and Valentines.


I hope you enjoyed this tutorial on how to make Woven Paper Hearts.


Thursday, January 22, 2015

Winter Craft Round-Up

Hello Everyone!
I'm Deirdre and I blog over at A Burst of First.
I am so excited to be a part of this wonderful collaborative blog. 
I'm coming at you today with a....
I love a good classroom craft!!
I believe so many aspects of doing a craft are beneficial for our students.
It builds fine motor, listening skills, creativity and much more!
Some of my "rules" for choosing crafts any time of year are:
{1} They have to take longer than 5 minutes.
There's nothing like spending an entire prep period planning an adorable craft, getting the kids all set up and turning around 3 minutes later with some cutie in your face saying "I'm done!". 
You've all been there I know! 
{2} No fingerprints, handprints or footprints with paint.
This may sound cruel, but it's a lot of prep and clean up for the product.
I like to keep things more simple than that!
{3} Not too many parts!
Those crafts where you need a hundred pieces on a variety of
 different colored papers make me bananas. 
Other than this....Let's get our craft on!!

LOVE PENGUIN
This little sweetie is adorable!
Recently my son made me one at home because he saw them 
in the hall at his school and thought I would like one.
How sweet is that?
Of course a quick poke on Pinterest and I found them!
Check it all out here on the Crafty Morning blog.

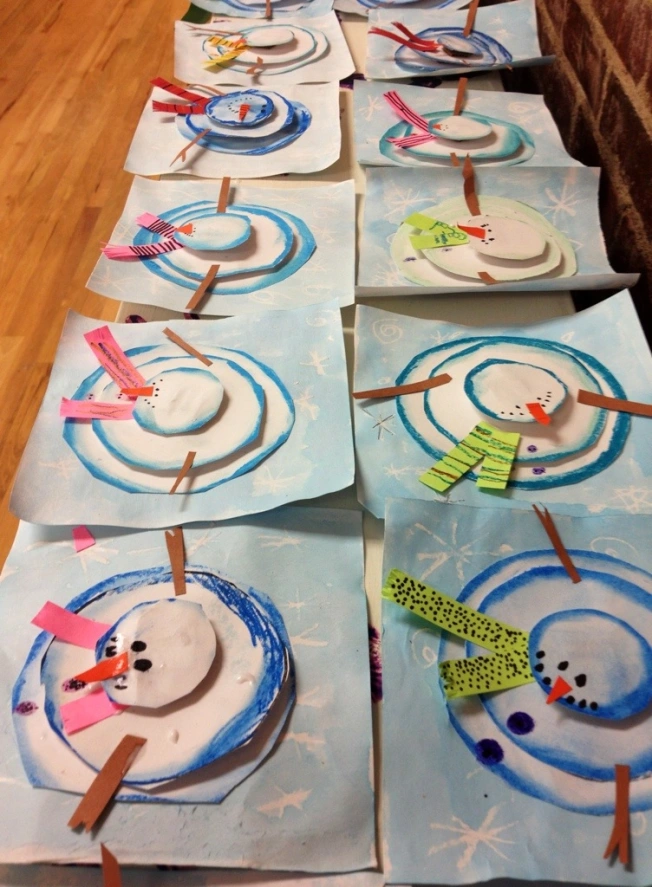
MELTY SNOWMAN
I saw these on Pinterest awhile back and I melted for them!
Get that pun all you Frozen fans?
Click here for some awesomely detailed instructions.

A YUMMY 100TH DAY
I bet the 100th day is sneaking up on you!
It sure is around here!
I am in love with this delicious craft.
It makes me want ice cream even in our cold weather.
I plan to do this in my room in a few weeks.
We are going to add ten toppings to each scoop!
I'm not super crafty, but I feel pretty smart about that idea!
Click here to see this project and some other great 100th day ideas. 

ABE AND GEORGE
We made these last year and they skyrocketed to my top ten favorite crafts.
They are reversible!!! Yes for real!!
I love 2 for the price of 1!!
They are from Erica Bohrer's blog.
Grab the free (yay!) template here!

FUN IN THE COLD
My sweet bloggy friend Aris of Sailing Into Second
recently made these adorable kids in the snow.
I must add these to my to do list!!
A Year of Many Firsts has a free template here

SNOW MUCH FUN
Last up we have not quite a craft, but a fun experiment!
Amazingly we have had very little snow here in New England this year.
I am not complaining at all!
I could probably live the rest of my life with out snow.
Bet your bottom dollar that my students would love to do this though!
I think I may have something fun up my sleeve for Friday afternoon {wink}.
Click here to check out this sweet post. 

So fun to "meet" everyone!!
I hope you'll visit (and follow) me over at A Burst of First!


Monday, November 24, 2014

Last Minute Ideas for Thanksgiving Week

Are you scrambling for ideas to do this week when you and your class are just really ready for a break? I have a few simple activities that won't take much planning to throw in centers or do during a Thanksgiving celebration. 

Grab these 3 FREE writing prompts to have your students. The "How to Cook a Turkey" prompt always turns out so cute no matter what grade level you teach. 
 I have some very detailed and gruesome writers! :)
Grab some construction paper, crayons, and sentence strips and you can make Native American headbands! I made this educational by having them make a pattern design on their headband. We also talked about Native American symbols and why they used them. History and math in one!
You can also grab this FREEBIE from my friend over at Mrs. Thompson's Treasures. My kids love doing her mystery pictures. 
I hope these simple and free ideas can help you get through this short week. HAPPY THANKSGIVING!!!


Tuesday, June 10, 2014

A Fun Tactile Activity

The school year is winding down and everyone is anxious to get to some summer fun. This is a quick, easy, colorful, minimally messy activity with modeling dough that works great whether you're still in class and needing to get the wiggles out, or you're looking to make some fun summer memories. I tested this activity with my nephews and we had a blast!


What you'll need:
Flour
Water
Salt
Food Coloring
Several Bowls
Plastic Wrap

Optional:
Cooking Oil
Rubber Gloves
A Mixing Spoon


Step 1 - Grab your Recipe for Homemade Modeling Dough
For this activity, I took an online recipe for baked Christmas Ornaments and adapted it. You may already have a baked ornament recipe that you like, but if not I'd recommend either of the following:

Wikihow: http://www.wikihow.com/Make-Christmas-Ornaments-with-Dough
Allrecipes: http://allrecipes.com/recipe/ornament-dough/


Step 2 - Make the Dough
Use the recipe of your choice and follow its directions for ingredient amounts. Mix together the dough until the ingredients are just wet enough to form a ball. DON'T do the kneading step yet. When mixing the dough you can use a spoon, however I prefer using my hands. I feel like a get a more consistent dough that way. If you choose to use the hand-mixing method, I recommend you rub your hands with some cooking oil first. It'll save them from feeling all salty and dried out.

Next, break the dough into smaller balls, one ball for each color you'd like to make. I decided to go with the 4 primary colors so I broke the dough into 4 equal parts.


Now it's time to add some color! Add your food coloring to each ball and then knead each individual ball according to your recipe directions. The different recipes I looked at recommended 10 minutes. Now I know 10 minutes is a long time, but it's well worth it and here's why: First, kneading is an important step in making the dough the consistency you need for modeling. Second, it saves future messes, because once the color is kneaded into the dough it doesn't rub off on anything else! Warning: When you initially add the food coloring to the dough, you may wish to wear gloves to prevent the food coloring from getting on your hands. However, once the coloring is worked into the dough (through the kneading), the dough absorbs the color and doesn't get on anything else. Hooray!


Once you're done kneading the dough, wrap each ball in plastic wrap and put in the fridge until ready for use.


Step 3 - Let the Creativity Begin!
Now it's time to turn your kids loose to have some fun! My nephews liked the different color choices and decided to make some monster faces.


Special Notes: 
  • The dough might be a little sticky so you may want to put down some protective plastic. Or, they can make their creations on top of wax paper for easy transfer to the baking sheet.
  • These art creations will need to baked later, so you'll want to make sure the kids don't make them too thick.


Step 4 - Baking the Dough
After all the creativity has happened, it's time to bake the dough. Cover a cookie sheet in tinfoil or wax paper, place your students' creations on top, and bake according to your dough recipe. If your students' creations are thicker than a cookie, it will probably need a longer bake time than recommended. At that point you'll just need to watch the dough carefully and take it out when it's done. As you can see from the pictures below, the color isn't diminished with baking.


Step 5 - Enjoy!
Once your students' creations have cooled, they are ready to be shown off to the proud parents (for display-not eating!).


I hope your students have as much fun as my nephews did. I'm a very biased Auntie, but I think these monster faces turned out pretty cute.

Cheers!


If you enjoyed this post, be sure to check out our store:

http://www.teacherspayteachers.com/Store/Teri-And-Tiffs-Creative-Resources


and follow us on:

http://www.teacherspayteachers.com/Store/Teri-And-Tiffs-Creative-Resources

https://www.facebook.com/teriandtiff?ref=hl