Pages

Showing posts with label reading comprehension. Show all posts
Tuesday, September 22, 2015

Comprehension for Beginning Readers

Teaching students to comprehend during/after reading doesn't always have to be a quiz or written responses. The idea of comprehension is simply to process what they are reading and understand it. Even the earliest of readers can start to show comprehension skills, even it's just with drawings. The importance of teaching comprehension is so students understand what they just read, and they aren't just reading word without putting meaning behind them. 

Even at the beginning of Kindergarten, we start working on comprehension skills. For my higher academic students, we use this Decode & Draw worksheet bundle which have students read the simple word and then draw a picture to match. My goal is to see if students are able to know what that word means they just read. These worksheets are differentiated with 2 versions: words or simple sentences. 
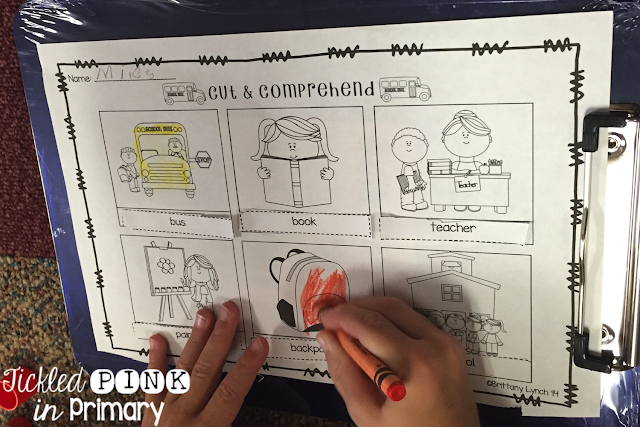
These Cut & Comprehend worksheets are similar and differentiated as well, but students have to cut & paste the words to match the picture.  I told the students that if they couldn't read the word, then they could look at the beginning sound to give them a clue. I made both of these bundles with 2 versions for every month of the year. I can throw these in centers and students will know what to do with this activity all year long! 
Really Good Stuff sells these beach balls that are a fun way to work on comprehension after a read aloud. Throw the ball to a student, have them pick a question and respond to the answer. It's a fun way to engage students, as well as see who was not only listening to your read aloud, but also was processing what you were reading.
Once we start getting our book baskets and attempting to do picture walks and read words, I use these Interactive Reading Responses. Since not all students are on the same level, I can differentiate the pages each students gets and whether they draw or write out their answers. I worked with this student 1 on 1 to discuss the book "Chicka Chicka Boom Boom". He understood the idea of sequencing, but isn't quite ready to write sentences or words yet. I told him he could illustrate what happened in the book and tell me about it when he was finished. Can you tell the letters are falling out of the bent tree...so cute!
The story starter pages in this bundle come with dotted lines and regular lines, depending on what your students need. In the past at my listening center, students would just write and draw about their favorite part. These responses get the students to think more about the book and find ways to connect to what they read. 
 
Here are a few more examples of the interactive pages. Having these fun response sheets available will make your students pay more attention to these skills during their story.
There are over over 20 pages of reading responses to help your students work on comprehending what they read. You can find this bundle in my TPT store here


Tuesday, February 24, 2015

3 Ways to Help Students Master Sequencing

Hello from Michigan! I’m Kelsea, a former 4th grade general education and PreK-8th grade special education teacher turned full-time momma of three (3 yrs and under)! J I blog over at Teacher Gems. I am eager to share some fun ideas with you today to help students master sequencing!


Sequencing is understanding how a series of objects, events, and time occur in a specific and logical order. Because of it’s abstract nature, sequencing can be a difficult skill to master. Yet it is an important skill used in many areas of life. In our daily lives we sequence events such as getting dressed, eating breakfast and going to school. Sequencing is also used across subject areas. We sequence numbers in math, order events in history, sequence steps in a science process, etc. Perhaps the most well-known concept of sequencing occurs in reading when retelling the events of a story.

There are many ways to teach sequencing. Below are three simple methods that will help your students master the skill. Ideally these methods are taught in progression moving through the steps as students become more proficient. However, they can also be taught simultaneously depending on students' prior knowledge and comprehension level.


We naturally sequence in our daily living. A great way to sneak in some extra practice is to intentionally expose students to sequencing without necessarily teaching it. For example, you can use picture schedules (like these free ones) to help students begin to think about sequencing. When giving directions for an activity use simple picture cue cards to illustrate each step (i.e. first color the picture, next cut out the shape and last paste it into your booklet). Put the picture cue cards on a whiteboard in sequential order for students to follow.

Use task analysis to practice sequencing. Task analysis involves taking a simple task like brushing your teeth and breaking it down into step by step instructions. A fun activity to practice this is to have students create posters. Students might make a poster that shows a toothbrush, another poster that shows toothpaste being put on a toothbrush and a third poster that shows the toothbrush brushing teeth. Once students have made their posters talk about them as a class. Can anyone think of any other steps that might be needed for brushing teeth? Try to get students to really think about the details involved such as twisting the lid off the toothpaste, squeezing the tub of toothpaste, turning the sink on, rinsing the toothbrush afterwards, etc. Create a bulletin board with students' completed posters.

Creating an environment of sequencing will give students a jump start to learning this important skill. After introducing students to sequencing through their environment it's time to move on to intentionally teaching the skill.


Helping students master the skill of sequencing will increase their reading comprehension and, depending on how you teach it, will strengthen their writing skills. As a special educator I found that often students who struggled with reading comprehension also struggled with sequencing. When practicing sequencing of a story these students would easily get frustrated with the task and give up. Once students have given up on a task it is much harder to motivate them to try it again. This can be detrimental to learning since mastery of a task takes practice.

Instead of burdening students to come up with a correct answer, I found that students were much more encouraged to try an open-ended task. For example, instead of having my students cut and paste sentences with the main events of the story in order (where if they were incorrect they were stuck!), I created a sequencing sort skill center with picture cards to order. This center allowed students to work on mastering the skill in isolation from reading. So instead of having the picture cards related to a story we read, I came up with picture card sets of three things that went together and let the students write their own story after they sequenced the pictures. This takes the pressure off the student to get a correct answer. While the three picture cards in a set have a seemingly obvious logical order, students can come up with a different order that works for them.


Having students write about the order will give insight into whether or not they are thinking logically about the sequence of events. For example, the picture set below is meant to be sequenced as follows: First you mix together all the ingredients, next you put the pie in the oven to bake and last you take the pie out of the oven and eat it. A child may, however, put the picture of the oven first and in their explanation say, “First you preheat the oven, next you mix together all of the ingredients and last you take the pie out of the oven.” Some might even argue that this explanation is superior to the former (as most recipes call for preheating the oven prior to mixing together the ingredients).


Using picture cards allows students to easily rearrange the images if they think of a better way to sequence them. Having students write their own stories to go along with the picture cards gives the teacher a better understanding of students' thought processes. This in turn will help the teacher to plan more individualized instruction.


Once students have mastered the skill of sequencing in isolation it is time to add the element of reading. Start with three simple pictures that summarize the story and work toward adding more pictures with more details as students become gain proficiency. Practice sequencing as a whole class by placing the picture cards in sequential order in a pocket chart.

Assign students events from a story to illustrate. Have them cut out their pictures and paste them onto popsicle sticks. Then have students come up to the front of the room and arrange themselves (with their popsicle stick) in order of how the events occurred in the story.

Another fun way for students to independently practice sequencing after reading is by using these free story apps. Students listen to a story that is read to them and then sequence four picture cards. Once they have sequenced the pictures they can record themselves retelling the main events of the story.


I hope you have enjoyed reading these ways to help students master sequencing! If you have more tips for teaching sequencing please share in the comments below. If you're interested in using my sequencing sort skill center with your students you can find it by clicking on the image above. Thanks for reading! 


Be sure to stop by my blog and say hello!


Thursday, January 8, 2015

Teaching students to think about reading

Hi, I'm Aimee from Pencils, Books, and Dirty Looks.

How do you teach students to think about reading?


We all have those students in our class that can read anything.  You know the ones that can decode words like disestablishmentarianism, but the second you ask them to talk about what they've read they're clueless.
I have a class full of above grade level readers this year.  They can decode anything!  Often we forget that decoding doesn't necessarily mean comprehending.  Even the best readers need to be reminded to stop and think while reading.  Thinking about reading is one of my favorite strategies to model.  I made cards to hold up in my classroom to remind students to stop, think, and question during independent reading time.
I display this card when I want students to read:
I hold up this card when I want students to stop and write what they're thinking:
I hold up this card when I want students to stop and ask a question about what they're reading:
I also made a tri fold to display during guided reading groups:
Often my students like to read with a friend, so I made cards to display when students are buddy reading:
And finally, I hold up this card when I want students to stop and talk with their buddy:
The cards have worked really well since I introduced them to my students!  First, I spent a week or so modeling the cards during our read aloud time.  I would stop and think out loud, ask a question about the story, or have them buddy talk about the story.  Next, I introduced the cards to my small groups during guided reading.  Each student has a dry erase dot on their spot at the table.  When I flip the tri-fold, they know to pick up their marker and write.  We don't discuss what they've written until the end.


My next step is to use the cards during independent reading.  Hopefully, within no time, they will become as good at thinking and comprehending as they are at decoding!
These cards, along with an included worksheet for students to write their thoughts and questions, are available in my TpT store.


Saturday, January 3, 2015

Interactive Notebooks

Hi it's Allison Stuckey from Stuckey in Second!

I've started using interactive notebooks in my classroom and I love them! I started using Angela Olson's Lucky Little Learners math notebooks last year with my second graders, about halfway through the year. I decided that this year I had to scoop up all of her units and start them from the beginning! Here are some activities that we have worked on so far with our addition strategies unit.


I just love them and would recommend them over and over again. In fact, I HAVE recommended them over and over again. I'm always posting the fun stuff we are doing on my Instagram page @stuckeyinsecond

Here is the Teachers Pay Teachers story for the math interactive notebooks I use. She even has some free samples, so check those out! Visit her blog here:
This year, I've also decided to do Interactive notebooks for reading! I'm super excited! I purchased Nicole Shelby's second grade set and I'm loving it so far. Also, I have been finding other activities that I might normally make into an anchor chart (and still will for the classroom) but I can print it and have them add it to their notebooks for an instant resource at their fingertips! Here are the few things we have done in our reading notebooks so far! 
Nicole's awesome set printed and in a binder for me to pull and copy anytime I need it! 


Here are some of Nicole's other pages that I can't wait to do!!! 


Here is Nicole Shelby's 2nd grade Reading Journal (She also has language ones and different grade levels!)

Visit her blog here:


Saturday, December 27, 2014

Close Reading with Oreos

Hello! It's Allison from Stuckey in Second! I wanted to share a popular post that I recently had on my own blog. It was a big hit and I heard from a lot of teachers after they tried it in their own classrooms. I can't take the credit for the idea, but it sure was a great one and I couldn't resist sharing it over here too for all the Who's Who readers!!

Enjoy!


What a fun day! My team and I heard about this awesome OREO cookie lesson from the third grade
teachers at our school and of course, since it involved OREOs, we had to try it!! It was just
one of those awesome lessons, better than I thought it would be. It made my whole day! (Even if the kids had been eating Oreos!)


For the full lesson, see Lindsay's store at Primary Polka Dots for her Close Reading lessons.

Here is how it went in my room today!!!
First, I passed out one cookie to each student. I did it in kind of a rushed way (on purpose) and told them to eat it AS SOON AS THEY GET IT. ("What!? Eat it before everyone else has one? This is weird...." All real comments.) By the time I was done passing them out, a few kids had finished their cookies. My plan was working perfectly. I encouraged a few kids to "Hurry, finish it up, we have to move on."

After some weird looks from the kids (Did I mention this was at 9:45 in the morning?) I had them all take out a Post-It note and a pencil. I asked them to write down what they just ate. ("Uh...okay...Mrs. Stuckey is losing it..." again, real comments.) A lot of the kids looked at me like I was asking a trick question, they were trying to write a complete sentence and use capitals and periods just to tell me they ate an Oreo. It was actually comical. Then I asked them to share with me what they ate, here were the responses:
Obviously, their responses were Oreo cookie, oreo, and one kid actually said Vanilla Wafer (gotta love it!) I didn't record that on the anchor chart because she was so embarrassed that she wrote that. But later, her mistake would be perfect for teaching the lesson.

Next, I passed out ANOTHER Oreo (could it be true!?), but I told them this time they could NOT eat the Oreo! I had them come down to the carpet with their Oreo cookie and I explained to them what they were going to do next.

  • Look at the cookie carefully.
  • Smell the cookie.
  • Think about the cookie.
  • Eat the cookie VERY slowly with your eyes closed, thinking about every bite you take.
  • Think about the texture and the taste of the cookie while you are eating.
What happened next was quite comical because they were literally SAVORING these cookies. I took a few pictures of them eating them with their eyes closed and I SO wish I could share them with you, but I won't.

When they finished, we did our "second read" of the Oreo. I had the categories in red written on the
anchor chart (while they were eating). I asked them to describe all of the parts listed. They couldn't stop talking! Look at how much they had to say after their "second read" of the Oreo!


The lesson that we all learned: It's okay to read through something fast the first time (like their first Oreo cookie), but if you do, you can only recall minimal information about it. If you reread it a second time and THINK while you are reading, you can recall a lot more! In fact, it might be smarter to do that the FIRST time!

My little lady that said she ate a Vanilla Wafer...perfect opportunity for my lesson! Sometimes we read through something so fast and with so little thinking that we literally DO NOT KNOW what we read! Right? She ate an Oreo and when she was done, had no idea what she had just eaten...just like our reading sometimes! 

They loved it! I loved it! They were excited about Oreos in the morning and asking if we could please do more reading lessons like this one! Ha. I was excited to show them a concrete example of how to Close Read! The rest of the day, we referred to our reading as our "first Oreo" or a "second Oreo." For example: Wait a minute, I didn't understand that. Let me REREAD and think about my Oreo (the text) one more time.

Try it tomorrow! You will love it too! So glad that this activity was introduced to me by some of the other amazing teachers at my school and I just couldn't wait to share it with you all!


Update: I've recently discovered that Lindsay, over at Primary Polka Dots originally had this great Oreo idea and has the full lesson included in her Close Reading Passage packets. It's amazing how such a great idea can be spread far and wide: across schools, school districts, and across the country. In the few short months since I have posted this blog post about using Oreos in my classroom to teach close reading, I have had such an overwhelming response. Thank you Lindsay for the great idea! You are touching the lives of children far and wide, without even realizing it!! 


Tuesday, December 16, 2014
Hey Friends!  I'm Abbie Jinnings from Tales From The First Grade!

I am so excited to share with you today an interactive summarizing lesson! I don't know about you, but my students always want to tell me so much when summarizing!  I am working with them on developing an understanding for the important or "best" parts of a story!  

Let's get started!  I prepared for the lessons by setting up my anchor charts! Here is our summarizing basic definition chart.

After we set the foundation of what a summary is, I "hooked" the students on the new concept with some hands on learning.  We made a trail mix out of corn cereal, raisins, and M&M's!  As we made the trail mix we discussed how a story has lots of details and parts, just like our trail mix.   The trail mix is great together, just like all the details in a story.  As in the trail mix and a story, some parts are better than others.  I instructed the students to look through their trail mix and pick the best ingredient!  


After the students determined the best ingredient they sorted the mix.  All the children were sure the chocolate goodness of the M&M was the best! 


After a small snack of trail mix we had a discussion about the connection between the best parts of a book and the best parts of the trail mix.  From there we read the book Charlie and the Christmas Kitty by Ree Drummond.  If you have not read one of her Charlie books you must!!  Not only do I love her cooking show she is now one of my favorite authors.  Back to the lesson..  After reading we completed an anchor chart over somebody, wanted, but, so.  


We ended our mini unit over summarizing with completing a flip book over Charlie and the Christmas Kitty.  I love using flip books as a response to literature!  My students do best with illustrating the  front page and writing on the inside.  


Hope you are inspired to add some hands on activities to your comprehension lessons!  


Be sure to check out my Facebook page!


 Facebook


Merry Christmas