Pages

Showing posts with label Classroom Design. Show all posts
Friday, November 20, 2015

Surviving in a classroom without wall space

Hi, it's Aimee from Pencils, Books, and Dirty Looks.  Today I'm going to tell you a little bit about my classroom.  It's a very large classroom, and I love all the floor space that it has to offer.  Students are able to spread out around the room and work without being on top of each other.  However, there is a downside.  My classroom has very little wall space.  I have a wall of cabinets and counters, a wall of windows, a wall of book shelves, and a wall with a dry-erase board and Smart Board.  Luckily, I still live by the old preschool adage, "You get what you get, and you don't throw a fit."  Here's how I deal with my lack of wall space...

1.  I hang anchor charts on anything magnetic.  The back of my room houses the entire leveled library for the 3rd/4th grade high ability program where I teach.  Lucky for me the book shelves are metal.  I use clip magnets to hang charts to them.  The charts are easily removed when I need to grab a set of books.
2.  I have a decent sized dry-erase board in my room that is magnetic as well.  Since I have a Smart Board, I don't need it for direct instruction.  I placed my focus wall on the dry-erase board.  I type up each week's focus and hang them with clip magnets.


3.  I use every flat surface in my room even if it happens to be a door.  My WOW wall hangs on a closet door in my classroom.  Students each have a clothespin with their number on it.  They hang quality work that they want to share with others on the door.
4.  Behind my easel is the only wall space that is available in my classroom.  Seriously it is maybe 5 feet wide and is sandwiched between my Smart Board and classroom library.  I use the space to hang more anchor charts.  Some are hung with 3M hooks while others are hung on a ribbon strung between two hooks.  I rotate my charts depending on the skill/strategy that we are working on during the week.  Since this space is front and center in my classroom, it is visible from our group space as well as student desks.  (Click HERE if you are interested in seeing all the anchor chart tool kits that I have to offer in my TpT store)


5/6.  I have an very long row of very small cabinets in my classroom.  The cabinets are above the sink and computer area.  I utilize this space for our Indiana History Timeline.  This works perfectly since the cabinet doors aren't large enough to display much else.


The south wall of my classroom is nothing but windows (Don't get too jealous!  My view is of the Village Pantry gas station that is right across the street).  I make the most of this space by displaying multiple things on the windows.
7.  This window displays our math fact masters.  Instead of making a chart to display student progress, I printed and laminated a photo of each student.  When a student masters an operation, their picture goes up on the window.  This is a real motivator!!
8.  This is one of my data windows.  I have a bar graph made out of painters tape for our math topic tests.  This too is a motivator for students.  They can't wait to see if the class average is higher than the previous test!  Above the bar graph is a decorated book spine for our read alouds this school year.  We are hoping to make our way across all of the window shades.
9.  This window displays students' birthdays.  I was lucky enough to find this for free on a blog that I follow, but unfortunately I accidentally deleted the file and can't find the source.  If anyone knows, please leave a comment, so I can give credit to the creator!!
10.  Every teachers needs a spot in their classroom to display all the cute notes and artwork from students.  I hang student creations on the pull down shade behind my desk.  Some are taped to the shade, while others are clipped to the shade and pull chain that opens and closes the shade.

There you have it!  This is how I survive in a classroom with very little wall space.  If you have any ideas that I haven't mentioned or more suggestions for making the most of little to no wall space, please leave a comment below!



Saturday, August 8, 2015

Creative Classroom Storage Solutions

Hi there! Today I (K's Classroom Kreations) am going to let you all in on a little secret....I have an addiction to containers! That's right. I just love shopping for baskets and boxes and whatever other little containers I can get my hands on. Problem is, I can easily end up with a few too many (and buying new each year isn't a realistic possibility). I'm going to share with you some creative storage options that fill my need to organize and store, without breaking the bank.

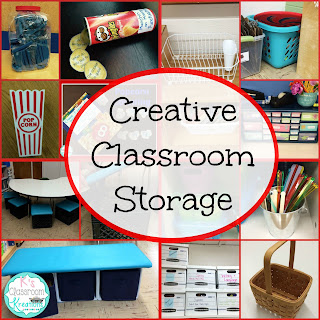
The first type of storage you will find in my classroom consists of recycled food containers. Sometimes I use them to store manipulatives like my Base 10 blocks in the giant Animal Cracker container. Other times I use them as inspiration and storage for simple centers. The Pringles can is holding my Munchin on Punctuation writing center. I also found this adorable popcorn container (bottom left) at the Dollar Tree. I think it could work perfectly with my popcorn counting math activity (but the recycled popcorn box is just as cute!)

I'm sure if you search Pinterest you will see dozens of other ideas like using baby food jars to hold small items or an empty frosting container to organizer bulletin board border in. What I like most about this type of storage is that it adds excitement to the learning. Plus, I am always looking at food boxes now and getting inspiration for future classroom games. Next up on my list will have to be something with Popsicle sticks and a Popsicle box....


As teachers, our brains have a hard time shutting off from the classroom. This is evident in the next ideas where everyday household items take on a new purpose.

First up, the Kitchen aisle! I have used the plastic sink bins (bottom left) for years as open storage to hold books, notebooks, and my "New Kid on the Block" box. This year, after some more Pinterest-ing, I learned about the drying rack option for technology. I am waiting to get my iPads back from over the summer but I plan on standing them up in the rack as a charging station. Best part, the cords won't tangle! Next, I found this sturdy teal laundry basket to keep all of our recess toys in. Items like this are on sale now for College Back to School season (and it matched...and I have an addiction to storage..so I had to have it). Lastly, the toolbox! There are dozens of versions out there to download. I kept mine pretty simple with colored paper, ocean themed stickers, and mini address labels.

Of course I can't recycle and reuse all the time- sometimes (my favorite times) I just need to buy things! I love plastic containers from Dollar Tree for my library, manipulatives, and center materials. Little tin pails have been all the rage at Target this summer - I am storing reading trackers in this little guy (googly eye on popsicle sticks, drink stirrers, highlighting strips). These cardboard banker boxes have been some of my best purchases. I am able to store materials (special books, lessons, decorating supplies, etc.) by season and topic. These were a bit pricier but have held up extremely well for cardboard. Lastly, baskets. I use these for sorting activities mostly but the storage possibilities are endless.

 Last type of storage in my room requires getting a bit creative! I was able to get these milk crates for free a few years ago. I originally covered them in Duct Fabric but redid them in this teal vinyl this summer. Last year I stored my kid's morning work and small group activities inside of them. The bench is simply 3 crates screwed together and spray painted. I like the final look but do not suggest spray painting...black works fine and is a lot less of a pain. You can now find the crates in different colors too. The bench is by far one of the favorite places to hang out in my classroom.
 Just a few more Dollar Tree finds (geesh, I should get a commision for how often I suggest them)! I snagged these little sandwich holders and snack boxes earlier this summer. I plan on using the sandwich containers to put a deck of cards, dice, or other small center activity in. Just the fact that it has Minions or Spiderman on it will make it an instant favorite. The snack containers could be used for the same thing but I plan on using them for behavior. Last year I implemented a token system for a few of my challanging students (read more about it here). I used velcro to stick a plastic cup to each desk but they would still get tipped over. These little containers will hold the tokens and again, the theme makes it even more exciting!
Last up is my pirate themed treasure box. I bought this a few years ago at a craft store (with a 50% coupon of course!). I used it to store materials for my Pirate day at the end of the year. It could also be used as a prize box or simply as storage.

Hope you were able to find a few new storage and organizational ideas. Setting up a classroom this time of year can be overwhelming, especially finding a place for everything. Good luck and have a great year!

For other ideas be sure to check out my blog, K's Classroom Kreations. Thank you!


Want to remember these tips for later? Pin here:


Thursday, August 6, 2015

Classroom Facelift

Hello!! Happy August! I am Melanie from Momma with a Teaching Mission . I am a first grade teacher and am going into my 3rd year. I inherited my classroom and MANY items in my classroom. And I will be FOREVER grateful to the lady who retired who I replaced. She left me books, baskets, games, centers, and so much more. But after two years of kind of still living in 'her' classroom, I decided to make some changes. Maybe you are in the same boat as me, so keep reading!!

So many things I left the same for the past two years. Which nothing is wrong with, however, I felt like it was time to put my spin on the classroom! So I decided to write a little post about dressing up or giving your windows a face lift with some do-it-yourself made curtains.

So when I got hired 2 years ago, the bulletin boards were empty. So that was one area I went ahead and purchased the chevron fabric to cover the bulletin boards. HOWEVER, I know nothing about buying fabric, so when I purchased the fabric for the bulletin boards, I had lots left over! These leftovers have been sitting folded in one of my cabinet drawers to almost 2 years!


So the other day, during my lunch (I'm teaching summer school), I thought, 'hey, let's dress up these windows!' So I got all my fabric out and laid it on the desks! And my it was ALOT!!
This is a before picture of the window. As you can see, I put little stuffed animals on the shower curtain rod. But it's just awful!!
So I cut the curtain strips about 3 inches wide, and they were about 2 feet long. I had 4 different kinds of fabric (which I had originally bought at Hobby Lobby). I had Black and white chevron, white and pink chevron, blue and white chevron, and then another pattern with the black/white/blue/pink with flowers. My room colors are blue, pink, white, and black.
So this is the after! I am nowhere near a seamstress and I definitely won't quit my day job! But I think it looks cute and it adds a pop of color to the windows! I just tied the fabric strips to the shower curtain rod and I was done in about 45 or so minutes!!

Make sure to check out my blog, as I will be doing a classroom revel at the beginning of September!! Momma with a Teaching Mission Wishing everyone a fantastic new school year!

Melanie


Thursday, October 9, 2014

Table-Group Signs with Style and Charm

I'm going to go out on a bit of a limb here and say my classroom is stylish. 

To me, at least.

I've got a rustic, antique kind of vibe going on... lots of table lamps, barn-wood bulletin board paper, old kitchen hutch re-purposed into a bookcase, curtains. Yes, I have curtains. They add to my color scheme, which I try to maintain throughout my room: blues, purples, and orange. So, 'ya know: stylish. My style, anyway.

Our table-group signs, those things hanging from the ceiling above each group of students, serve multiple purposes, one being that they are a perfect way to unify the colors I've chosen with which to decorate the room.

Those signs' functional purpose, just like with anything you would hang above your table-groups, is to give an identity to each group of students. I can simply call the "orange group" and ahhhhh, everyone knows who I'm talking to.

My favorite purpose for the way I do our group signs is to build teamwork and cooperation skills within each group, because the members of each group are planning and decorating their own signs.

What follows are step by step instructions for our stylish table-group signs.

The supplies I use are large sheets of construction paper (12"x18") carefully chosen to fit my color scheme, fishing line or string, and ceiling hooks.


I give each table group a different piece of construction paper to design. Each group can design their paper however they choose. I don't give many restrictions, except to allow only crayons and colored pencils. I've found that markers can be so bold that they can distract from the true color of the sign. I like to have students all incorporate their names onto the signs too. Even when we switch seats, the signs will stay in place, and these original groups will always remain the "founding members."


After each group has decorated their sign, I collect them and laminate them. Then I roll each one and tape it into a tube, with the design on the outside.


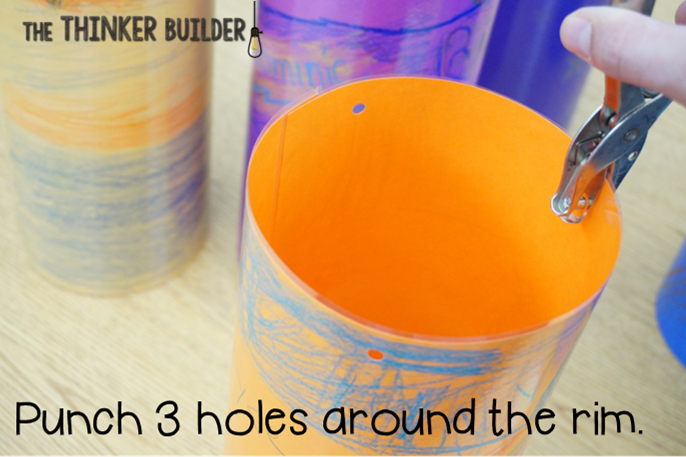
Then I punch three evenly-spaced holes around the top rim of each tube.


Next, I tie pieces of fishing line, two feet in length, to each hole. Fire code for our district requires an 18 inch gap from the ceiling to whatever is hanging from the ceiling.


I pull the three pieces of fishing line together and tie the ends into a knot.


Then I hang the knotted end onto a ceiling hook that is positioned over each table group.


There you have it. The signs remind me of pendant lights, without the light, of course.


The custom student-design of each sign and the bold pops of color make these table-group signs my favorite type of "hangy thing" in my classroom.

And they also add a little style. I think.

http://thethinkerbuilder.blogspot.com/


Come visit me at my blog, The Thinker Builder!


Saturday, August 2, 2014

Cheap and Easy Bulletin Boards

Hey yall! Natalie here from Teachery Tidbits.

http://teacherytidbits.blogspot.com/
 
 
Well, I officially started back-to-school on Thursday, so I am in full force get-my-room-ready mode. My kiddos won't start until Wednesday the 6th, but Open House is Monday the 4th sooo.....
there's some work to do!

One thing that I really love about getting my room ready is doing my bulletin boards. So I wanted to share a little tip that might help you when doing your bulletin boards.
 
 
I really love using plastic tablecloths for bulletin boards for a couple different reasons.
 
1. They're cheap. I buy the 99 cent plastic tablecloths from Wal-Mart. The price is right for a poor teacher like me!
 
2. They're durable. The plastic holds up pretty well, as long as you don't put tape on it.
Plastic + tape = major rippage
 
3. They're vibrant! Tablecloths don't fade or lose their color overtime, like butcher paper. The color stays bright all year long.
 
4. Fun patterns! Nowadays, you can get plastic tablecloths in lots of fun patterns. I mostly stick with solid colors, but last year I picked up that fun chevron tablecloth above and it made a HUGE statement for my bulletin board!

Here are some of my boards from last year that I used plastic tablecloths on.


You do have to really make sure that you get all the wrinkles out though!
I obviously didn't do a good job on my genre board up there....yikes!
Those wrinkles are driving me crazy just looking at that picture!
 
But its also an easy fix! Just smooth and staple :)
 
Alright, that's it for me! Off to get more work done :)


Thursday, July 10, 2014

Wish you thought of it earlier?? Let's plan ahead!

My vacation just started less than 2 weeks ago, but I am already thinking about the new year! Don’t get me wrong, I’m looking forward to my months of relaxation, but I LOVE setting up my classroom and organizing myself for the new school year (ask me again in October, though :D).
Every year, I think of things halfway through the year that I wish I had thought of at the beginning of the year. I figured, what better time than NOW to share ideas of things we want to implement this upcoming year?


So, if you share my enthusiasm for setting up and organizing,  here are a few ideas that may help. Please share your own ideas; I love learning new ways to make my life easier or my classroom more fun :).
  • CLASSROOM THEME: Pick a theme and brainstorm a list of associated words/ideas. Then, think about your classroom- reading and writing areas, word wall, poetry board, etc. See if you come up with ideas of how to incorporate the theme into these areas. For example, for a space theme, you may name your tables after planets, and your reading corner could be called ‘The Reading Orbit,’ your word wall may be labeled ‘Word Galaxy’ and your trash can could be the black hole :). I made a few themed lists and decided to go with a farm theme because I had so many cute ideas for it! Here is a look at one of my reading nooks- the garden of reading. 
    I wish I had more pics, but this year I will be amping everything up with stuff from my farm décor pack! If you also want a farm theme, click the picture to take a look- it’s on sale! The EDITABLE  newsletter template is a freebie.
  • ANCHOR CHARTS- I love doing anchor charts with my kids, but they are time-consuming to ‘cute-sify’ every year! So I laminate charts with just a border, heading and anything else that doesn't need kid input, then I fill in the meat of the charts with the students using dry-erase markers- cute and kids still have ownership because of their participation!
  • STUDENT PORTFOLIO/MEMORY BOOK FILES- I also keep a file folder for each student, with manila folders inside to separate items, such as writing samples, assessments, etc. This year, I also used this to store unit of study projects that they completed over the course of a few weeks, such as our farm study. Having it kept neatly in one place made it easy to send home undamaged at the end of our study. I also had my students work on a year-long memory book and placed their sheets in a folder till the end of the year, when I stapled them together to make their scrapbooks. Here is the scrapbook and a freebie !

  • TWO FILING SYSTEMS- My monthly files hold holiday and seasonal items, but I keep all my skills stuff organized by just that- skills. I used to organize by unit in program, or month we covered the skill, but we change programs so often, I was constantly rearranging my files.  

  • GARAGE SALE! Keep a bin for things you don’t need/want anymore. As the year goes on, instead of getting rid of them, place them here. At the end of the year, have kids earn bucks named after you (my kids earn Tejeda bucks) for excellent work and on the last week of school, host a garage sale in which you place all your junk. . . ahem, merchandise . . .on the tables for kids to ‘shop’ for! Very motivating when kids have checked out early for vacation!

  • PLANNING AHEAD- I always have an ‘extra time’ basket and a  ‘sub tub’ ready for whenever we may have 5-10 extra minutes, or even a whole extra period, if an event is canceled, delayed, etc. It helps to have plans for a sub in case you have to be out unexpectedly. I keep books and response sheets in there from my monthly read-alouds packs, since many can be used year-round and cover essential skills, as well as Scholastic News magazines with directions for pulling them up on the interactive board. Plus, I always keep things like a bus list, first aid kit, class emergency contact and allergy list, schedule, etc).
  • Make yourself a beginning of year to-do checklist that you can save for next year!

  • Use a notebook or Excel spreadsheet to track your expenses for tax purposes.
  • BIRTHDAY CORNER-This idea I got from a colleague, who got it from her 5th grade teacher! To make every birthday special, I wrap the cover and bottom of a big storage box (we reuse the same box for each birthday) that kids get to open on their birthday. I fill it with 3-4 little treats (bouncy ball, bubbles, pencil, etc) as well as A LOT of tissue paper (we actually make a joke out of it, since the box is so big and is mostly filled with paper :D).  I also decorate the back of my door with a big happy birthday sign and take the kids' pictures holding the box while wearing a birthday crown in front of it. 
  • CENTERS- Creating centers can be very time-consuming, so I love centers that are ‘reusable.’ For example, I keep a stack of reading response sheets that can be used with different books and kids just write in the title of their book at the listening center. Check out this awesome freebie from Krista Wallden. . . 
and I use my baseball spelling center, which can be reused weekly because kids just write in the new words. I also like sticker story center, because students can always use different stickers to make up new stories. You'll find a link to a free one in the writing centers freebie below, from my previous post, in case you didn't get it before: 


OK, so hope some of these helped you start thinking of things you want to implement this year! If you have any other ideas of things to start the year with, please share! Enjoy the rest of your vacation!