Hey Everyone! I'm Kristen from Kristen's Kindergarten and I'm excited to share an exciting math tool with you today! Rekenrek's (wreck-en-wreck) have been around for many years and I was finally able to take a math workshop to learn more about how to use them with my Kinders.
I figured out a way to make them for about $20 (for my whole class!)
All you need are a few simple materials to make a class set of rekenreks.
I got all my materials from Michael's
Adhesive Foam Sheets (6 x 9 size) 30 pack
Black Pipe Cleaners
Red pony beads
White pony beads
Poster board (2-3 sheets)
You will also need:
Scissors or Exacto knife
marker
Self healing cutting mat
Ruler
Begin by turning your foam sheet over and measuring in 1 inch on all sides. I drew this on the back side so it will not show in my finished rekenrek.
Using a self healing cutting mat, carefully score the lines with a pair of scissors or Exacto knife.
Push your scissors gently into the foam and cut on your score lines.
Take 2 pipe cleaners and trim them to fit just inside your foam mat. Mine are just over 8 1/2 inches.
Thread 5 red and 5 white beads on to each pipe cleaner.
Peel off the backing to your foam mat and stick the pipe cleaners to it. I press one end of the pipe cleaner down firmly and then stretch the other end, keeping it as straight as I can before pressing it down.
Stick the adhesive side of your mat to a sheet of poster board. I stuck mine in the corner to make it easier to trim.
You're rekenrek is finished! Be sure to press the mat down firmly to the poster board, paying special attention to the areas around the pipe cleaners.
Rekenreks are great for helping your kiddos to see numbers in different combinations. Even my Kinders can show ways to make numbers to 10 using both racks on the rekenrek. Below you can see one of the ways to make 5.
Later in the year we can use both rows to show numbers to 20 and all the different ways to make that number.
This is a great book to help you get started with Ten Frames and Rekenreks.
Rekenreks are quick and easy to make and will truly help develop your kiddos understanding of numbers!
Hi there, it's Whitney from The Crazy Schoolteacher! What do you do with all of the cute projects or fantastic stories your kiddos write? Does it go something like this? Staple, try to remove without completely destroying the project(which consequently causes tears...lots of tears) or cutting yourself in the mean time, staple and repeat.
Well friends, if that is you I am about to make your life a lot easier. Closes pins. Yep, using clothes pins to hang student work verses staples has saved me a lot of time and headache! Go ahead, add up how much time you spend stapling, un-stapling, then stapling again...it adds up! And well, ain't nobody got time for that!
Here is what I do...
What? You are lucky enough to have beautiful bulletin boards in your hallways?Well, I have another solution for you. Get your hot glue gun ready to go!
Hi guys! It's Molly from Lucky to Be in First! I'm here today to share some of my favorite read alouds {and a freebie, too!}
First up, one of my closest friends in the world {Greta!} wrote a book along with her sisters and mom {isn't that the cutest?!} Well, her book is fantastic! It's a great story about being yourself. Head on over to Amazon and get it! I'll wait here.
Seriously...she sells her book on Amazon! Isn't that amazing?? They're actually creating an entire series of books!
Another one of my faves stars little miss Molly Lou Melon. Again, this story is all about being yourself. I love this goofy little gal! There's also a bunch more in the series now, too!
Now this next book, I can barely read aloud without cracking up! Have you read The Night I Follow the Dog? Its hysterical! Your kids are sure to love it, too!
And here's my classic favorite book. I still get a little teary every time I read this one!
I also love to show my students this video on YouTube - Shel Silverstein actually reads it!
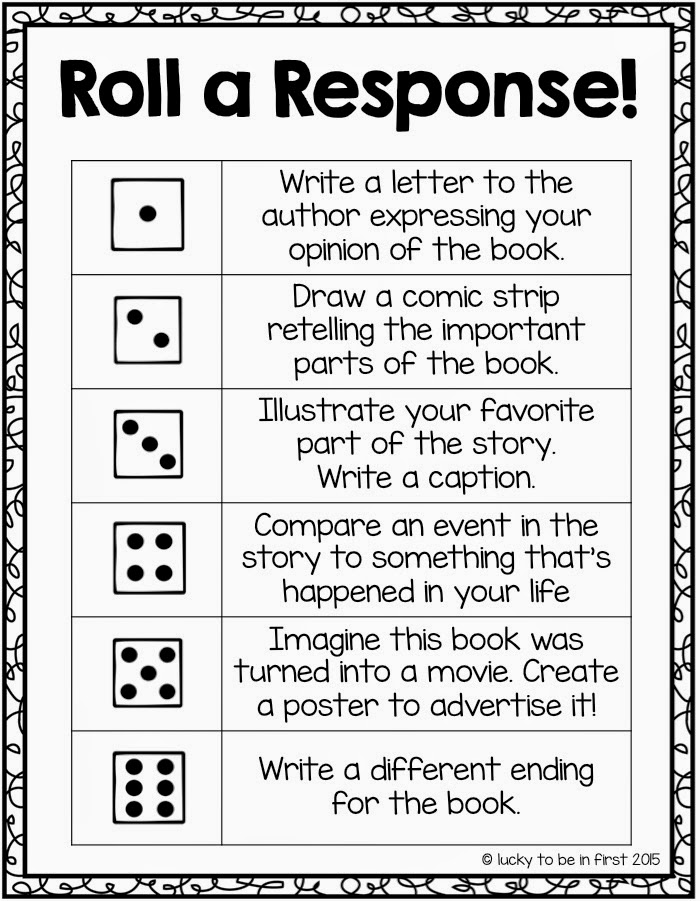
If you're looking to stretch those little minds a little further, click on the pic to grab this freebie! To use, simply ask the kids to roll a die and complete the activity that corresponds to the number they land on!
Want to snag even more FREEBIES? Sign up for my newsletter to have an exclusive freebie delivered to your inbox each month :)
Hi everyone! It's Michaela from Reading Royalty! Whether it's students in your class or your own children, we've all come across a reluctant reader. It seems like nothing will ever change their opinions on reading, making completing summer reading an extremely difficult and stressful topic for parents and teachers everywhere. Here are some tips that may help:
Make it a Game:
Who doesn't love a game? To help motivate reluctant readers, I've created a FREE reading BINGO board! Some kids thrive on competition - so make it a challenge! The challenges are silly, fun, and include reading a joke book with an accent or read a scary story with a flashlight.
This is a huge motivator! So many amazing books are turned into movies. Read the books with your child and then watch the movie and talk about similarities and differences. I know that I LOVE to read books before I watch the movie and then compare. Talking about books is so much fun.. and you don't have to make a Venn diagram (it is Summer vacation after all!)
Read High Interest Books:
Sometimes reluctant readers just haven't found the right book yet! This has happened with a few of my students. They HATED reading.. but once they found that *one* book, they were hooked! That book is different for every child. Let them choose what they'd like to read, explore different authors, series, and genres. Expose them to graphic novels, joke books, short stories, poetry, etc. You never know what might finally pique their interest!
Share Your Love of Reading:
This is a really important part of showing children how important reading is to their lives, even as adults. Seeing other people read and share their positive feelings toward reading will help them foster their own love of reading. Whether it's the newspaper, a magazine, reading a book together, or reading aloud, nothing is too little!
Hi, it's Aimee from Pencils, Books, and Dirty Looks. Today I want to talk about using anchor charts in the classroom. I love anchor charts! Anchor charts make thinking visible to students. Posting anchor charts around the room keeps current and relevant learning accessible to students. Students can refer to the charts and use them as tools all year long. Due to wall space, I can't display all of my anchor charts at once. When a new anchor chart replaces and old one, I still like to keep it available for student use. Here's how I store my charts:
Anchor charts can be a spur of the moment thing or a resource that is used year after year. For anchor charts that I plan on keeping, I laminate them to keep them in good shape. Since chart paper is larger than most laminators, this is how I laminate my charts:
I also like to label my anchor charts when they're put in the anchor chart bin. Here's how I label my anchor charts:
If you don't have room to display or store all of your anchor charts, you can use personal anchor charts. My Anchor Chart Toolkits contain all the pieces needed to make an anchor chart, but also include personal anchor charts for your students.
I would love to hear how you use anchor charts in your classroom! If you would like to try a sample of one of my Anchor Chart Toolkits, click on the picture below.
Hi, Anita here from I Live to Learn I Love to Grow. I'm enjoying my first few weeks of summer vacation and hope you are enjoying your vacation too. If you aren't already on summer vacation hang in there it's coming.
Why do we love selfies so much? 1- They are pictures of ourselves and we love to see ourselves in pictures. Be Honest. I know there are times you wish you weren't in a photo if it is a bad one, but the "JOY" of selfies is you can delete the bad ones and take another. 2-It's a great memory. You're making a memory of a memory just by taking the photo. I remember trying to get our whole family in a photo at a restaurant and we were having lots of trouble and then the waitress stopped and asked us if we wanted her to take a photo of us. We agreed to let her take one and after it was over my son said, "That wasn't as fun as the photo we were trying to do." It's fun trying to squeeze everyone in and then squeeze and take that "PERFECT" photo. 3- It's just plain fun. Acting silly with friends, family, or by yourself is just what makes taking selfies so entertaining. It could be a photo of going to a movie. an ice cream run, shopping, Mother's Day, or enjoying the different seasons of the year. No matter what it is selfies will always be lots of fun.
So why not use selfies in the classroom? The camera is free and comes with every iPad.
There are many ways you could use selfies in your classroom.
1. Take a selfie of you with your class. I started taking more selfies with my students towards the end of the school year to post to our class twitter account. You can never get all students in the photo (unless your class is super small) but students love to try to squeeze in.
2. iPad Screen Saver We are lucky enough to have 1:1 iPads so the students take a selfie to use as their screen saver. We have a little mini lesson on the camera the first time we get our iPads out to use them for the year and then I let them take a few selfies. They get to choose their favorite and delete the others. This makes it easy for me to identify the iPads right away when I look at them.
3. Selfies with different facial expressions.Use the selfies for helping to develop character traits when writing. Make a book about different feelings and use it to help students learn to get along with one another.
4. Label a selfie with parts of speech. Think about your face it has lots of features. You could label all the nouns on your face. Then label it again with the action that each part of your face does. This would be labeling verbs. For older students have them turn the simple labels into sentences and require them to have certain parts of speech in the sentence like past, present, and future tense verbs. Educreations is a free app that you could use to make this selfie with labels
5. Acrostic Poem Take a selfie then write a poem using your name. You could use many different apps for this but these students used the free app Canva. I made one class account and signed all my students into it on their iPads. I didn't help them to much with this app. They learned most about it on their own. Don't be afraid to let your students learn by trial and error. Have a class expert that has figured it out and have them help other students.
6. A Selfie Comic In December Elf always visits our classroom. This year we had 2 elves. The students were surprised one morning when they came to school and the elves had taken selfies on their iPads. Each iPad had a different selfie. There was also a day when they were allowed to take their own selfies with the elves. They could chose to make a comic with the photos. We like to use the Halftone 2 app for our comics. It is a paid app but it does go free periodically. You can read more about some comics apps here on a blog post I did about popsicle comics. You could have students take selfies with a class mascot, stuffed animal or figurine and make comics on different skills you are working on in the classroom.
5. Selfies with any object. Take a selfie with any object and write about it. You can write, type, blog or record all about your favorite valentine, book, stuffed animal, writing utensil, product, candy, toy, etc. The list could go on and on.
6. Selfies holding up things to represent numbers. Make a collage with the selfie photos and add some math facts to it. Use 2 friends to represent tens and ones. Four friends for ones, tens, hundreds thousands, etc. Make a math comic or use educreations to write on your number photos. Fraction selfies with a person up and person down. I'm sure you get the idea and now your creative juices are flowing.
7. Make a Selfies Digital Book My second graders made selfies books with one selfie and one sentence about it on each page. We used my Selfies Snaps digital writing unit to do this. (read all about it below) We were focusing on complete sentences and simple writing at the beginning of the school year. A fifth grade teacher friend used the unit to have her students turn their sentences into a paragraph. She explained how this worked well at the beginning of the year because many of her students had forgotten how to write a good paragraph. See one of the student's sample video above. Using these lessons was as a great way to teach my students about the app Book Creator. If you don't have the app you will want to get the free one to try it out.
I hope you have lots of new ideas about how to use selfies in the classroom. Would love to hear your ideas in the comments below.
Selfies Snaps is a mini unit of digital writing. It includes step by step lessons to make a digital book using the free app Book Creator. Students then publish their book to the free iBooks app and share it with the class.
Students take selfies with suggestions given to them on one of the photo grids. Grids include ideas for the classroom, playground, and around the school. Then they write sentences, make a digital book, grade their book, and share it. Step by step videos help students follow along with their iPads to make their digital book.
The unit includes half page cards that can be used as a Writing Station or Center for many weeks after doing it as a class. Students can chose from 8 different grids to make 100's of different books.
Here is everything included in Sefie Snaps my first iPad Mini Unit.