Pages

Sunday, August 9, 2015

Planning for a Successful Year

Hello, everyone! If you're not back in school yet, you will be soon. I believe that PLANNING is the #1 thing you need to do in order to have a smooth year. Planning needs to be done in three ways - daily, monthly, and yearly. In this post, I'm going to explain how my team plans for a successful year.

Daily Planning

It's so important to have a daily plan. You can't teach without one!
  1. First, you need to have a planner that works for you. My school uses www.planbook.com and we love it! It's only $12 a year (my school pays for it). We love it because all of the standards are there - you simply choose your state,  your standards, and the subject from a drop-down menu. It's easy and it reassures you that you are teaching the standards. Another reason we love it is because administration can see what you are doing. They can easily log on and see what you are teaching without them having to come talk to you about it. This cuts down on conference times with them, because they already know what you are teaching. This isn't a post for Planbook, I promise, but I also like it because you can move your lessons around. I live in North Carolina, and we have a lot of snow. So if I miss a day, I simply log on to my Planbook account and bump the lesson to the next school day. Now, as much as I enjoy Planbook, I also use a paper planner. I find that it's easiest for me to have it right in front of me. So after I created my detailed plans in Planbook, I copy shorter, more simplified ones, into my Erin Condren Planner. The teacher planner has seven sections for you to plan. Here is a picture of the labels I made. I bought these at Staples. Click here to see them at Staples. They fit perfectly in my Erin Condren planner! I plan to go back and put the time on them, too, after we finalize our schedule. Here is a link to the labels if you want to use them. (The font is used is KG Miss Kindergarten. You can download it for free, for personal use only, here.) 
     
  2. Once you have your planner, you need to have a planning guide. There are lots of free ones online, depending on the subject, standards, and grade you teach. Our county met and created one, and we meet to update it often. When you have a planning guide that you are happy with, store it in your planner or somewhere where you can refer it often. As you plan daily, you'll want to keep in mind where you want to be at the end of the week, month, and year. Yes, this does make planning daily an easier task!
  3. Next, you need to make sure you are planing with your teammates. My team meets weekly to discuss our plans and make sure we are teaching at the same pace. Collaboration is key!!! You do not have to be cookie-cutter teachers, and your lessons may vary, but has proven extremely helpful for my team to plan together!
  4. It's important to keep in mind that your daily plans will change. You know that sometimes our students move faster or slower than we anticipated, and that's ok! Teachers have to be flexible. However, a daily plan is a must!

Monthly & Yearly Planning

  1. I mentioned above that you need to have some type of pacing/curriculum guide. Get it out and plan your month! Some teachers have units or themes, which are easy to fit into months. In fourth grade, we don't usually have themes, but we do have units (informational text structure, fractions, etc.). Use these themes or units to plan out your month. Don't do units or themes? That's ok, too! You can still have a goal in mind. Decide how you want to start your month and decide what you want your students to have mastered by the end of the month. Again - this is a plan, not set in stone. 
  2. Create a "Year at a Glance" calendar! This has changed the way my team works! We had a curriculum map that we had created, and honestly, it was just a bit overwhelming! Sure, it's a necessity to plan out all of your standard for the entire  year. However, it is a lot to take in. So we decided to plan it on a calendar!
    1. First, we printed out free online calendars for August - May.
    2. Next, we took our holiday or date-specific skills/topics and placed them.
    3. Then, we took our reading units/books/skills and placed them where they made sense.
    4. After that, we took our social studies and science units and placed them where they fit. For example, we go to Raleigh (our state capitol) in November, so we placed our government unit and government literature in late October and early November.
    5. Finally, we placed our math units in the order they made the most sense to us. For example, we always teach place value first because everything builds on that. 
    6. Below is a picture of our "Year at a Glance" from last school year. Again, this year is not finished because we still have a lot of planning to do. However, maybe it can help you as you plan. I always need a guide to look at before I start planning - I am such a visual learner! Just click the picture to download! This was created by Kim Miller from For a Love of Teaching. Thanks for allowing me to share this, Kim! Check our her blog today!!
I hope you I have helped to make your planning somewhat easier this year. I hope you have a fantastic 2015-2016 school year!

Monica


Saturday, August 8, 2015

Creative Classroom Storage Solutions

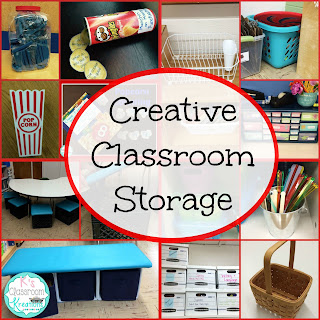
Hi there! Today I (K's Classroom Kreations) am going to let you all in on a little secret....I have an addiction to containers! That's right. I just love shopping for baskets and boxes and whatever other little containers I can get my hands on. Problem is, I can easily end up with a few too many (and buying new each year isn't a realistic possibility). I'm going to share with you some creative storage options that fill my need to organize and store, without breaking the bank.

The first type of storage you will find in my classroom consists of recycled food containers. Sometimes I use them to store manipulatives like my Base 10 blocks in the giant Animal Cracker container. Other times I use them as inspiration and storage for simple centers. The Pringles can is holding my Munchin on Punctuation writing center. I also found this adorable popcorn container (bottom left) at the Dollar Tree. I think it could work perfectly with my popcorn counting math activity (but the recycled popcorn box is just as cute!)

I'm sure if you search Pinterest you will see dozens of other ideas like using baby food jars to hold small items or an empty frosting container to organizer bulletin board border in. What I like most about this type of storage is that it adds excitement to the learning. Plus, I am always looking at food boxes now and getting inspiration for future classroom games. Next up on my list will have to be something with Popsicle sticks and a Popsicle box....


As teachers, our brains have a hard time shutting off from the classroom. This is evident in the next ideas where everyday household items take on a new purpose.

First up, the Kitchen aisle! I have used the plastic sink bins (bottom left) for years as open storage to hold books, notebooks, and my "New Kid on the Block" box. This year, after some more Pinterest-ing, I learned about the drying rack option for technology. I am waiting to get my iPads back from over the summer but I plan on standing them up in the rack as a charging station. Best part, the cords won't tangle! Next, I found this sturdy teal laundry basket to keep all of our recess toys in. Items like this are on sale now for College Back to School season (and it matched...and I have an addiction to storage..so I had to have it). Lastly, the toolbox! There are dozens of versions out there to download. I kept mine pretty simple with colored paper, ocean themed stickers, and mini address labels.

Of course I can't recycle and reuse all the time- sometimes (my favorite times) I just need to buy things! I love plastic containers from Dollar Tree for my library, manipulatives, and center materials. Little tin pails have been all the rage at Target this summer - I am storing reading trackers in this little guy (googly eye on popsicle sticks, drink stirrers, highlighting strips). These cardboard banker boxes have been some of my best purchases. I am able to store materials (special books, lessons, decorating supplies, etc.) by season and topic. These were a bit pricier but have held up extremely well for cardboard. Lastly, baskets. I use these for sorting activities mostly but the storage possibilities are endless.

 Last type of storage in my room requires getting a bit creative! I was able to get these milk crates for free a few years ago. I originally covered them in Duct Fabric but redid them in this teal vinyl this summer. Last year I stored my kid's morning work and small group activities inside of them. The bench is simply 3 crates screwed together and spray painted. I like the final look but do not suggest spray painting...black works fine and is a lot less of a pain. You can now find the crates in different colors too. The bench is by far one of the favorite places to hang out in my classroom.
 Just a few more Dollar Tree finds (geesh, I should get a commision for how often I suggest them)! I snagged these little sandwich holders and snack boxes earlier this summer. I plan on using the sandwich containers to put a deck of cards, dice, or other small center activity in. Just the fact that it has Minions or Spiderman on it will make it an instant favorite. The snack containers could be used for the same thing but I plan on using them for behavior. Last year I implemented a token system for a few of my challanging students (read more about it here). I used velcro to stick a plastic cup to each desk but they would still get tipped over. These little containers will hold the tokens and again, the theme makes it even more exciting!
Last up is my pirate themed treasure box. I bought this a few years ago at a craft store (with a 50% coupon of course!). I used it to store materials for my Pirate day at the end of the year. It could also be used as a prize box or simply as storage.

Hope you were able to find a few new storage and organizational ideas. Setting up a classroom this time of year can be overwhelming, especially finding a place for everything. Good luck and have a great year!

For other ideas be sure to check out my blog, K's Classroom Kreations. Thank you!


Want to remember these tips for later? Pin here:


Thursday, August 6, 2015

Classroom Facelift

Hello!! Happy August! I am Melanie from Momma with a Teaching Mission . I am a first grade teacher and am going into my 3rd year. I inherited my classroom and MANY items in my classroom. And I will be FOREVER grateful to the lady who retired who I replaced. She left me books, baskets, games, centers, and so much more. But after two years of kind of still living in 'her' classroom, I decided to make some changes. Maybe you are in the same boat as me, so keep reading!!

So many things I left the same for the past two years. Which nothing is wrong with, however, I felt like it was time to put my spin on the classroom! So I decided to write a little post about dressing up or giving your windows a face lift with some do-it-yourself made curtains.

So when I got hired 2 years ago, the bulletin boards were empty. So that was one area I went ahead and purchased the chevron fabric to cover the bulletin boards. HOWEVER, I know nothing about buying fabric, so when I purchased the fabric for the bulletin boards, I had lots left over! These leftovers have been sitting folded in one of my cabinet drawers to almost 2 years!


So the other day, during my lunch (I'm teaching summer school), I thought, 'hey, let's dress up these windows!' So I got all my fabric out and laid it on the desks! And my it was ALOT!!
This is a before picture of the window. As you can see, I put little stuffed animals on the shower curtain rod. But it's just awful!!
So I cut the curtain strips about 3 inches wide, and they were about 2 feet long. I had 4 different kinds of fabric (which I had originally bought at Hobby Lobby). I had Black and white chevron, white and pink chevron, blue and white chevron, and then another pattern with the black/white/blue/pink with flowers. My room colors are blue, pink, white, and black.
So this is the after! I am nowhere near a seamstress and I definitely won't quit my day job! But I think it looks cute and it adds a pop of color to the windows! I just tied the fabric strips to the shower curtain rod and I was done in about 45 or so minutes!!

Make sure to check out my blog, as I will be doing a classroom revel at the beginning of September!! Momma with a Teaching Mission Wishing everyone a fantastic new school year!

Melanie


Wednesday, August 5, 2015

Setting up and Managing Effective Group (Peer) Work in the Classroom

Have you had success with group work in your classroom or do you try to avoid it because it can get a little crazy at times? Hi, I'm Kelsea from Teacher Gems and I'm excited to share some tips with you today for setting up and managing effective group (peer) work in the classroom. If you are one who tends to avoid group work (because, well let's face it, it can be a lot of work!) I want to challenge you to give it another try because of the many benefits. I believe that each student has a unique set of strengths and weaknesses. When we pair students up in groups there are more opportunities (like assigning specific roles) to cater to individual strengths. Group work can also help prepare students for real life where they will be interacting with others on a daily basis. The social skills learned from group work alone can be worth the effort! And of course we can't forget the well known fact that two heads are better than one! In order to get the most out of your group work time it is important to have a structure in place and set up expectations prior to beginning a project. Here are 6 steps to help you get the most out of group work in your classroom.


Step 1: Selecting Groups

The first step to successful group work is setting up the groups. This may sound like a simple step but it is actually a very important step that is often overlooked. When coming up with groups there are several things you should consider. First, take into account the project your students will be working on and how many students make sense for that particular project. Anticipate the different jobs/roles that the task/project can be broken into to help determine the number of students for each group.

Once you have determined an appropriate number of students for each group it is time to figure out which students to pair up. There are several ways to do this. One approach is to be intentional about who you pair up and try to compliment a child's weakness with another child's strength and vice versa. Another school of thought it to allow students to be randomly paired in order for them to learn to work with students of differing opinions and personalities. One simple way is to have students work with the other students in their row (if you have desks) or at their table (if you have tables). Another idea is to randomly select students (which was my 4th graders preferred method). All you need for this idea is an old soup can, a little cutesy duck tape and some popsicle sticks. Peel the label off the can and wrap it with decorative duck tape (be sure to wrap around the inside lid so you don’t cut yourself like I did!). Then write each student's name on a popsicle stick and place them in the can. Now when you are ready to select students for a particular group you can just draw out popsicle sticks. I love using the can method because you can use it throughout the year for lots of other things too like picking who gets to present first, creating a new seating chart, etc. Sometimes I would even have other students pick out the names so they knew I didn’t rig it! 

Step 2: Outlining & Assigning Roles/Jobs

Now that you have your groups in place it is time to outline the specific roles or jobs necessary for the task and assign them to each student. Here is where you want to play to your students' strengths. *Side note: rotating jobs (for different projects) can also allow for students to improve on their weaknesses while providing opportunities for each student to try out a new role (and eliminate the "that's not fair she got to do that last time" comments). 

There are several roles possible and each project could have a different set of roles. In some cases you will want to assign the same role to several group members (such as the illustrator role if the project is a poster that will be heavy in illustrations). Here are a few suggestions for roles:

1. Writer, Recorder or Note-Taker: Their job would be to write down or record all the important information needed for the project or poster. Strengths to consider for this role would be someone who is attentive to detail (yet able to see the big picture) and someone with neat handwriting.

2. Time Keeper: This person's job is to keep track of the time and help keep the group on task. You can give them a stop watch or have them watch the clock. Strengths to consider for this role would be someone who is able to think ahead and break apart a task into time segments or is not afraid to call out times to the group. You may want to instruct them to call out how many minutes are left after every 5 min. or so (to avoid distracting the group every minute).


3. Materials Manager: This person's role is to gather all the needed materials for the project and help keep them organized while the work is being done. They can also make sure the materials get put back in the correct place when the job is done.


4. Illustrator: The illustrator draws and colors all the pictures for the poster. Remember you may want to assign this role to more than one student if the project is illustration heavy such as a poster. Strengths to consider for this role is creativity, attention to detail and care of materials.

5. Researcher: This can be a role assigned to one person or assigned to the group as a whole. In this role the person would look up any information needed to complete the project and relay it to the note-taker. Strengths to consider for this role are reading ability, reading rate and the ability to skim and pick out key details.

6. Presenter: This person's role is to be the spokesperson for the group when presenting their project or poster. They should show and tell the class what the project or poster is all about. Strengths to consider for this role are speaking skills, eye contact and summarizing skills.

7. Clean-Up Crew: This is a role that I like to assign to the entire group. Working as a team to clean up is an important skill to emphasize. The materials manager can oversee the clean-up and help delegate tasks for the rest of the group to accomplish.

These are just a few ideas for roles to get you started but the options are endless! Another idea for assigning roles would be to have students volunteer or select roles within their own group.

Step 3: Setting Up Expectations

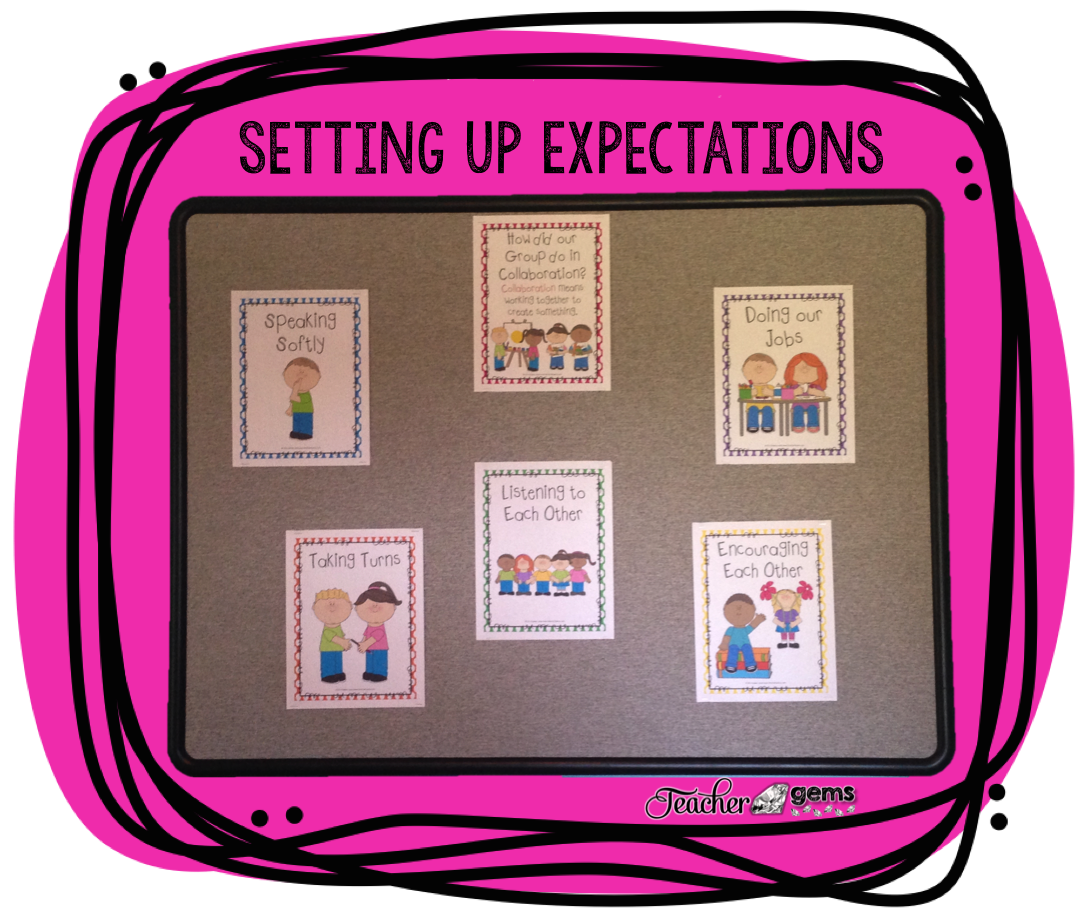
Before sending off your now eager learners, it is important to set up expectations for group work in general. What is the goal of your project? How much time should you spend on each task? What types of behaviors are expected? Here is where you can teach your students about collaboration and what it means (working together to create something). I created these posters to help students learn the key characteristics of successful group work: speaking softly, listening to each other, taking turns, encouraging each other and doing our jobs.


Step 4: Defining a Work Space

Make sure to designate a specific area of the room for each group to work. Have the necessary materials ready ahead of time and make sure the materials manager knows where to find them. Defining a work space helps cut down on messes and helps groups stay on task since they are not being interrupted by other groups. If you don't have enough separate spaces for groups to work within the classroom send one or two groups to a quiet place in the hallway. Make sure they know to be quiet and not interrupt any of the other classes or they will lose their privilege of working in the hallway! 

Step 5: Group Work in Action

Now it's time to let your students work! They will be excited to get started. Make sure there are no questions before you begin and then walk around the room and monitor groups as they work. This can be a great time to take some anecdotal notes. Note how students are communicating, how students are fulfilling their roles and which students look like they could take on more responsibilities in the future. 

Step 6: Group Evaluations/Self-Assessments

When students have completed their projects (including presentations if you have them), have students reflect on how they feel they did as a group. What things went well and what areas could use improvement? I like to provide each student with a simple chart like the one pictured below that they can complete immediately following the completion of their project. You can choose to have groups fill out one evaluation chart together or have each student complete one and then compare the results.


So there you go! Give it a try! If you are interested in the posters or chart pictured above you can find them in my TpT store by clicking on the image below.


Thanks for reading! Be sure to stop by my blog and say hello!


Tuesday, August 4, 2015

Classroom Game Changer: IXL Math

Hi, everyone! It's Jaime from Bright Concepts 4 Teachers. I am here today to tell you about one of my classroom loves.
                                   
I have been using the IXL Math online program in my classroom for over a year now! I work at a K-12 span school and finding a program that can meet the needs of all our students, site wide, is next to impossible. However, IXL Math goes above and beyond! It is amazing!

Here is how it works:
Each student has their own personal account. All you have to do it input your class roster and IXL generates a list of user names and passwords. I printed this list for my records and keep it in a plastic sleeve in my plan book. At first, students can't remember their passwords or they use capital letters and they need to be lowercase etc. So, it is essential to have a class list nearby. IXL also generates a letter you can use to send home to parents explaining the program and how they can use it a home with their child. I sent this home immediately with the user name and password too.

I have bookmarked the home log in page on my classroom computers to make getting started easier for the kids. Once they are logged in, this is what they see:


 It shows every grade level Pre-K through Algebra 2 and how many skills are available to practice at each grade level. My kiddos click on second grade. This grade level happens to have 221 skills to practice. All of the skills are Common Core aligned!!! Yes, that is correct.... Common Core aligned. Just click on the standard you are teaching and it tells you which lessons the kids should work on. I post a list of lessons that review standards I have already taught, so the kids know which standards to review.

This is just an example of some of the second grade skills students can practice. All they do, is click on the skill and then off they go!

Here is the beauty...everyone works at their own pace. If you have advanced learners, they can move ahead. If you have struggling learners, they can go back a grade level and practice the skill they missed and then move on.

The first arrow points to the skill being practice. It also shows you how many problems have been practiced with that skill and how long it took the student to complete the number of problems.

If a student misses a problem this is what they see:

The correct answer is displayed and an explanation shows how it can be solved correctly. If your students are younger, and have trouble reading, the problems can be read to them too!

Another part of the program I love, is the awards screen. As the students answer questions, they earn awards. This is an example of one awards page in my class.

This student has practiced on IXL for almost 2 hours and has mastered 19 skills. I love the visuals and how positive it is for the student. It gives them a goal to their next win and reinforces how well they are doing!

As a teacher, there is a reports section that I love! I get weekly emails about how each student is doing. I can monitor what skills they are working on and how much time they have spent practicing. Everything is transparent! If a student is working on skills that are too easy for them, I can redirect them to the skills they need to practice. It also shows skills where your class is struggling, so you know right away what to reteach!

If you have a computer lab at your school, you can take your class to practice IXL. As they are working, you can monitor what each student is doing from your own computer! Yes, you can "spy" on your students. If you tell them to all work on two-digit subtraction skills because you have a test on that skill later in the week, you can see if they are actually doing it and how well they are doing. Then, you can redirect or go help those students who are struggling! Simply incredible! Real time data that can be used immediately to improve instruction!

This student is reviewing her money skills just as the person next to her is reviewing his place value knowledge.

I love how they can work at their own pace and review their strengths and weakness so they build their confidence and math skills at the same time!

I could go on and on about the incredible features of this program! I simply love how it meets the needs of ALL of my students, as well as mine, as a teacher. I think the home connection is crucial too! Parents can monitor their child's progress at home. For homework, I ask the students to try and practice for 20 minutes each day. The constant reinforcement is essential for their success! Parents love the at home component too!

Here is a little freebie to help you organize your student user names and passwords. I leave this by my computer for easy access, just in case one of my little ones can't get logged in correctly. Click HERE to download your copy. Enjoy!


Monday, August 3, 2015

A Quest for Apps

Hi, this is Brandi from The Research Based Classroom. One thing I didn't think much about when I decided to move from first to fifth was resetting up my iPads. So I started on a quest to find some great apps for fifth grade. It was a little harder than I thought it would be. First off, when looking for apps for first grade I found a great blog called Best Math Apps and Websites for PreK, Kindergarten, First Grade and Second Grade. I found some great things for first grade there. You can see a blogpost I wrote about some of my favorite math apps I found on the site here. I really thought I would find something like that for fifth grade... but no such luck. However, I did find some really great free apps that I want to share with you.

Did you know that the National Council of Teachers of Mathematics (NCTM) makes apps? Free apps!
  1. Pick-a-Path: Uses powers of ten, negative numbers, fractions, decimals and more. 7 different levels each with 7 different puzzles.
  2. Equivalent Fractions: Create equivalent fractions and match them to their location on a number line.
  3. Math Concentration: Play alone or with a partner to match whole numbers, shapes, fractions or multiplication facts to equivalent representations.
  4. Deep Sea Duel: Play alone or with a partner to collect numbers that will reach a specified sum. This game not only has 10 levels, but it gets harder as you become more successful. It also has a negative rational number option.
The Math Learning Center has some great electronic manipulatives too. Also all for free.
  1. Number Rack: This app is probably more for younger grades, but I'm leaving it on the iPad. You never know. It is a virtual Rekenrek, which is my favorite math tool in first grade.
  2. Geoboard: Think perimeter, area, fractions, angles & more!
  3. Number Pieces Basic and Number Pieces: These two apps use base ten pieces. Students can also record and label their thinking and work on the app. Number Pieces is the more advanced version and it has additional features for representing larger numbers, and for multiplication, and division.
  4. Number Line: Visualize number sequences and model strategies for addition, subtraction, multiplication and division.
  5. Number Frames: At first I thought this was more for lower grades. But custom frames can be made to help visualize factors, products, fractional parts & more.
  6. Pattern Shapes: Explore fractions and geometry in a multitude of ways.
Pattern Shapes

Number Line

Number Pieces

Number Pieces
My quest isn't over yet, I'm still looking for some great apps. I'd love to hear about your favorite apps!


Sunday, August 2, 2015

Do you Scoot?

Hi all!  This is Francheryl from Primary Essentials.  I'm here to share an activity you can use in your class to review different skills and give your students a little movement too!

Have you ever heard of or used Scoot in your classroom?  It a great way to review and informally assess your class.  This is not an activity I would use everyday or even every week.  I would pull out this activity every once in a while to spicy up your reviews.  This activity can be used for any content area.

What you'll need:
task cards or question cards for each student in your class
recording sheet for each student
timer


If you do not have enough questions or task cards for each student you can add in some Rest Stop cards to make up the difference.  At the rest stops, students get a break and just wait for the next scoot.
You should give it a try during the upcoming school year!  That's all I've got!  See you around the blogging word!

Francheryl
Primary Essentials