Pages

Friday, January 23, 2015

Creating meaning: An Artful Approach to Teaching


Creating meaning: An Artful Approach to Teaching

Using art as a vehicle to bring meaning to assignments can improve student engagement and create a classroom culture that is vibrant and exciting.

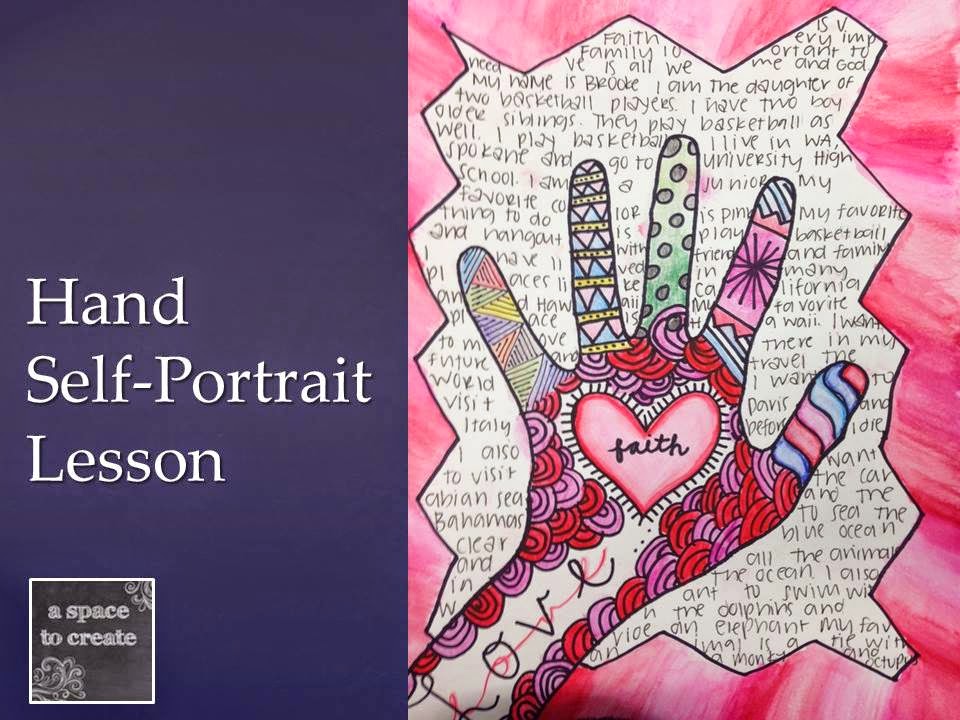
Checkout this Hand Self-Portrait lesson that I use in my art classroom. The English Language Arts teachers have begun to incorporate it into their classrooms as well.

I learn so much about my students with this lesson. It is amazing what they will share with you if you ask them to.

Hand Self-Portrait Lesson:

  • Medium - Watercolor Pencils or Colored Pencils or Markers
  • Project Length - 2-3 days
  • Grade - 3rd grade through 8th grade
  • Subject - Art, Creative Writing, English Language Arts
  • Objective - Create a piece of art using color theory, pattern, rhythm, variety and unity that identifies a core belief about yourself and serves as a self-portrait.  
  • Materials - Watercolor pencils, brushes, water cups, watercolor paper if using watercolor pencils. If using colored pencils or markers, just paper, permanent markers, thumbnail worksheet, zentangle ideas to get started, YouTube videos to use as an anticipatory set.

Start by showing students a video of Zentangles. Here are a couple  that I like, but search and you can find a ton of different examples.

http://youtu.be/R_t_34mchtw
http://youtu.be/56n7_1FGgiw

Step 1:
Students trace their hands with a permanent marker, create a fun border that goes under the hand and then choose a word that they think best describes who they are as a person. Students should write this word in the palm of the hand.

Step 2:
Give students a worksheet filled with squares to practice their Zentangles. I have my students practice at least 6 different patterns. I let them use pencil if they feel they need to for the first 3, but require them to use marker directly on the last 3, so that they can do that for their finished hand.


Step 3:
Have students use one of the zentangle patterns in the border area of their hand portrait. I talk about creating rhythm, unity and variety through the use of repetition and patterns and thick and thin lines. Check out my video of that here:


Step 4:
Next have your students add color. We use watercolor pencils, but you can use whatever you have on hand, markers or colored pencils will work great too.


Step 5:
Lastly have the students write out the story of who they are. I have all of my students start with the same line: My name is _________, I am the daughter/son of ___________. And then they take it from there.

Here are a couple of my students work in progress:


Here are a couple of the finished hands:


Have fun with this lesson and make sure you let the students and yourself just enjoy the process of getting to know one another!

If you'd like to purchase this lesson with the Doodle Idea Starter sheets that includes 12 step-by-step zentangle patterns and a Powerpoint you can find that here:
https://www.teacherspayteachers.com/Product/Hand-Self-Portrait-1664637


See you next time,


Thursday, January 22, 2015

Winter Craft Round-Up

Hello Everyone!
I'm Deirdre and I blog over at A Burst of First.
I am so excited to be a part of this wonderful collaborative blog. 
I'm coming at you today with a....
I love a good classroom craft!!
I believe so many aspects of doing a craft are beneficial for our students.
It builds fine motor, listening skills, creativity and much more!
Some of my "rules" for choosing crafts any time of year are:
{1} They have to take longer than 5 minutes.
There's nothing like spending an entire prep period planning an adorable craft, getting the kids all set up and turning around 3 minutes later with some cutie in your face saying "I'm done!". 
You've all been there I know! 
{2} No fingerprints, handprints or footprints with paint.
This may sound cruel, but it's a lot of prep and clean up for the product.
I like to keep things more simple than that!
{3} Not too many parts!
Those crafts where you need a hundred pieces on a variety of
 different colored papers make me bananas. 
Other than this....Let's get our craft on!!

LOVE PENGUIN
This little sweetie is adorable!
Recently my son made me one at home because he saw them 
in the hall at his school and thought I would like one.
How sweet is that?
Of course a quick poke on Pinterest and I found them!
Check it all out here on the Crafty Morning blog.

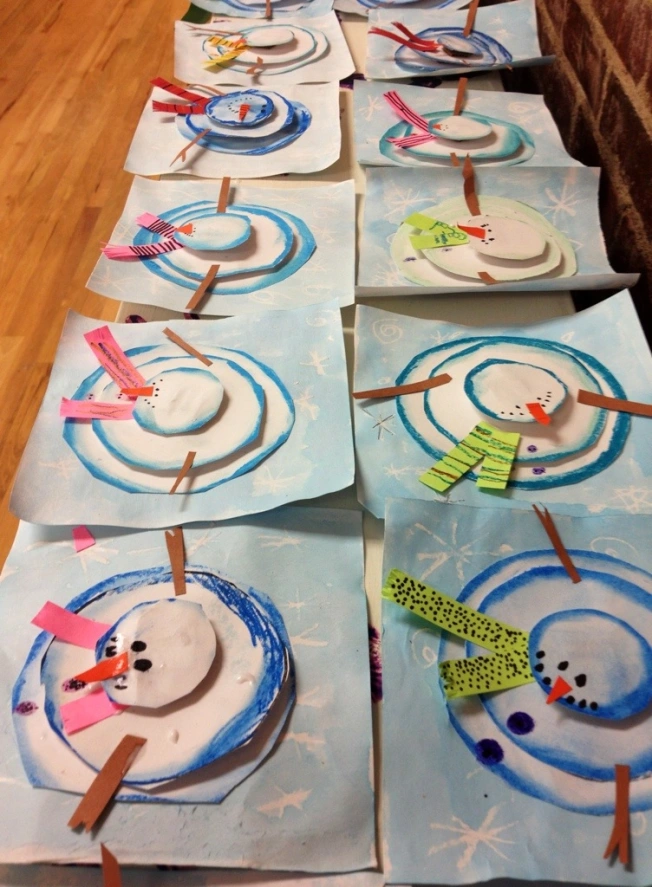
MELTY SNOWMAN
I saw these on Pinterest awhile back and I melted for them!
Get that pun all you Frozen fans?
Click here for some awesomely detailed instructions.

A YUMMY 100TH DAY
I bet the 100th day is sneaking up on you!
It sure is around here!
I am in love with this delicious craft.
It makes me want ice cream even in our cold weather.
I plan to do this in my room in a few weeks.
We are going to add ten toppings to each scoop!
I'm not super crafty, but I feel pretty smart about that idea!
Click here to see this project and some other great 100th day ideas. 

ABE AND GEORGE
We made these last year and they skyrocketed to my top ten favorite crafts.
They are reversible!!! Yes for real!!
I love 2 for the price of 1!!
They are from Erica Bohrer's blog.
Grab the free (yay!) template here!

FUN IN THE COLD
My sweet bloggy friend Aris of Sailing Into Second
recently made these adorable kids in the snow.
I must add these to my to do list!!
A Year of Many Firsts has a free template here

SNOW MUCH FUN
Last up we have not quite a craft, but a fun experiment!
Amazingly we have had very little snow here in New England this year.
I am not complaining at all!
I could probably live the rest of my life with out snow.
Bet your bottom dollar that my students would love to do this though!
I think I may have something fun up my sleeve for Friday afternoon {wink}.
Click here to check out this sweet post. 

So fun to "meet" everyone!!
I hope you'll visit (and follow) me over at A Burst of First!


Wednesday, January 21, 2015

Analyzing Running Records - MSV Made Easy with a Freebie!

Hi everyone! It's Michaela from Reading Royalty! Since mid-year benchmark testing is here, I thought it would be helpful to talk about getting the most information out of those running records as possible.


Analyzing errors and self-corrections in running records can give you SO much information. This information can help you to determine what your students are using to decode words and what they need to work on. 

Take a running record of a student reading a passage or short text aloud. Be sure to record what their errors are above the word they read incorrectly or self-corrected. Need running records? Check out the Teachers College Reading and Writing Project for some FREE ones! You can also do a running record of any book a child is reading.

Let’s take a look at an example:


Take a look at each error and self-correction individually to determine whether or not the student was using meaning, structure, or visual information while reading. Notice if students are over-relying on one type.

Analyzing Errors:
Ask: "What type of information did the child use when they made this mistake?"

Analyzing Self-Corrections: 
Ask: "What additional information did the child use to correct the error?"


M – Meaning: Does this error make sense?
This student read screamed for cried, and self-corrected after reading burn for bury. Errors using meaning show that students are comprehending what is happening in the text or by using the pictures. It is evident that this student was using meaning after self-correcting the word bury in a sentence. This student understood that the word didn't make sense in the context of the sentence. I would work with this learner on using visual information (paying close attention to the letters/word parts in the words) along with meaning. 

S – Syntax/Structure: Does this error sound right?
This student read it for that, to for for, and my for her. These errors are acceptable in the English language and fit the structure of the text, without changing the meaning. I can hypothesize that this student was using syntax/structure when reading.

V – Visual: Does this error look right?
This student read glazed for gazed and Gliman for Gilman. Glazed does not make sense in the context of the story, nor does it fit the structure of the sentence. Gliman is a little different because it is a name. This student’s error doesn’t change the meaning or structure of the sentence. Because the beginning and ending sounds in the words were read correctly, these errors do show that the student is attending to visual information. I would also note that the student needs to work on reading through the entire word by recognizing known word parts to help them decode.

The goal of MSV = Self-Correction 
We want students to be able to monitor and self-correct on their own. Avoid immediately pointing out errors to students. If they do not self correct, guide them to reread the entire sentence instead (helpful prompts below). We should give students strategic actions to use with any book, rather than just guiding them through the book you're reading. 


Prompts to guide students:

  • "Run your finder under the word and read all the way through it."
  • "What strategy could you try here? (chunking, covering up part of the word, familiar word parts, etc.)"
  • "Try that again and keep the story in your head."
  • "If that didn't make sense, remember it's your job to check it again."
  • "What are you thinking about?"


MSV has ALWAYS confused me. Every single time I analyzed a running record I had to Google what it meant. For some reason I couldn’t keep that information in my brain. So I made a cheat sheet (lifesaver). If you want this cheat sheet for yourself, you can download it for FREE from my TPT store!


Thanks for Reading! 
Michaela
Reading Royalty


Tuesday, January 20, 2015

Kids, Yoga, and the Brain


Friends~Yoga is an incredible exercise for both the brain and the body.  That is why I love that at my school ALL students have PE everyday and one of those days is a YOGA class.  
(We even have recess too!)
Yep! That's right! Grades K-8. 
Once a week, my students head to our yoga room, take off their shoes, and roll out their mats.  Why? because we want our students to connect their brains to their body movements! We want our students to be healthy active learners.  
Yoga is a fantastic way for children to activate both sides of their brains.  Many yoga poses encourage cross body motions that strengthen the connection between the right and left hemisphere of the brain. 
The right side controls emotions and creativity while the left side handles more logic and numbers.  When both sides of the brain are activated learning becomes easier.  

We all know that students these days are feeling the stress of testing in the classroom.  Some schools are even considering limiting or getting rid of recess!

Yoga allows them to focus on their breathing when stress enters their bodies.  The breathing encourage a release of that stress.  Students that are active and learn to understand their bodies are more confident and able to handle what life throws at them.  

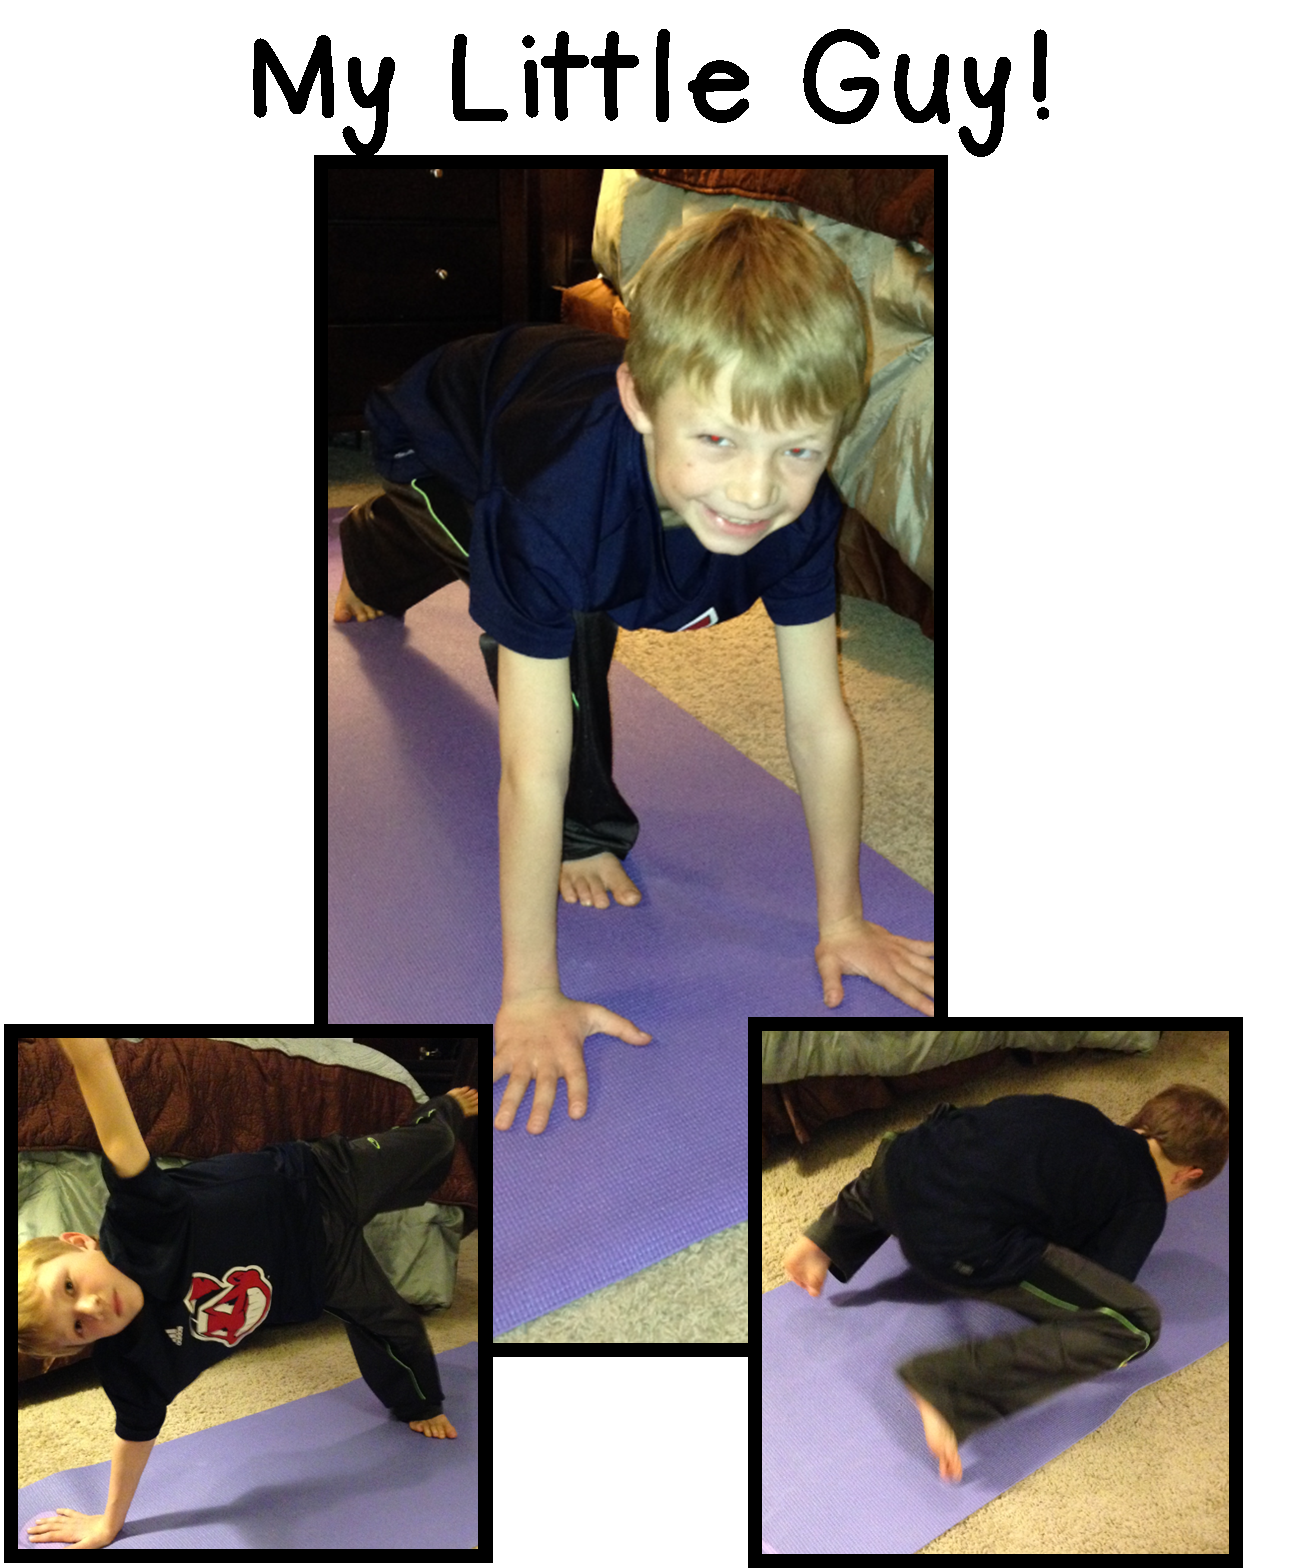
I know from my own daughter, the stress level for our young teens at school can be intense. She relies on the focused breathing that she has learned in yoga to stay in control both at school and on the softball field.  My 3rd grade son loves yoga and was so excited to show you all some of the poses he has learned in school. 


Click the video to see him in action! 

As a teacher, I see the benefit in the classroom     everyday.  We use some of the yoga breathing and cross body activities during our morning meeting and at the end of the day.  My first graders are more focused and centered after their yoga class and it is great for brain breaks in the classroom.  
If you don't have yoga in your school, I encourage you to add it into your weekly routine.  This is a simple video to get you started! 

I just love this poster!  
ABCs of Yoga has some great resources!


~A Yoga pose a day keeps the stress away!


Monday, January 19, 2015

Valentines and 100th Day of School

I was tossing around the ideas for this months blog post. I was torn between Valentines Day and the 100th Day of School. I thought to myself, "Why not do both?" So I came up with an easy, and FREE idea to share with you lovely teachers.

100 Reasons We "Heart" Our School

See what I did there ^


Please excuse all the weird feet in my pictures. They are our "Staring 2015 off on the 'Write' foot" papers. 

For us, the 100th day of school will be February 6th. I thought this would be a fantastic way to introduce the idea of the 100th day of school with my kids and decorate my classroom for Valentine's Day. 

As a class, we came up with reasons we love our school. Each student came up with a different reasons why they loved our school and I wrote it down on our white board. When then talked about how it would be boring if every student wrote "Miss Strosnider." We talked about how we can write down similar reasons, but not the exact same reasons. We came up with 5 other ways we could say "Miss Strosnider." The students brainstormed and came up with some great responses. We wrote down "My teacher," "Our teacher," "Miss Strosnider teaching us math," "Miss Strosnider teaching us reading" and so on. This was a great lesson for expanding vocabulary when writing. 

Each student had to come up with 5 different reasons why they love our school. I had 18 students that day, 18x5 = 90 reasons, we had some students make an extra fairy. They needed to write them down in a prewriting and I kept a running list so there were no repeats. The students really started to get into their writing when they found out that another student had already wrote down their idea. 


I created these black and white Valentine "fairies" (as my students call them) from clipart by Krista Wallden and Educasong. I printed them off on red, pink, and white construction paper. I printed off the copy of the boy and girl on white paper for their favorite thing they love about our school. 


I typed up all their responses, to make sure there were not any duplicates, and gave them each a copy. I passed out their one white response paper, a sharpie, and their list. They had to pick their favorite reasons why they love our school from their list and write it on the white paper. 


I collected the paper and allowed them to pick between the different fairies to write the rest of their responses. They cut out the red and pink papers and we hung them in the hallway. 


For centers, I allowed them to use "Miss Strosnider's REAL art supplies" to water color their white responses. I let them use my Prismacolor water color pencils. I wanted them to take pride in their work, and all of them really took their time and made amazing fairies. You can have your students use regular water colors have them color their white fairies. 


Here are some pictures of the final product hanging in my hallway. I love how their favorites stand out agains the red and pink fairies. 


To make the banner:
Print off the banner on thick card stock, cut and laminate. Punch two holes at the top to string your ribbon through. This took an entire 6 yard ribbon spool. To help with stringing the letters, add some tick packaging tape around the end and form a point. This will help keep the ribbon from fraying. 

You can grab this banner and all the materials for free by clicking on the image below:


Sunday, January 18, 2015

Self Assessments in Kindergarten

HIYA everyone!
It’s KIMBERLY from LovingKinders!  I am excited to guest blog this month.  So without further adieu, Let’s CHAT about


As you know, I teach K.  I adore my kinders and I look forward to all of my lessons and watching them gradually grow as independent writers.  This year our school has been undergoing accreditation.  YUCK. One area of current discussion is: 

Student Self Assessment.  

At first, I hide my head at our staff meeting. I place it on the table and close my eyes. Really?  
Self Assessment in kindergarten?  
We have enough assessments! 
NOW I have to have them judging themselves?  
Great. 

After pondering a couple of ideas, I thought to myself.  

Wait!!!  
Brain FART~! 
I DO this! I DO? 

REWIND.  In addition to teaching k all year, I teach summer school for the kiddos that need extra help as they transition into the first grade.  During our summer session we do a lot of independent writing, moving from “with support” to working towards writing independence.  

During this intervention, I provide my students with CHECK LISTS copied or stapled to their papers.  These checklists give them ways for the students to CHECK THEIR OWN WORK during and after they complete their writing.  

Many students that have difficulty transitioning into the first grade, have trouble remembering all of the RULES FOR WRITING.  They have sporadic capital letters, no punctuation, or inadequate letter/word spacing.
  
So what should we do?  REMIND THEM PEOPLE!


So... I created simple, yet effective self-assessments that can be attached or copied right onto their writing projects/journals in order to assist them with all of these kinder writing rules. 


These are GREAT self assessments and they eliminate me saying 
“Don’t forget your spaces!  How do you stop a sentence?  What do you need to start a sentence?” 

To be honest, I still say this.  
But maybe a little less. 

By adding a quick checklist- with PICTURES, students can use this to check their writing! Genuis right?  

Hey, I know I didn’t invent this but I do use it and 
IT WORKS.

Good luck making your own CHECK LIST Self Assessments.  If you are interested in these, check them out at my TPT store. I have editable and non-editable forms.


UNTIL NEXT TIME LOVIES!