Pages

Showing posts with label teacher organization. Show all posts
Saturday, April 9, 2016
Sunday, February 7, 2016

The Amazing Binder Clip

I'm a little OCD when it comes to school supplies (what teacher isn't!!) and one of the tools I like to hoard is binder clips.  I looked through my carefully organized drawer of binder clips (in 5 different sizes and 4 colors) and tried to figure out some ways I could use them up!  Here's a few ideas that I came up with that really helped me get some spaces more organized!

 We have a station for charging all our devices, but the cords keep falling down, so if you clip a binder clip on a desk or shelf, you can feed those little cords right through them (and for the small ones, clip them on with a smaller binder clip to the large clip) and they won't fall down anymore! This also keeps them super untangled!
 I love to read chapter books (this one is from the Magic Tree House series), but I often lose my place.  Not anymore!  Just pop a small binder clip on and never lose your place again!
 How many of these tiered folder holders do you have?  I've got three! One sits just to the right of my desk, close enough for me to see from my computer screen and phone.  I clip the staff directory/roster here and I always have every classroom extension number handy--and I can't lose it this way! 

 I also have a set of wire shelves next to my desk holding all my teacher books, but the little trinkets and bracelets that my sweet students give me often fall through the shelves, so enter the binder clip! I can clip one on the side of the shelf, hold their sweet gifts and hold up other important papers as well!

 How many of you have LOTS of little scrap papers floating around on your desk? They need a home, but not in a drawer? Yeah, me too! Use a large binder clip to act as a giant paper clip, and as a bonus, it will stand up on its own! 

 I use binder clips to display student work in the hallway too! Makes it super simple to change out their work (so easy they can do it!) and holds it on firmly attached! Much better than clothes pins!


We have a computer program that requires us to have a separate user name and log in for each student.  You can see how beat up these papers are and we are only 1/2 through the year! So by using a binder clip and hanging it from a Command Hook, we can keep them together for longer and they won't get lost!
 
 Short on space in your classroom? I have curtains up over all my open bookcases to help cut down on the clutter you see, but to also keep my kids with sensory needs happy. :)  You can use binder clips to clip on large charts and other student work to the front of them to make better use of your space!

 I just discovered this idea and I LOVE it! I have paper lanterns and lots of other student work hanging from my ceiling, but the old paper clips and strings keep falling out of the ceiling tiles.  So, by tying a string to the handle part of the binder clip, you can clip them to the drop ceiling tiles and they aren't going anywhere! :)

A few years ago, I switched from making labels for student mailboxes each year to using binder clips.  BEST DECISION EVER! Once my students put their mail in their mailboxes, we couldn't see their names any more, so by using binder clips, we can ALWAYS see their names and know where to put their items. :)

I hope you found a new idea or two that you can use your stash of binder clips for--or maybe you're rushing out the door to buy a big box? 

Come visit me over at Kristen's Kindergarten!


Tuesday, July 14, 2015

5 Things to Do to Get Ready for Back to School


While we are still in the middle of July and summer vacation is still in full swing, the beginning of the school is definitely in the horizon from here!  As much as I want to extend my summer vacation a little bit longer, I know that any time that I put in to prep my class for the back-to-school rush now, I will definitely be thankful later. Here are ways I prepare my classroom before the beginning of the year.

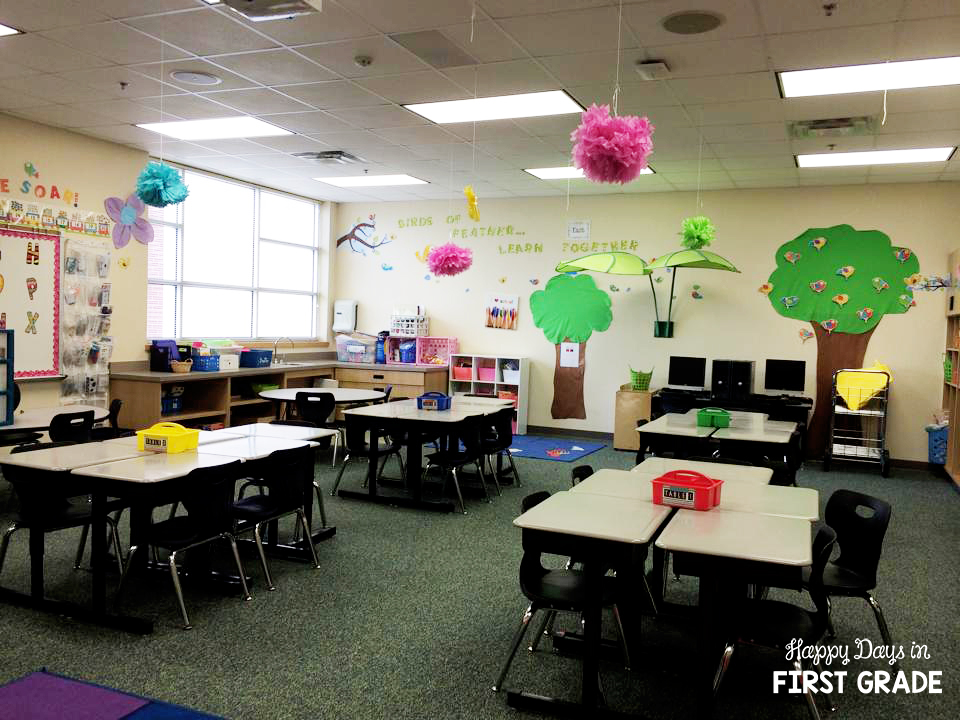
 1. Decorate Your Classroom
 May you move to a new classroom, just want to revamp your classroom's theme, or want to rearrange your word wall or student desks, do it now when you have time the energy and time. New decorations and borders are always coming out in the summer! While it's definitely hard on the wallet, and I try not to make it too over-stimulating to accommodate to my students' needs, I must admit that I am a fool for all things cutesy that make my classroom inviting and engaging for my students. Try also to follow teacher supplies stores online as they often have giveaways and promotions going on in the summer.


 2. Get all the First-Week-of-School Essentials Ready
Name plates, dismissal tags, name tags, supplies organizers, communication folders, behavior calendar, sharpened pencils, and the list goes on...Whatever it is that you need that first week of school, go ahead and purchase them now. I usually get my roster the day of Meet-the-Teacher, however, I try to have all the materials on my desk ready to go when it's time. It saves me a lot of time and helps keep things organized.


 3. Create a Plan on How To Organize School Supplies
My students begin bringing in items on Meet-the-Teacher Night. There are certain things that I like for my students to keep in their cubbies for personal use (scissors, pencil box, crayons, folders, notebooks, and markers), and there are other things that are for community use (construction paper, erasers, dry-erase markers, tissue boxes, glue bottles, glue sticks, etc.).

For items that are shared throughout the year, I leave bins out in the hallways with labels and instructions for parents and students to simply drop them off. As more things are collected, I then place enough shared supplies (glue bottles, scissors, and pencils) in little bins in the middle of student desks while others like tissue boxes, construction paper, and dry-erase markers are placed on shelves or in cabinets.  Also, the first day of school is also a great time for students to work in small groups to separate construction paper by color. This activity allows students work together and take ownership of their own classroom.   In addition, whenever you need a stack of a certain color construction paper, it is already separated and ready to use! :)

Below are the labels that I use for organization.


4. Reorganize Your Teacher Desk
I try every year to reorganize the supplies inside my teacher desk simply because I know once school begins, it is the last thing on my mind. And what's more frustrating than trying to find more staples or paper clips when it's the first week of school and you have about a million notes and forms to collect?! Buy cheap desk organizers to help compartmentalize different areas in your drawers for all your office supplies essentials. This has helped me keep organized, and a great way for me to know exactly where my things are when I need them.


 5. Decide On Your Student Seating Arrangements
Some teachers on my team have decided to do away with individual desks and go with circle tables. I've decided to keep my student desks as I prefer my students having their own storage space and to eliminate time from getting supplies when needed. Once I have my student desks arranged, I make sure I place labels on their supply bins to show what group they are in (Group 1, 2, 3, & 4). This really helps when I call to pass out papers or line up. No matter what you decide, this is the time to decide if you want five students to a group, the use or desks or tables, or where all your different learning areas will be (Writing Center, Library, Word Work, etc.).


These are just five things that have really helped me get organized for the beginning of the year. What are some things that you do to get your classroom going?


Thursday, May 28, 2015

5 End of the Year Sanity Savers!


The end of the year is a very stressful time for teachers - our to do lists are a mile long. However, now is the time to start thinking ahead to next year as well (when your report cards are done, that is).  Today I am sharing a few things to do right now to make life when you return to the classroom just that much easier.  

Before I start, my best piece of advice to save your sanity in the days leading up to the end of the year is to ENLIST YOUR STUDENTS FOR HELP. I teach first grade and they are always eager to help out. Obviously there is a limit to their helpfulness, but if you teach older children then the possibilities are endless.  

Here are 5 things I have learned to do over the years to make my life just a little easier at start up in the fall: 


I learned the hard way that this is a must-do if you plan on replicating a particular bulletin board, or in my case, the word wall. I never seem to leave enough space for the words when setting up my word wall in the fall. I have such a hard time judging without the visual of the words. Enter my iphone and voila you can now look the picture you took and use it to easily get your letter headers placed with the right amount of space to add your words. Take pictures of any bulletin board/display/anchor chart that you think you might want to remember or refer to again for the next year. I am a very visual person and have many such photos on my phone. 


Do I really need this? Take time to purge! Sort out that filing cabinet. If you didn't use the papers in that file this year and you are staying at the same grade, recycle them or give them away! If you are like me then that will not be a priority when you return in the fall. I am totally guilty of an overflowing filing cabinet – take a look at my picture. I inherited files from the teacher whose room I moved into 15 years ago and they are still in there! Perhaps I have a problem!    Anyone with me??


Students love doing this job. First I have them find all the damaged books and move them into the book hospital bin. At that point it is up to me to decide if the book requires tape or if it has seen better days and is ready for the recycling. I have a number of books that will be recycled this year as they are so well loved even tape won’t help. Next, my students make sure all books are in the proper labeled basket, either guided reading level or thematic. It is astonishing how poorly sorted the book collection becomes. Very quickly those helpers start to police the other students as books are being returned. If your students are anything like mine we are bound to find a D level book in the E or F basket. I love starting out the year with my books all sorted and organized. It’s one less thing to worry about in the fall! CAUTION: I did not take time to straighten up my bins for the pictures.  This is real life at the end of the year! 


This will be a true sanity saver because systems that didn’t work probably drove you insane throughout the year! Now is the time while the year is winding down to honestly evaluate your organizational systems. Did they work for you and/or your students? Did students use the systems you put in place properly? If the answer is no, then why is that the case? How can you change things so it works for next year’s class? I have a drawer organization system I use to put all my copies etc. in for the week. I love it, but I don't use it faithfully, especially when I get very busy. I will continue to use this system though, despite my inconsistency, because it does work better than anything I have tried before. With my students I started using reading boxes a few years ago to help my students organize their read to self books. This is a system I love but I am finding the kids are really hard on the boxes this year: take a look at those tattered boxes. I think at the end of last year I only had 2 destroyed and this year it is almost half the class. This is a great system but I need to do more teaching about caring for their book boxes next year. 


These are some of my other organization hacks I implemented that I LOVE and will use again next year. Be warned, all the labels are looking very well used.  


What were some of your highlights from the year? What were some of your student’s? Have your students brainstorm about some of the things they liked best about the year. If it has stuck with them then it is probably a “keeper” activity. Take a moment and jot down some of your highlights as well. This can be pretty hard to do even at the end of the year so imagine how impossible it will be in the fall. This is also a good time to do some planning, if only in your head, about things for next year. I often plan to do this and forget, so I am hoping that the act of simply writing about it here on the blog will spur me to take the time to do this with my students. 

I hope you found some helpful pointers or simply were just reminded of things that you already do and need to do as the year winds down. I am on the final month countdown and will be thinking about these things in the coming weeks. 

Lastly, how about saving your sanity right now? As the weeks wind down it is more difficult to keep students engaged in their learning. I like to continue with a predicable routine until close to the end for my own sanity.   This Summer themed Spin and Graph center which is available in my store right now is perfect for this time of the year. Simply print and provide a paper clip for spinning and you have a center ready to go.  It's an engaging and relevant review task and a sanity saver all in one!  


Sunday, March 29, 2015

Tips for Being a Traveling Teacher

Hey there!  It's Alison from Learning At The Primary Pond (formerly Ms. Lilypad's Primary Pond).  Today I have some tips to share with you about being a "traveling" teacher!  This may be helpful to you if you are a reading specialist (like me!), speech/language teacher, some other kind of specialist, work in several different buildings, or just don't have your own classroom to teach in.  But keep reading even if you are a classroom teacher with a room all to yourself, because a lot of the tools I use to stay organized will be helpful for all teachers!


This school year has been my first year as a reading specialist, and my first time not having my own classroom.  I do have a small area in our reading room to myself, but I share the space with 2 other reading specialists and at least 5 program assistants.

At the moment, I work only with Kindergarten.  The Kinder classrooms are at the other end of our (rather large) building.  Instead of bringing my students back to the reading room, I stay closer to their classrooms to maximize instructional time.  I was working in the hallway for a while, but thankfully have been able to move into a smaller room near their classrooms.

Not being able to teach in my own space has been challenging, but I've adapted.  Here are some things I've done that have made my life easier:

1.  I invested in a great teacher bag!  The bag in the photo below is from Amazon (click the image to check it out).  


It has 6 pockets on the outside that are perfect for storing markers, pencils, and other materials.  The inside has a flat bottom so that most things will stand up in it.  I love it!!

You could also definitely try a rolling cart if you have to move around a lot within your school or between schools.  I only have to carry my bag to my teaching spot and then back again, so it works just fine for me.

2.  I store materials in places other than my office.  I see 10 students for interventions, and I have a large plastic folder for each student.  I realized that it just didn't make sense to carry the folders back and for the very single day.  So I put them in two small plastic baskets and asked another teacher (who works in the small room where I teach) if I could store them in her space.  She didn't mind one bit!  This works out great, and whenever I want to use the folders to plan, I just go to the room, take down the baskets, and start working.

3.  I use a tabletop stand to display anchor charts and learning objectives.  This little stand has been a lifesaver!  I use it to display an alphabet chart, other anchor charts, and daily learning objectives for my kids.  Having chart paper or a pocket chart is out of the question since I travel, but I have been just as happy with this.


It's totally collapsible, inexpensive, and has protective sheets for 20 different pieces of paper!

4.  I use a simple "sticky note system" to stay organized.  One problem I found was that I would think of things that I wanted or needed to do while I was teaching...and then I'd completely forget them by the time I got back to the reading room.  It was an "out of sight, out of mind" thing.  Because I wasn't teaching in the same place where I get my materials ready, I was forgetting what I wanted and needed to do for the next day.  Fortunately, the solution to this turned out to be pretty simple.  I make sure that wherever I am teaching, I take out a pack of sticky notes and pen and have them ready to go.  When I think of something I need to do, I write it down.  When I'm ready to return to the reading room, I take the sticky note off the pad, carry it with me, and place it right into my planner (which stays in the reading room).  Then I have a ready made to-do list in a place that I know I'm going to look each day. 

5.  I bring my own cleaning supplies.  When I had a classroom, I knew that a table was clean (or not), because I was in that same room all day.  However, all bets are off when you're working in a space that multiple people (and many germy kids) use!  I keep wipes in my teacher bag and wipe down the table before I start teaching each day.  And every time I do it, I'm glad I did...you would not believe the dirt that comes up!!


Well, that's what I've learned so far - what would you add to this list?