Pages

Friday, February 28, 2014

Making Feedback Meaningful

Hi again and happy Friday!  It's Alison from Ms. Lilypad's Primary Pond.  Today I have some quick tips for you on giving meaningful feedback to students, and a freebie to make giving feedback a little easier!

This year, I'm teaching second grade reading and writing, and our school has been focusing on having students respond to texts by answering comprehension questions in writing.  The kids write in their reading journals just about every day.  This is great, and I've seen their writing come a long way, but of course it creates a whole lot of writing to grade...


http://www.tumblr.com/tagged/grading-papers


If you're anything like me, grading papers is not #1 on your list of things you enjoy doing on the weekend!  But as much as I don't like doing it, I know it's super important to give my kids meaningful feedback.  Feedback not only improves their work, but it also helps hold them accountable for their independent work time.  Every week, I take an in-depth look at my kiddos' written responses at least once (I also spot check here and there as I have time).  I try to grade their responses around Wednesday or Thursday, so that they can take my comments into account during the rest of the week.  

When I first started grading their responses, I wrote comments on their work.  And then I noticed I was writing the same comments on different kids' papers over...and over...and over.  There had to be a better way, I thought.  Enter:  the rubric.


I use this same rubric to give my students feedback on their written responses.  It focuses on just three areas:  answering the question, using text evidence (details), and using capital letters and periods correctly.  If a student has done well in one area, I use a green highlighter to mark it.  If a student needs to focus on one area, I use an orange highlighter to note that.  I feel like, in the mind of a second grader, rubrics can just look like a whole lotta words put together, so the color coded highlighting helps them better understand how they did.

When you use a rubric for grading, it's important that kids first know what the rubric means.  When I introduced the rubric, I went over each part and then we actually practiced scoring a pretend paper using the rubric.  I do re-teach how the rubric works from time to time, just as a refresher.  When I hand back their reading journals, I point out that I have stapled the rubric on the page next to their work, and remind them to look over it before they write their next response.  

If you would like to use this same rubric, click on the picture below to download for free!  


Happy teaching!
Alison


Thursday, February 27, 2014

Morning Work Made Easy

Hey everyone! It's Heather from Second Grade Perks. I want to share something with you today that has saved me a ton of time as a teacher and has just made our mornings at school go so much smoother. Now, what I am sharing is a product from my TPT shop but please don't think I am just trying to sell you a product. My product is just what we use in our room but you can technically use any type of morning work you want with this system I am going to explain.

I realized just how much I love this system when I started writing sub plans one day. As I started to write them the first thing I listed was morning work. All I had to write was they come in and do their morning work and they all know what to do. It felt great, so I decided to snap some pictures to show you what I use and explain to you why I am in LOVE with our routine. First, every table in my class has their own morning work basket with a number on in.


Inside of the baskets are all of the materials they will need for the whole week. (We rotate baskets each week). The materials are a ring with 5 morning work task cards all aligned to CCSS, books, morning work sheets, and a bag with their name for unfinished morning work. This is where though you could insert your own tasks or morning work ideas if you wanted to.


 When the kiddos first get to the room they have their basket already on their table. They pick a card from the basket and get to work. Some cards may ask them to read a book from their basket and complete a task and others may ask them to get a morning work sheet to complete. All of this work is done in their morning work notebook. The pages are numbered in their notebook so they know what page to complete each task on (makes easier for grading). The cards are simple enough that they can complete one card each morning. At the end of the week, I take up the notebooks and baskets and grade them. On each page I either put a check or I circle the number if they need to go back and look at it again. I might even put a note as to why it was circled. Most of the time it is because they did not follow all of the directions on the card such as color your picture.


 On the inside of their notebook I put the date and the grade they got for the week. As you can see in this picture I used it was the first time we did these, and I waited and graded at the end of the month of August (we had only been in school 2 weeks) and the girl missed 10. After that they start to get the hang of it and do much better.


I mentioned above that each kid has a bag in their basket. Some days students just don't get finished with a card and if they need to they can put the card and any materials they were using in their bag. That way the next morning nobody gets their card before they get to class.

Now why do I LOVE this routine so much? Several reasons. One, it is aligned to CCSS and increases in difficulty through the year. Two, I can get grades from it each week. Three, the kids know what to do all year long without me having to explain it. And the biggest reason of all is because at the beginning of each month all that is required of me is to print and laminate the cards (which I won't have to do next year) and make a few copies of the required morning work sheets to put in their baskets. After I take care of that I am finished preparing morning work for the entire month. Ahhhhhh sigh of relief! It feels great.

Click on the picture to be taken to the bundle for the whole year if you want to see more images. I'm going to put this bundle on sale for just $15. Like I said though you can easily use the general basket/rotation idea that I just described with your current morning work. Try it and I promise you will fall in love!

http://www.teacherspayteachers.com/Product/Morning-Basket-Work-Bundle-August-May-698850
 
 
https://www.bloglovin.com/blog/5245119
 
 
secondgradeperks.blogspot.com/


Tuesday, February 25, 2014

Bible in the Classroom

Hi all! I am from Bonnie Kathryn Kinders and Beyond. I know many of you can not teach Bible in your classrooms. However for those Christian and Catholic school teachers, I hope that you can find this to be helpful. For other teachers, you might find it interesting how I teach writing to my kindergarteners. I have had many requests from teachers wanting to know about my writing process. I plan on writing a future post about Kindergarten writing on my personal blog.

With out further ado...

We have been studying David in our Bible time. This week my Daily 5 centers have been used to reinforce what we have been learning in our Bible time. I like to use Daily 5 to expand on our science and social studies lessons.

As a Christian school teacher, I try to integrate Bible throughout our day. I want my kids to know and understand that our walk of faith is more than sitting down for 15 minutes in the morning to read our Bible story.

Over the past week, we have talked about the life of David. I am teaching my kids Psalm 23 through sign language. Click here for a great website to look up signs for scripture.


Along with our curriculum, I read to my kids from the Jesus Storybook Bible. I love this Bible because each story points to Christ. We will read through the whole Bible by the end of the school year. I really like how the author refers to Jesus as the rescuer. If you want a sample of what this Bible is like, here is the video we watched about David from the Jesus Storybook Bible.


I sometimes use our snack time to show a video that relates to Bible, Science, or Social Studies.


I used the story of a David to introduce a writing assignment. We are currently talking about writing stories with a beginning, middle, and a end. In the past, I have read books where we have discussed the different parts of a book. I had my kinders brainstorm with me and we wrote this story together.


After our whole group time, I then gave them the assignment to retell the story of David. I helped them by writing a few words on the board that they requested. I released my kinders to start the assignment. I walked around for a few minutes and then I started calling my reading groups back to meet with me.

Here are a few pictures of them writing and the finished product. I just love their little drawings!


I used this worksheet for word work today. I like to change my word work centers to reflect the theme for the week. I also use it to integrate Science and Social Studies. Last week we went to the circus, so this week we have had circus activities in word work and work on writing.


If you are looking for ways to integrate Bible into your centers and curriculum, you can find my People of the Bible series here.


http://www.bonniekathryn.blogspot.com/
Blessings!


Monday, February 24, 2014

Vocabulary Counts

Hi! This is Linda from Kinder Doodles again.  I am a kindergarten teacher at a small rural school in Northwest Indiana.  There are eighteen little cuties in my class this year, and we are having so much fun together!

One of the areas that I like to focus on is building vocabulary.  I was fortunate to have the opportunity to attend a workshop that focused on strategies for improving vocabulary led by Dr. Anita Archer, an educational consultant on explicit instruction.  Her presentation was dynamic and informative ~ a workshop filled with ideas that I was excited to take back into my classroom and try.  Not only did I try some of her ideas, I am still doing them! 

 In order to provide explicit vocabulary instruction, begin by choosing three to ten words that pertain to your selection (book, chapter, content area) that are words that students will most likely encounter in other places.  Your word choice will of course depend upon your grade level.  Here is a picture of the vocabulary words in my Hibernation Mini Unit.  As you can see I selected words that my students would hear in the books we read as we studied hibernation.


To begin instruction, I showed the students the vocabulary word card as I pronounced the word.  I then had my Kinders repeat the word.  We clapped the beats in the word, and repeated the word several times.  It is important that students are actually able to say the words they are going to learn!  I gave a simple definition of each word & had the kids repeat the definition several times.  To help my little students to be able to read the words I added a related picture.  (The pictures were very helpful when the kiddos referred to the chart when writing.)

Another practice that I have found my students enjoy is using hand motions when chorally saying the definition.  In October when we studied the pumpkin life cycle, we used hand motions to help remember the meanings of sprout, vine, and ripe.  Adding a kinesthetic element to vocabulary instruction can really help some students to learn new words.


 Mrs. Archer recommends that vocabulary words aren't just stuck onto the word wall in alphabetical order. Instead, she feels that vocabulary words are best presented as groups of words that "go together."  (Alphabetically arranged word walls are more suitable to high frequency words.)  My Kinders helped to generate this list for a reference as writing, but it is an example of a what content vocabulary chart might look like.  I sketched little pictures to help the students know read the words.  (They may not be very artistic, but five & six year old kids are impressed by my drawings! lol)


 I like to use Scholastic's Knowledge Quest sets when studying content areas.  I have found that they are also a great resource for vocabulary instruction.  I have created a set of vocabulary cards & activity pages for their "Let's Visit a Farm!" set that is available on my TpT store


Click HERE a sample for you to use with the book An Orange in January.

One quote about the importance of early vocabulary instruction from her presentation that really stuck with me was, "direct vocabulary instruction has an impressive track record of improving students' background knowledge and comprehension of academic content" (Marzano, 2001)

Please visit my blog, Kinder Doodles for a peek into my little country school.  Thanks for reading!

http://kindergartendoodles.blogspot.com/


Sunday, February 23, 2014

Synonyms & Nursery Rhymes

Hello again! It's Christy from Teaching Tales Along the Yellow Brick Road. I hope that you are enjoying this blog; I know I enjoy checking in and seeing all of the wonderful ideas posted daily! 

This last month, I started teaching a vocabulary intervention group and I thought I'd share a quick activity that my students enjoyed! 

Part of this intervention time has been spent working with dictionary and thesaurus skills. To put some of our skills to work, we took nursery rhymes and altered them by finding synonyms to replace some of the more 'boring' words within them. Students then created a poster showing their new-and-improved nursery rhyme renditions. 

They looked good and gave students a chance to use their thesaurus skills. A win-win!

Hey Diddle Diddle
Row, Row, Row, Your Boat

Twinkle, Twinkle, Little Star

Hey Diddle Diddle
Twinkle, Twinkle, Little Star
 
On a slightly unrelated note, if you are planning ahead for St. Patrick's day, I have a couple of freebies in my TPT store for both primary and upper elementary. Click on the picture to see these holiday themed math freebies.

Hidden Number Activity

Rounding and Coloring Activity


I hope that you have a wonderful week!


Saturday, February 22, 2014

Building Discussion

In the school that I work in, building conversation skills among students is an extremely important developmental aspect that administration looks for when entering the classroom.  Not only do they believe it is important, but so do I.  Building conversation in the classroom allows students to socialize, share opinions, help each other determine the correct answer, build vocabulary, build upon each others answers, and the list goes on.  Believe it or not, but having collaborative conversations is something that kids do not always know how to do.  Here are some ideas for building conversations and higher order thinking during class lessons.

Turn and Talk
Simply pose a question and allow students to turn and talk to their partner/neighbor on the carpet to discuss the question.  When conducting turn and talks, it's important to establish at the beginning of the year or when you first start doing them that you sit knee to knee and face each other eye to eye.  Each student takes a turn talking.  Students can agree, disagree, help each other, add on, etc.

Conversation Prompts
I found these conversation prompts on Teachers Pay Teachers back in September.  I did not create them (although they are brilliant and I wish I could say that I did)!  They are created by The Mommy Teacher and they provide 9 different conversation prompts with picture clues... PERFECT for the primary grades (especially K and 1)!

Here is a link to her product: 

Since I teach Kindergarten, sometimes I will ask the students "Thumbs up if you agree with so and so and thumbs down if you agree with so and so."  Then I call on somebody and ask "Why do you agree or disagree with _______________."  I also ask "Would you like to add on to what so and so said?"  Their job is to respond with "I would like to add onto so and so ..."

Centers
Centers are the absolute best way to build socialization and non pressured conversation in your classroom - especially in the primary grades.  Centers are the be all, end all in my classroom.  I conduct centers during guided reading time.  I try to do centers every day, but sometimes it just doesn't happen.  And if it doesn't happen...... I do NOT hear the end of it!!  My class is adorable - and they will tell me flat out that center time is their absolute favorite time of the day.  Centers should provide structured activities that can be completed independently but that FEEL like play time!!  If you are a Kindergarten or First Grade teacher and don't conduct centers... well then you better hop on the center bandwagon because your kiddos are missing out!!!!  Benefits not only include the socialization that we are looking to build, but allow students to converse about answers, strategies, solutions, etc.  It can also provide students with certain developmental stimulation that they may not get on a regular day (such as cutting, glueing, touching tactile objects, etc.).  Centers most certainly build upon the desired learning and conversation that all classrooms should aim to achieve.  I will be posting a blog post soon on my personal blog about how I conduct centers in my classroom.  Please visit and follow My Personal Teaching Blog if you have not done so yet.

Discussion Ball
Similar to turn and talk except this involves the whole class.  I toss a SOFT MATERIAL ball to a student to begin the conversation and then that student passes it to another student and so on.  I usually begin the conversation by asking a question (this could involve an opinion, share something that they learned about a given topic, etc.).  Students guide the conversation, with minimal teacher interjection.

I don't have a picture of the ball that I use and I have no idea where I even got my ball from, but here is an example of the TYPE of ball that I use.  If you would like to know exactly which ball I use, leave a comment below and when I return to work on Monday, I can update this post.  


Discussion Sticks
I use these in my classroom as a method of "cold calling."  Meaning, that they are used to randomly call on students during class discussions.  This is a way to make sure that all students are paying attention all of the time because they never know when they will be called on.  Since I have a Promethean Board (similar to a Smart Board) in my classroom, I will also let the student who had a turn pick a discussion stick from random.  These are what my discussion sticks look like.


I created numbers, then cut and laminated them and glued them to large popsicle sticks.  I bought the tin in the $1 section of target (Super cute, right??).  These numbers can be used in more ways than just this, but for the purpose of this blog post I will refrain from sharing the other uses.  They can be purchased from my store here:

Group Work
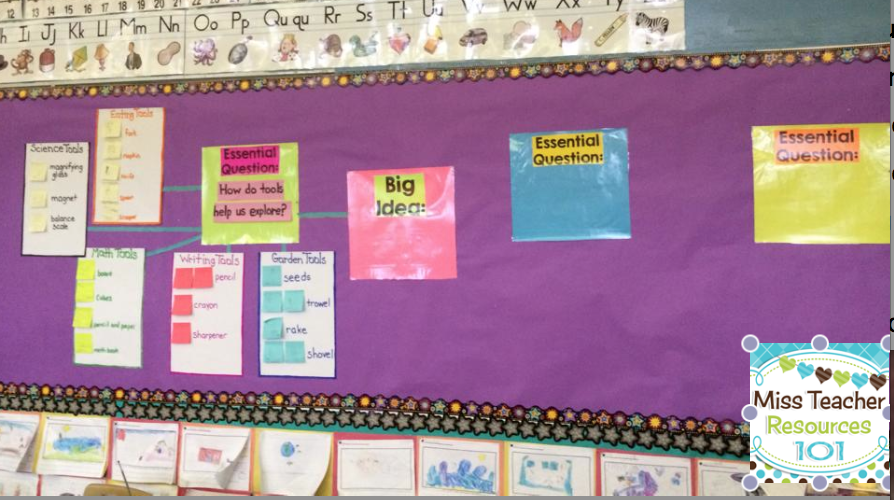
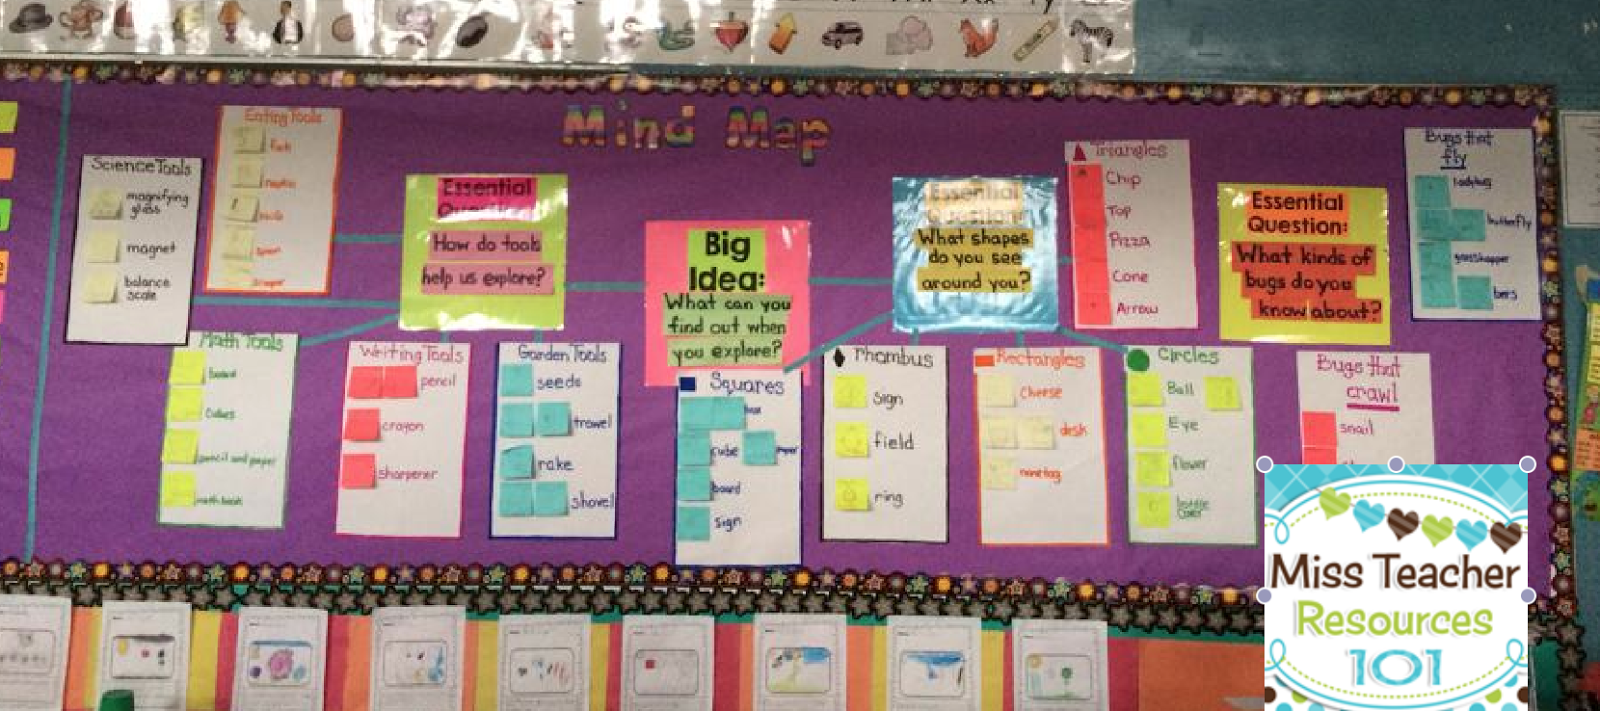
The last method for building discussion, is incorporating group work into your lessons.  Here is an example of what group work looks like in my classroom.  In my classroom the students are given one time per week to discuss an essential question that we have been working on for that week.  The students are asked a question and discuss amongst each other (UNINTERRUPTED) about the different ideas that relate/answer that question.  I have 4 groups and each group has a different sub area related to the essential question.  In my school, we call this Mind Mapping.  Pretty much it is a glorified brainstorm web, but when you actually take a look at it, it's kind of cool!  It gets students communicating with each other using the vocabulary and the information that they learned to answer a question.  After the students discuss, they are given a post it to draw a picture and label/write about the idea they came up with.  Their post-it is then put on their groups poster and hung up onto our mind map bulletin board.  The first picture shows what it looks like when it's in progress.  Each week we add to it, after about 3 weeks, it comes down and the new unit's big idea and essential questions go up.  The second picture shows a finished product.


One last thing before concluding this blog post ...
Something to keep in mind when asking questions to build conversation in your classroom is to remember that when you ask questions that begin with "Why" and "How," you are hitting the higher levels of cognitive thinking!  

I hope that you have found this post helpful and that you will be able to use any of these strategies towards increasing the rigor of discussion in your classroom.  So now I'm curious, how do you develop conversation building in your classroom??  Would love to hear more from you!


Friday, February 21, 2014

If I lived in a Snow Globe or an Easter Egg

Hello again.  I'm Deniece from This Little Piggy Reads. 


I know many of you saw a ton of snow in January.  Deep in the Heart of Texas, we didn't.  Our kiddos wanted a snow day secretly, many teachers did too.  
Since my students didn't get to go out and play in the snow, I decided to bring the snow into the classroom.
Okay, not snow, but the thought of snow.  
I'm sure you've seen many pinterest ideas about this writing topic, If I lived in a snow globe.... 
I saw this idea at a professional development class about 3 years ago.  This year, I had the opportunity and time to do this writing craftivity in class.  I LOVED how creative my students were and how they were literally engrossed by the idea of living inside a snow globe. 

I began by having them write a Main Idea and 3 Details, using Valerie King's Freebie Snow Globe Graphic Organizer.  Then, I did a mini lesson on including sensory details in our writing.  I used a few poems as mentor texts and they went back to add sensory details.  Next, I had my students "pose" for a picture based on what they wrote about.  The kiddos LOVED it!  Their stories were amazing.  Some students wrote about breaking out of the snow globe, some wrote about being an ice princess and someone even wrote about living in an ice palace and swimming in a hot chocolate pool.  It was hilarious to read them!  Their favorite part of the project - using paint to make the snowflakes!  Yes, even 5th Graders got super psyched to use paint.  


As Spring approaches, I think you could do a similar activity with an Easter theme.  If I lived in an Easter Egg...  I found this pic on pinterest (from Susan Norwood's blog) as an option for a bulletin board or a display.