This will be my last blog post for Whose Who as Marlie Strosnider. I will be switching my store name over to Marlie Rose when I get married this summer! With crazy wedding planning I have been looking for great activities with little prep work. I will be sharing with you this easy mother's day craft/card your students can do with little prep from the teacher.
The items you need for this card:
Brown paper
Card outline (click photo for free download)
String
Flower cut-outs. (I have a flower hole punch I used)
Strong glue
Student's pictures.
My school receives a sheet of student photo stickers each year. I am using them for this craft (you can easily take your students pictures).
Follow the pictures below to make this easy and beautiful mother's day craft for your students to give to their mothers.
What you need:
Flower pot outline, flower di cuts, pictures of students, green string, and strong glue.
Step 1:
Copy the flower pot outline onto brown construction paper
Step 2:
Cut the outline of the flower pot out.
Step 3:
Glue the outlines of the pot and the green string to the middle and fold the pot. Make a loop at the top for the mothers to pull the flowers out. Glue the loop.
Step 4
Glue 4 flowers onto the string. Have the students write "I love you" and the last flower have students glue/stick their pictures.
Step 5
Let your project dry. The flowers go into the pot once they are dry and you'll have a nice card/craft for Mother's Day.
I hope you enjoyed this quick and easy Mother's Day Card/Craft.
It's science fair time again and we have been working on our project. We used the scientific method to guide our experiment.
We began by talking about our problem.
Then we formulated a question.
And a hypothesis.
Next, we each made a prediction.
Then we conducted our experiment.
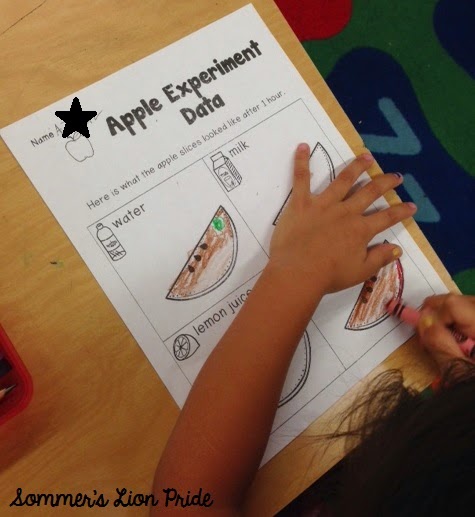
I prepped by dividing paper plates into 4 parts and adding the names of the liquids.
Then we dipped the apple slices into either soda, milk, lemon juice, or water and placed them on the plates.
Then came the hard part for my Kinders ... waiting!
We waited an hour and then observed the apple slices.
The differences between all of the slices was very subtle, but we did find that dipping an apple slice in lemon juice slowed down the browning process.
We recorded our results on this sheet.
Here is our display board, all ready for the Science Fair!
Hi, I'm Jessica from What I Have Learned. It's great to be back here on Who's Who! Since I've posted here, I've gotten a whole new blog design.
At about this time last year, I wrote a blog post for Who's Who all about how I use sentence frames in Math. Click on the link or the photo to read all the reasons behind why I use specific sentence frames in my classroom.
In the previous blog post, I gave you examples using sentence frames in multiplication. Today, I want to give you a some more examples, but this time using fractions. Here is how we have used vocabulary and sentence frames in our classroom to learn about fractions.
Become Familiar with the Vocabulary
The first day in working with fractions, we made fraction strips. This activity helped students become familiar with the language of fractions though hands on cutting.
We also played a game called Cover Up, where students had to cover up their whole piece with the fractional amount rolled on a piece of dice. While playing, one of the "rules" was that students had to say the name of the fraction, which helped them practice the correct language.
With older students, I have them write their turns to see how like fractions can be put together and how, when it's all added up, it equals one. For my second graders, my main objective was for them to practice accurate fraction vocabulary.
Sentence Frames
After students were familiar with the fractional terms, I introduced the sentence frames.
We practiced saying the sentence frames though choral responses.
Application
After students had a decent grasp of the sentence frames, we practiced partitioning shapes into equal amounts.
We started with precut shapes and folding. As we folded the shape and labeled it, we also use the sentence frames to describe it. Since we were working on two skills here, partitioning and using the sentence frames, I didn't have students take it to writing yet. I really wanted them to get the idea of partitioning fractions and describing them.
The next day, students partitioned their own shapes. We started all together on chart paper. Again, using the chart paper with the sentence frames, we discussed how I was partitioning and shading in the shapes.
Students went back to their desks and, using their math notebooks, drew a large shape, partitioned it, and described it using the sentence frames. I gave students the sentence fames so that they wouldn't get bogged down with the writing.
Students had to draw one circle and one rectangle, although they were able to choose how they partitioned the shape (within halves, thirds or fourths) and choose how to shade in the shape. This last student needed a little bit of help describing her shape, but you can see where the drawing along side the sentence frames helped her understand the concept.
One other game that my students have been playing a lot lately to practice the fraction terminology is Fraction Go Fish. This has been a beloved game in my classroom. Who doesn't love a good game of Go Fish?
Do you use sentence frames in your classroom? How do you use them to help your students understand and use academic language?
For more great ideas on how to teach difficult math concepts and scaffolding learning for students, come visit me at What I Have Learned.
Hey
there, farm folk! It’s spring and it’s time to go to the farm. We always enjoy learning about farm animals
this time of year. Here are some of our
favorite activities.
An easy but fun center is pictured here. Put out some small plastic farm animals. (We got ours at Michael's Crafts). Children can add a pond by tearing a small piece of blue construction paper and maybe a mud puddle for the pigs. Add a bale of hay from the craft store, too. Allow the children to construct some corral fences by gluing together craft sticks. We found a cute box at the craft store that looked like a barn but the children can build one using wooden blocks. Ask the children to bring in any additional items from home that would fit in this center. This activity center sparks LOTS of conversations about farms. Use it as a springboard for writing activities before or after visiting a local farm (if you are lucky enough to teach near one that allows field trips!).
The Little Red Hen story has been around for a LONG time but it never fails to delight. Many
authors have retold this classic tale and it is fun to read and compare several
versions. There are even some “twists” on the classic such as The
Little Red Hen and the Pizza and With
Love, Little Red Hen. Here are some pictures of books that we use every year. Create a comparison chart for several traditional books or use a Venn Diagram to compare a "classic" version with a newer "twist" version. See how the authors used parts of the original tales to create their "twist"!
Here is a simple but cute way to display student writing. Add some wings that "flap" and the head of the Little Red Hen at the top. Have students write summary sentences that retell parts of the story.
We created a retelling of the Little Red Hen in SONG! Click {HERE} to link to it at our TPT store.
After learning about (and maybe visiting) a farm, provide some themed writing paper for your students to use. Here are two students' writing using the paper we have for you at our FREE DOWNLOADS page. The paper comes in 3 variations for differentiating levels of writing. Click {HERE} to link to it.
We LOVE to sing so we created a Pocket Chart song and the cards to go with it. It is easily sung to the tune Are You Sleeping (A.K.A. Frere Jacques) Click {HERE} to download the words and picture cards shown above.
Be sure to read LOTS of books about the farm, especially Non-fiction. Here are some of our favorite titles. Did you know Joy Cowley wrote several books starring Mrs. Wishy-Washy? Be sure to look for Mrs. Wishy-Washy's Farm as well as the original Mrs. Wishy-Washy! After you read some books aloud, provide the students with some Beginning Readers of their own! Here is a FREE Little Reader called "The Farmer and His Goat". It comes with several extension activities that include an INTERACTIVE project your students will enjoy. Click {HERE} to link to it at our TPT store.
Click {HERE} to link to all our Farm-themed products!
Hi everyone, I can't believe another school year is coming to an end. Where did the year go? At the end of the year I always look at some of the things I am doing in my class and I decide what worked and what I might want to change for next year. I decided today to share a few of my favorite classroom purchases and management ideas from this year.
1. Ikea picture frames.
I bought these cheap picture frames last year at Ikea while I was in Florida on holidays. I made numbers to go in the frames and placed one of them on each group of desks. They were so easy to see and they made it easy when I wanted to call a group for dismissal at the end of the day.
2. Monthly storage bins
I found these great plastic containers at my local Walmart and felt they were just the right size to store extra materials for my monthly themes. Anything that doesn't fit into my binders goes in here. They are especially great for storing games and seasonal centers. My May/June one is empty but not for long!
3. Word Work storage
I love having all of my word work centers stored in one location in the classroom. I have the drawers labelled and it helps students when it comes time to clean up. They know exactly where everything goes. You can get a copy of the labels here.
4. Personalized stamp
The students at my school are given agendas to record their homework in each day. Years ago I used to go around and initial with my pen each student's agenda which proved to be quite time consuming. Then I read about a teacher who purchased a personalized stamp through Vistaprint. Three years later and I am still using the stamp I had made. After student's record their homework, I come around to quickly check their agendas and stamp them with my personalized stamp. It has been a huge time saver for me.
5. Class helpers
Over the years I have had many different ways to pick the student helpers. Many were way more complicated than they had to be. This year I wanted to keep this routine simple. To do this I simply typed my class list twice on a sheet of paper (I reversed the names on the list the second time I typed it) added some clip art and laminated. Then I attached two paper clips and each morning we just move the paper clips down the list. Easy peasy!
6. Magnetic sleeves
Another great purchase I made this year was to get some magnetic sleeves which can hold papers and attach easily to my magnetic whiteboard. I use one to hold all my extra memos that student may need if they lose the originals. I also like to use them to hold answer keys for sheets we may be working on. I put an answer key in the pouch and students go up to the board to self check their work.
I hope some of my favorite things from this year can help you as you plan ahead to next year. I would love to hear about some of your favorite things in your classroom. I am always looking for new and easier ways to do things in my class.
If you still need an activity to finish out the year you may like to try my School Year in Pictures accordion booklet. I am planning on having my students draw a picture in the photo frame and then write about the picture on the next page. It should make a nice keepsake for them to look at in years to come.


.jpg)


