Pages

Saturday, March 15, 2014

Expert Writing


Hello! It's Allison from Stuckey in Second! I'm excited to share our most recent writing project with you today.


We have been working on informational/expert writing this month. The kids are loving it. My basis for this writing is that the students write about something they already know a lot about (hence expert writing). The students aren't necessarily researching the topics they choose, they are just practicing informational writing about something they already know about. That way, they are focusing more on actually how to write information at this point and not necessarily worrying on researching. I did have a few kids that wanted to look up more about their topic and of course, I did not deny them that opportunity, but it wasn't. required. I told them they could read more to become an expert on their topic.

We started by creating a shared anchor chart with a list of possible topics that we are experts on. Then, each student created their own personal lists in their writing journals. After narrowing down a topic to start with, students started writing everything they knew about that topic. They saved the lists because the goal of this writing unit is to write multiple expert books.

We are lucky enough to have iPads in our classroom. We have one iPad per two students. I decided to publish the students' pieces by using Keynote on the iPads. This app is very easy for my students and is basically the same as PowerPoint. So, if you don't have iPads, but do have access to PowerPoint, that would be fun for the kids too! They love it!!


To get students ready for creating their Keynotes, I created slides on paper that they could fill in as their rough draft. Students picked which slides would go well in their projects, wrote their information, and created a small book. I didn't require them to write about an animal, but I noticed that a lot were, so I made many of the slides with titles to go along with their popular topics of animals.

Good news, here are the templates I used for them. FREE in my store!


After I conferenced with them to proofread and edit, they were able to start their Keynote. In the end, I was able to print their keynote as a PDF and make into little booklets.


My students love, love, love this and I definitely plan to do this unit every year now!


Here are some pictures to show you the steps we took and our finished, published projects on display! 


Partnering Students Using Appointment Cards


I am always looking for new ways to partner my students up and I found a great technique in Total Participation Techniques.


http://www.amazon.com/gp/product/1416612947/ref=as_li_tf_tl?ie=UTF8&tag=terrsteactrea-20&linkCode=as2&camp=1789&creative=9325&creativeASIN=1416612947This book has many (37 to be exact) practical techniques to involve your students in every lesson.
 
Many of the techniques allow students to mingle with peers while discussing/figuring out concepts taught. This relies on having students work with partners a lot. You can put students with partners in many ways such as desk partners, grade partners, or number partners. One of the best (and used the most in my classroom) techniques for putting students in partners is the use of an appointment card. The book goes into great detail on this partnering technique and I immediately fell in love with the practicality and ease of this technique.


Basically, students set up appointments ahead of time and when you need them to work with a partner you have them pull out their laminated appointment card and say "I want you to work with your 2pm appointment." My students always ask if they can meet with their appointment partners. Click on the picture of the appointment cards for a ready-to-go template.

Tip: If you have an odd number of students make sure they make an appointment where there will be 3 of them in a group.

Trust me when I say that this is the professional resource to have in EVERY classroom. What methods do you use to partner your students?

Cheers,

http://terristeachingtreasures.blogspot.ca


Thursday, March 13, 2014

6 Mistakes You Can Make When Teaching Children To Read


As a newly qualified teacher, you probably struggled with the mechanics of teaching children how to read.  However, once you mastered phonics instruction and guided reading sessions, it all fell into place, right?

But are you teaching this essential skill as well as you could be?  Is every child in your class getting it?

I've been doing some research* and will share my findings concerning common mistakes with you below.


Mistake #1: Teaching Upper/Lower Case Sounds and Letter Names in Isolation


I'm the first to admit, I have been guilty of this.

Why?

It made sense to me to break letters into manageable segments (lower case letter recognition and sounds, upper case letter recognition and sounds and then, finally, letter names) to make it "easier" for students.

Wrong.

Learning is all about making connections.  By teaching sounds and letter names in isolation this way, I was doing my students a disservice.  Struggling students often experience difficulties in making connections.   Teaching letter sounds and names in isolation makes the process more challenging for those types of students.


Mistake #2: Telling Students that "Tricky Words" are Non-Decodable


“Decodable words can be sounded out. Tricky words need to be learned by sight.”

Sound familiar?

Well, as it happens, only 4% of words in the English language are completely non-decodable.  

Picture yourself learning an additional language.  You spend weeks, perhaps months, learning the code only to be told to "forget all about that" and, instead, learn a whole bunch of words by sight.  Confused/frustrated much?  I know I would be.  

Instruction should address students' levels of decoding skills.  Emergent readers will most likely have to learn the word "the" before learning the "th" sound.  Initially, you should teach these students "the" as a whole sight word.  HOWEVER, later instruction should go back and address the fact that the "th" part of the word is decodable. 

The powers that be in England have attempted to address this common misconception in their curriculum guidance by using the phrase "common exception words" as opposed to "tricky words".  


Mistake #3: Teaching Rules and Exceptions Together


The English language has many rules with exceptions.  For example, "i before e except after c".  It can be tempting to teach "achieve"and "ceiling" together with some exception words such as, "seize" and "vein".  

Sure, you will save yourself a bit of time.  However, chances are you will confuse some students in the process.  After all, what is the point of learning something that doesn't always work anyway?  

Exceptions should be addressed when, and only when, students are proficient in their knowledge, understanding and application of the rule.  


Mistake #4: Teaching Phonics Exclusively During Phonics Lessons


Reading is an essential skill in every curricular area.  Use opportunities in lessons other than phonics to make connections with phonics instruction.  

As a primary school teacher, I often find myself explaining the meaning of various words.  However, I have to remind myself to discuss how to decode the word and then explain the meaning.  


Mistake #5: Not Making the Process Explicit and Multisensory


Do your students know exactly what to do when they encounter a word they don't know?  Is the process explicit and on display with visual clues?  If not, it most definitely should be.  

Students need to know what to do when they don't have us around to support them.   This is particularly essential when it comes to homework and school holidays.  

Building confidence is essential.  

A bookmark with visual clues / text would serve as an excellent reminder when students are reading at home.  


Mistake #6: Making Assumptions


I love this wonderful quote from Shantell Berrett over at ReadingHorizons:  "Assume nothing, connect everything".  

Regardless of how many times we, as experts, have explained various terms connected with reading, are you confident that every single student knows what you are talking about?  Check and check again.  


Finally......A Gift


To celebrate the launch of my new blog, I have created a free Dolch sight word game exclusively for my blog followers (the first of many treats!).


If you wish to claim this free download, suitable for Kinder through to 3rd Grade, please opt in at:  www.theokinawangirl.com

Warm wishes,

OkinawanGirl Lisa is a teacher/nomad/Internet junkie with experience teaching in Scotland, Japan and Spain.  You can check out her shiny new blog at:  www.theokinawangirl.com 

*Research:  Much of the content of this post was thanks to the wonderful webinars hosted by the team at Reading Horizons.  I highly recommend checking them out.  


Wednesday, March 12, 2014

Close Reading

Hi, I'm Jessica from What I Have Learned.  I'm excited to be here today sharing with you about Close Reading.

One of the biggest shifts in education that I’ve seen recently is the concept of Close Reading. This is not to be confused with Cloze reading (with a Z). I had to make that distinction the first time I learned about Close Reading!


Close Reading isn’t necessarily a new concept. I was taught how to do it in high school. The difference is that now we’re asking our elementary students to engage in close reading of complex texts. Students as early as first grade and kindergarten are learning how to closely read text to find answers and use textual evidence to answer those questions.

I'm a newbie at implementing Close Reading in my classroom.  We haven't done a very good job of it this year, but I'm always looking to improve.  Where have I gone to figure it out?  The internet, of course!

I created a Pinterest board  to save great Close Reading ideas.  It seems that there are several different ways to “do” close reading and steps to follow.  The basic idea is to get students to look at text at a deeper level.

Some suggestions:

If you’re just starting out, start simply. Use one or two coding features (maybe a circle for an unknown word and question mark for an unknown concept). Add coding features as you and your students become more comfortable with the process.


Find a routine that works for you. Read the text over several days and focus on certain parts, paragraphs, or features each day. Spend time going deep.

The general concept is:
  • 1st read: focus on the big ideas and whole text comprehension
  • 2nd read: Focus on how the text works, paying attention to the specific comprehension that you want students to learn through the text (compare and contrast, cause and effect, description, etc.)
  • 3rd read: Focus on connecting the text to self and other texts
I would also suggest that the text could be read over several days, either reading the whole thing each day or even breaking it apart by paragraphs and reading parts of it each day.  The small the chunk, the more successful students will be. 

Want to read more? This was a good, recent blog post on Close Reading. This particular blogger linked to various other blogs and resources about Close Reading. This article by Fisher and Frey is another good resource. There are also a ton of YouTube videos that show examples of students doing it in the classroom.

The biggest challenge for me has been where to access good texts for students. I have a lower group of second graders this year and for most, it's a challenge reading grade-level text.  Many TpT sellers have begun to write their own texts. There are awesome packets available with wonderful, deep texts.

Here’s some other helpful ideas on where to find texts:
  1. Your reading program:  Try this first. The text can be hit and miss. I tend to find better text in the short passages that come before and after the main story or in the supplemental books that come with the program. 
  2. Readworks: This is another resource that has leveled passages. They’ve been adding a lot of resources lately. You can find texts and lessons based on comprehension skill, or sort by grade level or text level. 
  3. Textproject.org: I just discovered this resource and haven’t fully investigated all the benefits of the site. They have some wonderful passages for second - fifth grade students amid other resources. 
  4. Reading A to Z / RazKids: This is a paid resource, but still a good source of text, if you have access to it. You can even print / display text for a small group or whole class so that everyone can read the same text. 
  5. Scholastic News and Time for Kids:  I was able to get subscriptions through Donor's Choose (now is the time to write projects for subscriptions for next year).  Some of the articles lend themselves well to Close Reading, some don't.  I save my magazines from year to year to reuse them with students.
  6. The Brown Bag Teacher also just did a great blog post on where to find text resources for upper grades. She mentioned Readworks and a few others that were new to me!
So, how have you used Close Reading in your classroom?  Any tips and tricks you can share with us that have made it easier for your students to access text at a deeper level?


Tuesday, March 11, 2014

Quilts for Black History Month

Our school just finished up celebrating Black History Month!

We spent the entire month learning about the achievements of important African Americans in history. Each class read books, did research, wrote papers, and drew pictures.

Then each grade level created a quilt to commemorate Black History Month.  They were hung in our school library.  We were able to walk through the library last week and view all of the wonderful creations!

Here they are!

This Kindergarten quilt features important African Americans.

George Washington Carver is highlighted in this Pre-K quilt.

This quilt was created by 1st grade and honors African American heroes.

 3rd grade created this quilt to honor artist Romare Bearden.

This quilt of quotes was made by 4th grade.

This quilt by 2nd grade highlights African American literature.

Scientists and engineers are featured in this quilt from 5th grade.

4th grade created this quilt about African American athlete pioneers.

Upper grade Special Ed. made this quilt highlighting famous African Americans.

Aren't they fabulous?  These quilts are a great way to display all of the learning that was going on for the entire month.  The students enjoyed researching, designing, and bringing their learning to life in these quilts.  They are so proud of their creations!

So next time your students are researching a topic, consider making a quilt!


Monday, March 10, 2014

Ten Ways to Use QR Codes in the Classroom with Online Tutorials

I am so excited to be writing my second blog post of the year on this wonderful blog. During my last post, you may remember that I offered to be your "virtual coach". I had several people who were interested in learning more about how to use QR codes in daily routines as well as how to create these cute little things. I decided to provide you with 10 ways to use QR codes in the classroom as well as step by step tutorials to help you get started. At the end of this post, you will find links to all of the resources discussed..

#1 - One of my favorite ways to use QR codes is to assist students in linking to websites for research purposes. Here is a picture of a kindergarten student trying out my American symbol research unit. Each day students learn about a different symbol. The first QR code sends students to images of the symbol to save to their camera roll and the other code sends them to a video to learn more about the symbol. Students then write, draw, or explain what they learned about the symbol by adding the information to their American symbol book using the Book Creator app. While this little unit is not quite ready for public viewing, I do have a butterfly research project that is similar. If you only have one iPad in your classroom, I always provide alternatives for student projects. Rather than creating  research booklets using Book Creator, students have a hard copy to write on.

What a great idea! Kindergarten students scan QR codes to research American symbols.

#2 - Another way I have used QR codes in the classroom is by using them for app smashing. During my Me on the Map geography unit, students use QR codes and Google Earth. Students take screenshots from Google Earth and then transfer their pictures to Pic Collage to create a collage that matches the pictures taken to the vocabulary students are learning from the unit. This is a great way to teach vocabulary to students and use multiple apps at the same time. Also known as an app smash.

#3 - Have you ever thought about using QR codes for behavior management? I created a behavior management system for one of my teachers and her students absolutely love it! QR codes are only one part of the system but allowing students to use the iPad can have a huge impact on student behavior and engagement.

QR Codes for Behavior Management? I've got to have this in my room!
#4 - In 21st century classrooms, it is important that we start thinking of ways to save students' online work. There are several ways to create digital portfolios but in the example below students add their best work to their blog. When the QR code is scanned from their display it takes the reader to their homepage with all of their projects.

Can this be any cuter? I can put my display up all year and the content is ever changing just by scanning this QR code. Genius!

These are ways that I have used QR codes but I asked teachers on my Facebook pages how they use QR codes in the classroom and here are some of their responses:

#5 - Kimberly said she has her kindergarten kids scan CVC words. Then they have to read/blend and draw a picture of the word. For math, she has her students scan a number and then fill out a 10 frame to match.

#6 - Brittany said she has QR codes in a listening center. Students love to scan the QR code to listen to a story read aloud or watch a short video of the book.

#7 - Deniece uses QR codes for scavenger hunts. Stations are set up around the room that have questions students answer about a specific topic and then scan to find the answer.

#8 - Cassie uses QR codes in her centers for students to find rhyming words and to solve math word problems. 

#9 - What about QR codes for mother's day? Jude says she uses them for mother's day presents. Students record a nice video for their moms. What a great gift!

#10 - One really great idea was from one of my model classroom teachers. Amanda suggested creating QR codes to direct administrators to lesson plans rather than having to print them off. She also thought it would be great to provide a QR code that would link to a Google form to allow the administrators to leave feedback of their visit. The feedback would be sent to a spreadsheet that is shared among the administrators and the teacher. Isn't that a great idea?

So there you have it...10 ways to use QR codes in the classroom. However, I know for some of you you are thinking, "The ideas are great but I have no idea how to make this work in the classroom." Well have no fear, I have created how-to videos to help you get started. I found this nifty little tool the other day called Minilogs. I thought it would be a great way to share the videos and resources I have created for using QR codes in the classroom. Just click on the play button to get started.


If after you have read this post, checked out the resources I provided and you still feel you need more assistance, just click on the picture below to let me know what your needs are and I will do what I can to help.

How do you use QR codes in the classroom? I would love to hear other ideas.


Sunday, March 9, 2014

Differentiation Made Easy. . . Or Just Not That Hard

I LOVE first grade. But let's face it, it isn't easy. . . especially with the wide range of abilities! To meet the needs of all of my students, I try to differentiate as much as I can. Here,  I'll give you some ideas for differentiation, with a focus on homework.

For my first 8 years of teaching, I used to make 3 homework packets! That's right-

Three. Homework. Packets!

Yup! Or as Sweet Brown would say, "Ain't nobody got time fo' dat!"

Really, like you have extra time to type 3 different packets, copy them separately, and make sure you place the right ones in the corresponding mailboxes (If I had a dollar for every time a kid came in with the wrong homework packet. . . ). Can you say exhausting?

Well, hopefully this post will help save you some time while still making homework meaningful for your students.

A few years ago, our district provided us with professional development from Judy Dodge, who wrote Differentiation in Action. She helped us think of ways to make differentiation easy. She made me realize that differentiation doesn't have to be as intimidating as it sounds. You don't have to recreate everything in order to do it. I'll add some differentiation tips at the end of the post, but for now I'll focus on using a choice format for homework. 
I use weekly homework packets, which get tucked into homework notebooks. All the students get the same spelling and sight words (in extreme cases, I do modify words). But, they get to pick from a choice menu each night.
The choices for each menu vary in difficulty. For example, the writing menu (if we're studying dinosaurs) may look like this:
Here's a sample from my reading menu, which is based on the skills we are currently working on- compare/contrast, identify story elements, etc.:
As you can see, differentiating doesn't mean making completely different activities! It also doesn't necessarily mean more work (as in number of sentences, math problems, etc.) or a different output. Students work on achieving the same skill and maybe the same product, but the method of getting there is what's different. In the reading choices above, the students are all retelling a story! The first group does it orally, the second group has the scaffold of breaking it down into parts, and the third group is expected to use organization independently to summarize.


OK, enough about homework- here are some ways to differentiate throughout your day:

Vary your methods of teaching- incorporate movement, song, let some kids listen to a book while others read it, use flexible grouping, etc.

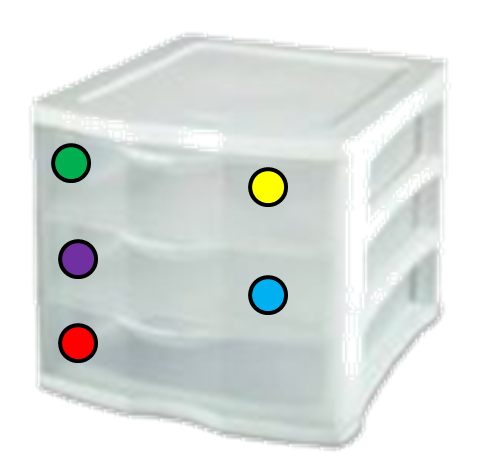
Center time: I have 3 different levels for most of my centers. I use a 3-drawer bin for each center and put stickers on the drawers that correspond to the groups. Since I am on maternity leave, I don't have actual pictures, but I used an online pic to show you here. So the green and yellow groups (my most advanced students) would take their materials from the top drawer here, the purple and blue groups from the middle drawer, and the red group from the bottom drawer.
Use choice whenever you can! For my reading response center, I have a choice poster and students pick a book from the library and choose which activity to do. I also have an ‘I’m finished’ center, with many different activities to do when they finish their center work.

When differentiating, think of your target goal and start with what you expect the average (on-level) student to do. Then, scaffold for students who will need support, and challenge for more advanced students. So, for example:


Here's a chart with some ideas on how to differentiate for three different levels. Again, note that the support group doesn't have less work in quantity, nor does the challenge group have more.  What is differentiated is the complexity of the activity and support given.


Just for you, I have made this differentiated pack a freebie for today. Go grab your copy! =)

Thanks for stopping by! I'd love to hear how you differentiate in your classroom!

Minion image from Despicable Me movie by Pixar
Borders and frames by Scrappin' Doodles, Graphics From the Pond, and Lovin' Lit
Fonts in graphics by Hello Fonts, KG Fonts and Kevin and Amanda